Make Workbench Speak Your Language
In this hands-on trial, you will customise the Workbench modelling language to match your organisation's vocabulary — so people in various roles can work in the same place without learning each other's notation.
Before you start
Estimated time: 25-30 minutes
What you need: Access to our trial environment, an editor for editing YAML files. Optionally: Your own IDE and Coding Assistant.
About your trial environment
Your trial environment includes everything you need to get started: a dedicated, isolated tenant in the IBM DevOps Solution Workbench, and a GitLab instance with repositories for all your projects - including our reference application Roboflow ready for you to explore.
You bring your own IDE and coding assistant — whatever you normally use. In our screenshots throughout these trials we use Visual Studio Code with GitHub Copilot.
Solution Designer
The Solution Designer is your main workspace in Workbench. This is where architecture is modelled,
design decisions are captured, and structured context is created for your coding assistant.
Your trial comes with a dedicated, isolated tenant. Log in using the credentials from your trial onboarding email.
GitLab
Every project in the Solution Designer is backed by a Git repository in your trial's dedicated GitLab group. Throughout the trial, you usually access GitLab repositories
through the Solution Designer since URLs are specific to your tenant.
To find the Repository URL for any project:
- Open the project in the Solution Designer
- On the Overview page that opens, you'll find "General Information" on the right hand side.
- The link under "Acronym" takes you directly to the GitLab repository for that project.
- Log into GitLab using the "Keycloak" button.
Cloning a project to work in your own IDE requires a Personal Access Token (PAT). To create one:
- Log into your Trial GitLab (using the Keycloak button)
- Click your profile icon in the upper right corner and select Preferences
- Go to Access → Personal Access Tokens
- Create a token with
read_repository,write_repositoryandapiscope
Cloning a project
To clone a project, you can either use the "Code" button in the GitLab UI and copy the "Clone with HTTPS" URL or you can copy the URL directly from the Solution Designer project page. To do this:
- Open the project in the Solution Designer
- Expand the footer bar that says "Git"
- Copy the URL
In both cases, use a terminal and run git clone <URL> -b <optional-branch-name> and use your username and the created PAT as the password when prompted.
Cloning via SSH is disabled in the trial environment for security reasons.
RoboFlow
Your trial environment comes preloaded with RoboFlow — a fictional B2B webshop for robotics parts that serves as the reference
application across all trial experiences. Its services are already designed and documented in the Solution Designer, ready for you to explore and build on.
Step 1 — Orient yourself
You are working with the Payment Service of RoboFlow — a fictional B2B webshop for robotics parts that serves as the reference application across all trial experiences. If you are new to the scenario or want a quick overview of the system and its services, expand the section below.
About the RoboFlow reference application
The RoboFlow reference application
The trials in this section are built around RoboFlow — a fictional B2B webshop for robotics parts that serves as the reference application across all trial experiences. If you want to find out about RoboFlow's ambitions and requirements, you can head to the RoboFlow overview page for a quick introduction.
RoboFlow's system is composed of multiple microservices, each designed and documented in the Workbench. The starting point is an architecture project — a high-level view of the system that shows which services exist, how they relate, and what responsibilities they carry. RoboFlow's architecture is modelled using C4 notation, one of the modelling languages IBM DevOps Solution Workbench supports out of the box.
The diagram below is the Container Diagram (Level 2) of the RoboFlow system in the RoboFlow architecture project — one level below the overall system context (L1), showing the individual services and their relationships. You can also open it directly in the Workbench.
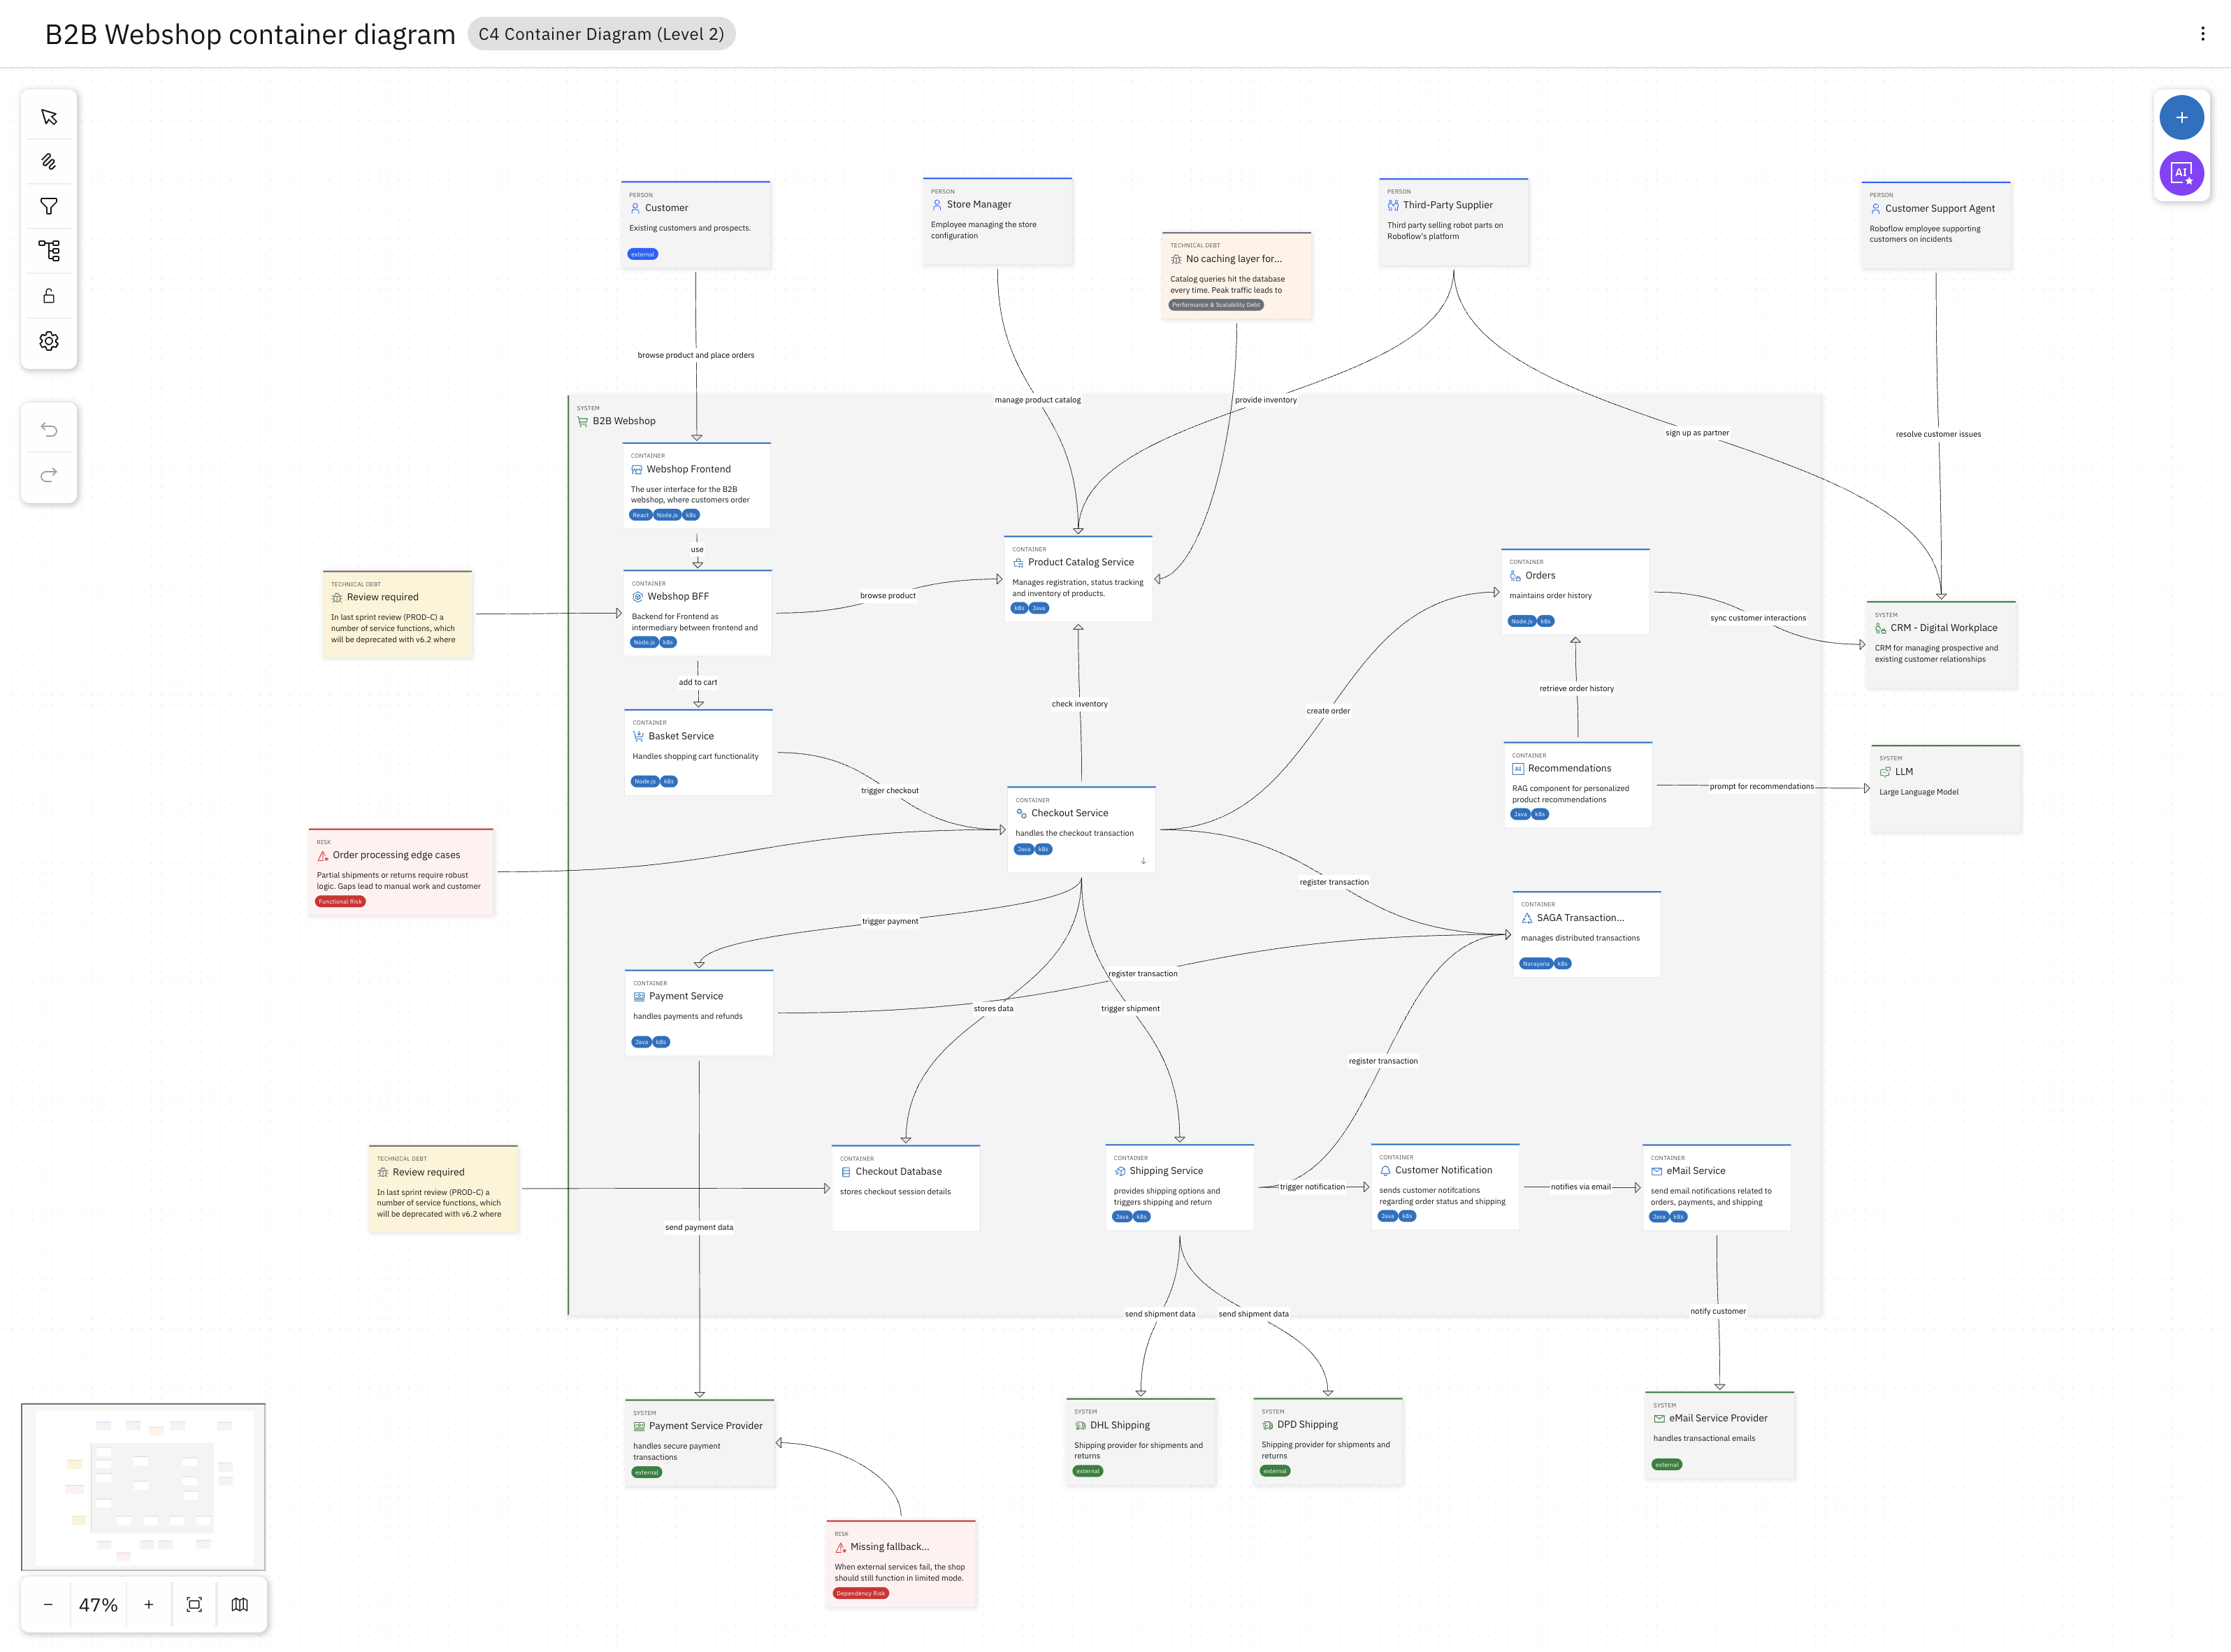
The system includes a WebShop Frontend, a Basket Service, a Checkout Service, a Payment Service, and others. Three services are central to the trials:
- Checkout Service — orchestrates the checkout flow, applies discounts, and initiates payment
- Payment Service — handles all payment processing and integrates with external payment providers
- Gift Card Service — manages gift card balances, validates voucher codes, and tracks redemptions
Each service usually has its own service project in the Workbench — a separate, more detailed specification that defines the service's boundaries, domain model, interfaces, and the architectural decisions that apply to it. This is where the real design work happens.
Explore a service
As an example, let's look at the Checkout Service.

Select the Checkout Service on the L2 diagram and in the sidebar on the right (you might need to expand it) navigate to the Loop tab.
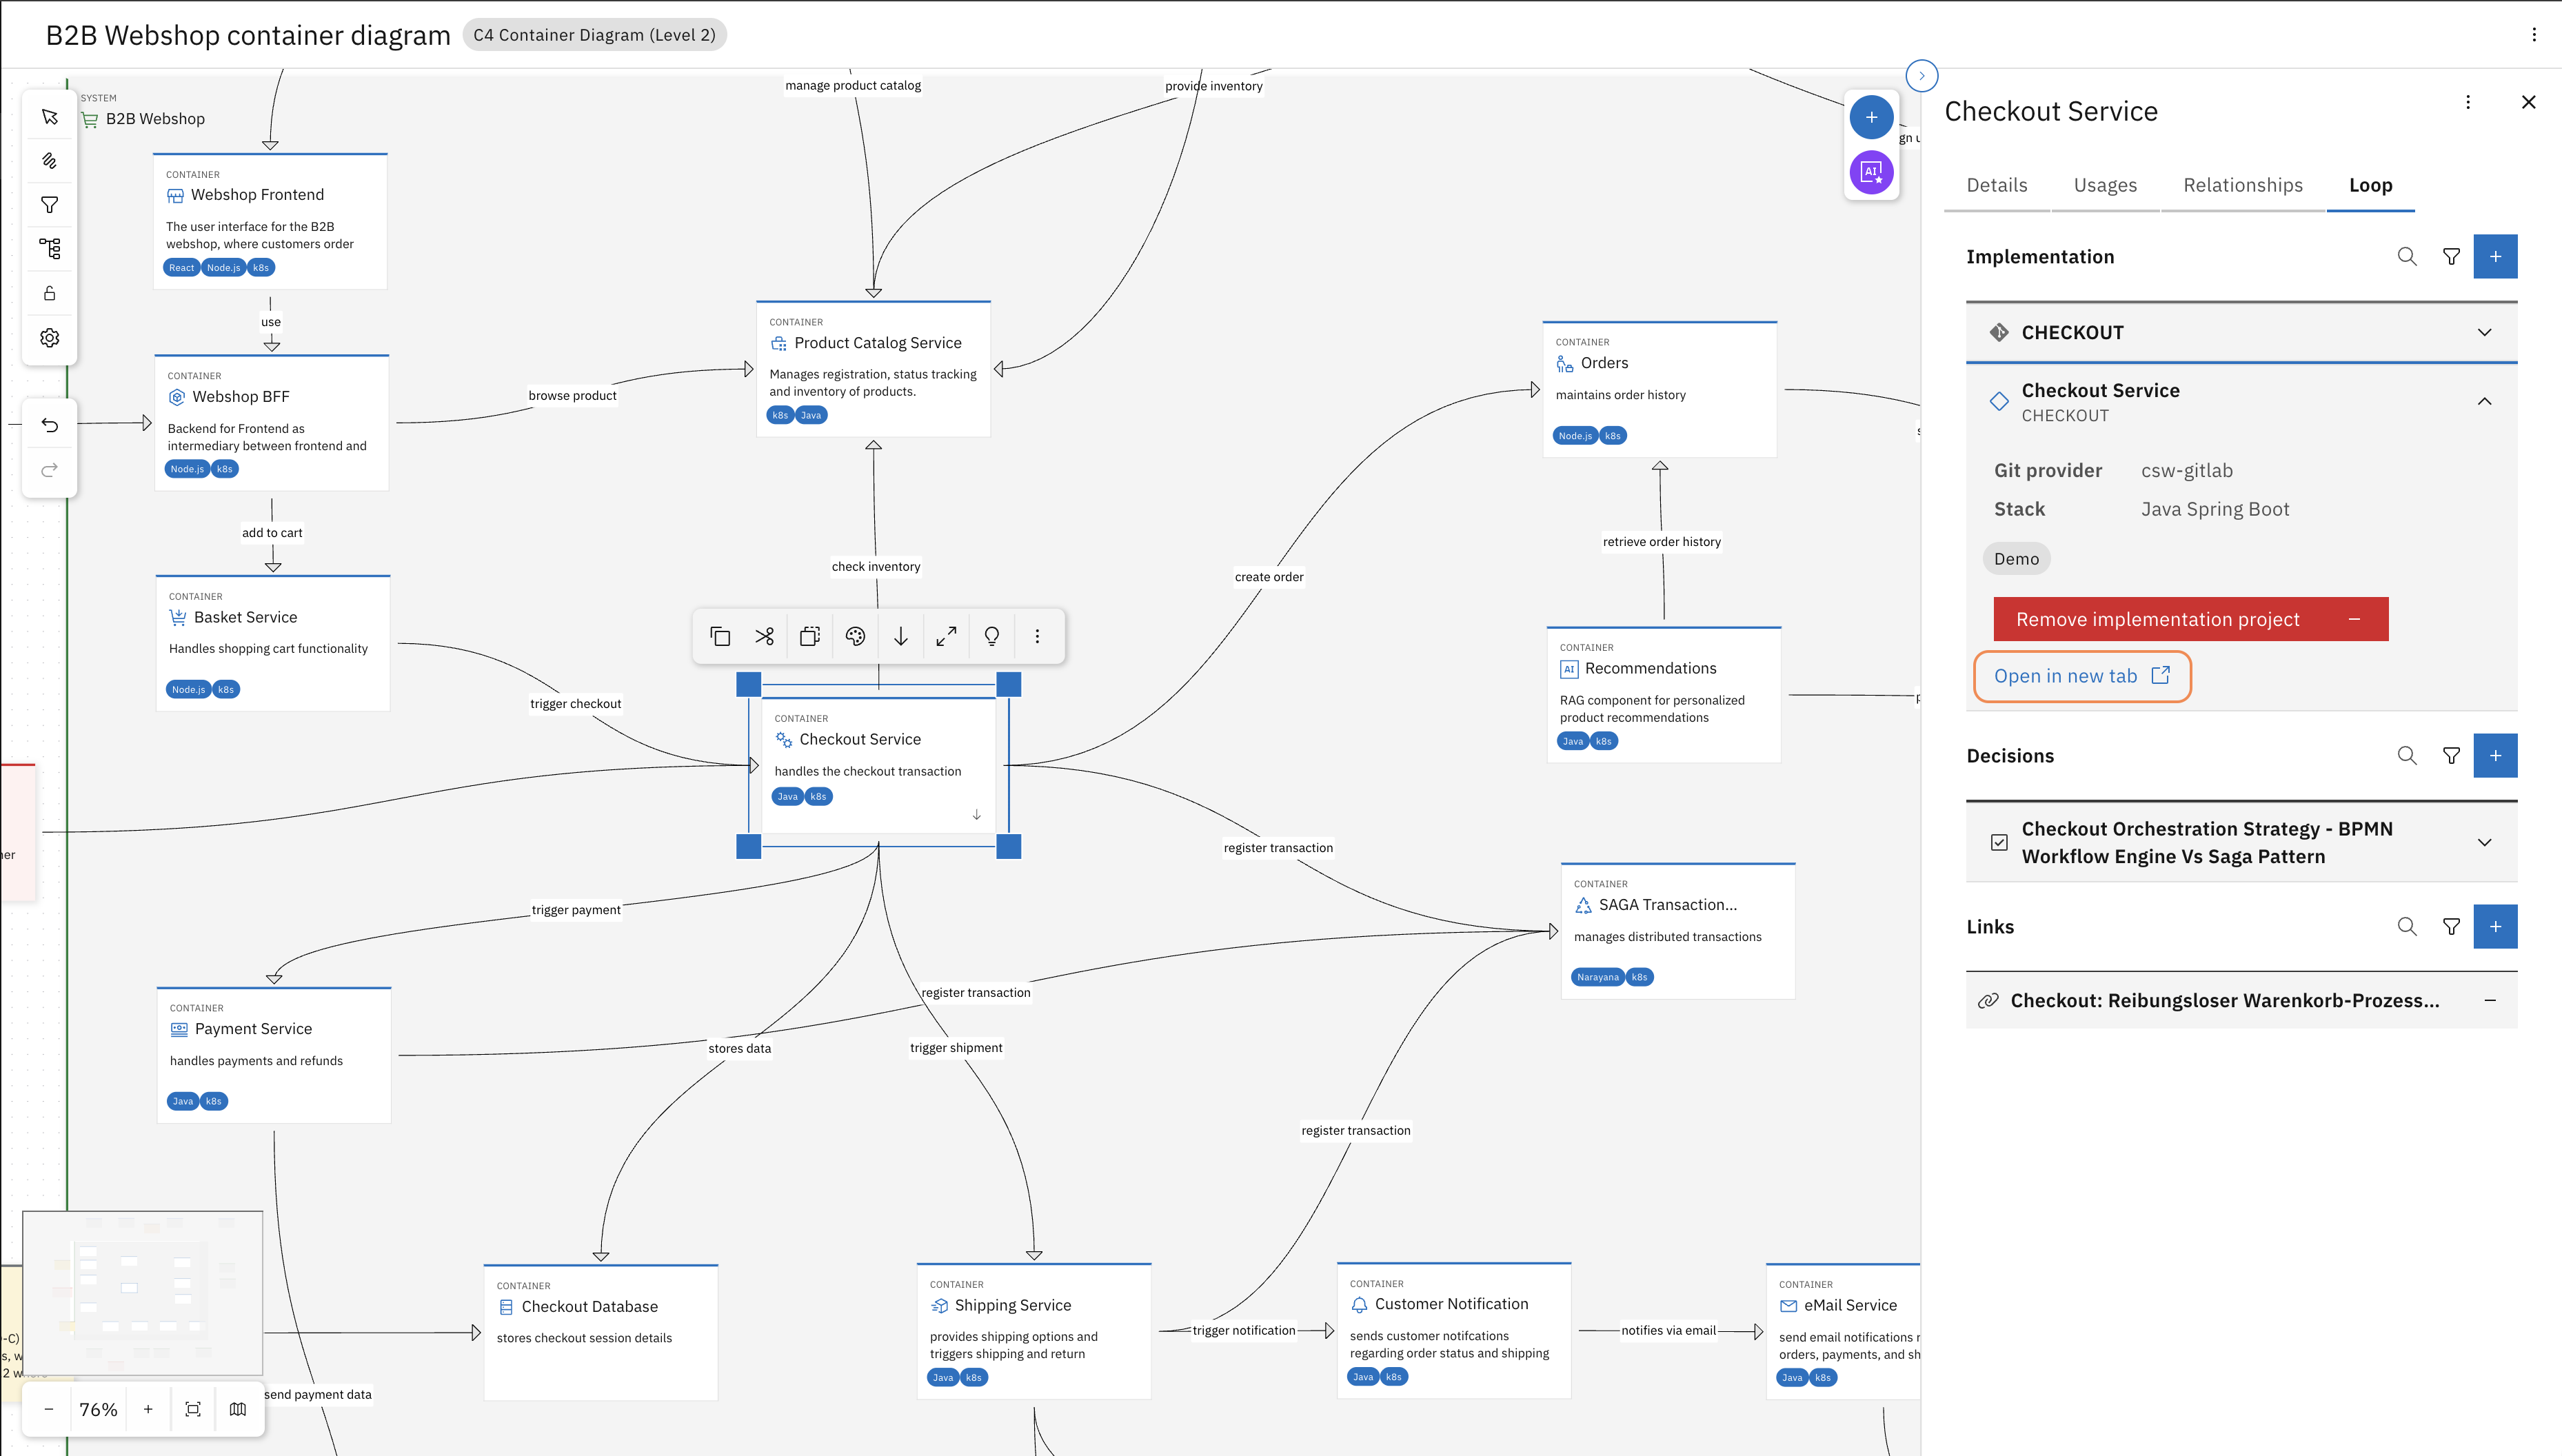
Find the Workbench project and "Open in new tab". This will open the service project where the design details of the Checkout Service are modelled and documented.
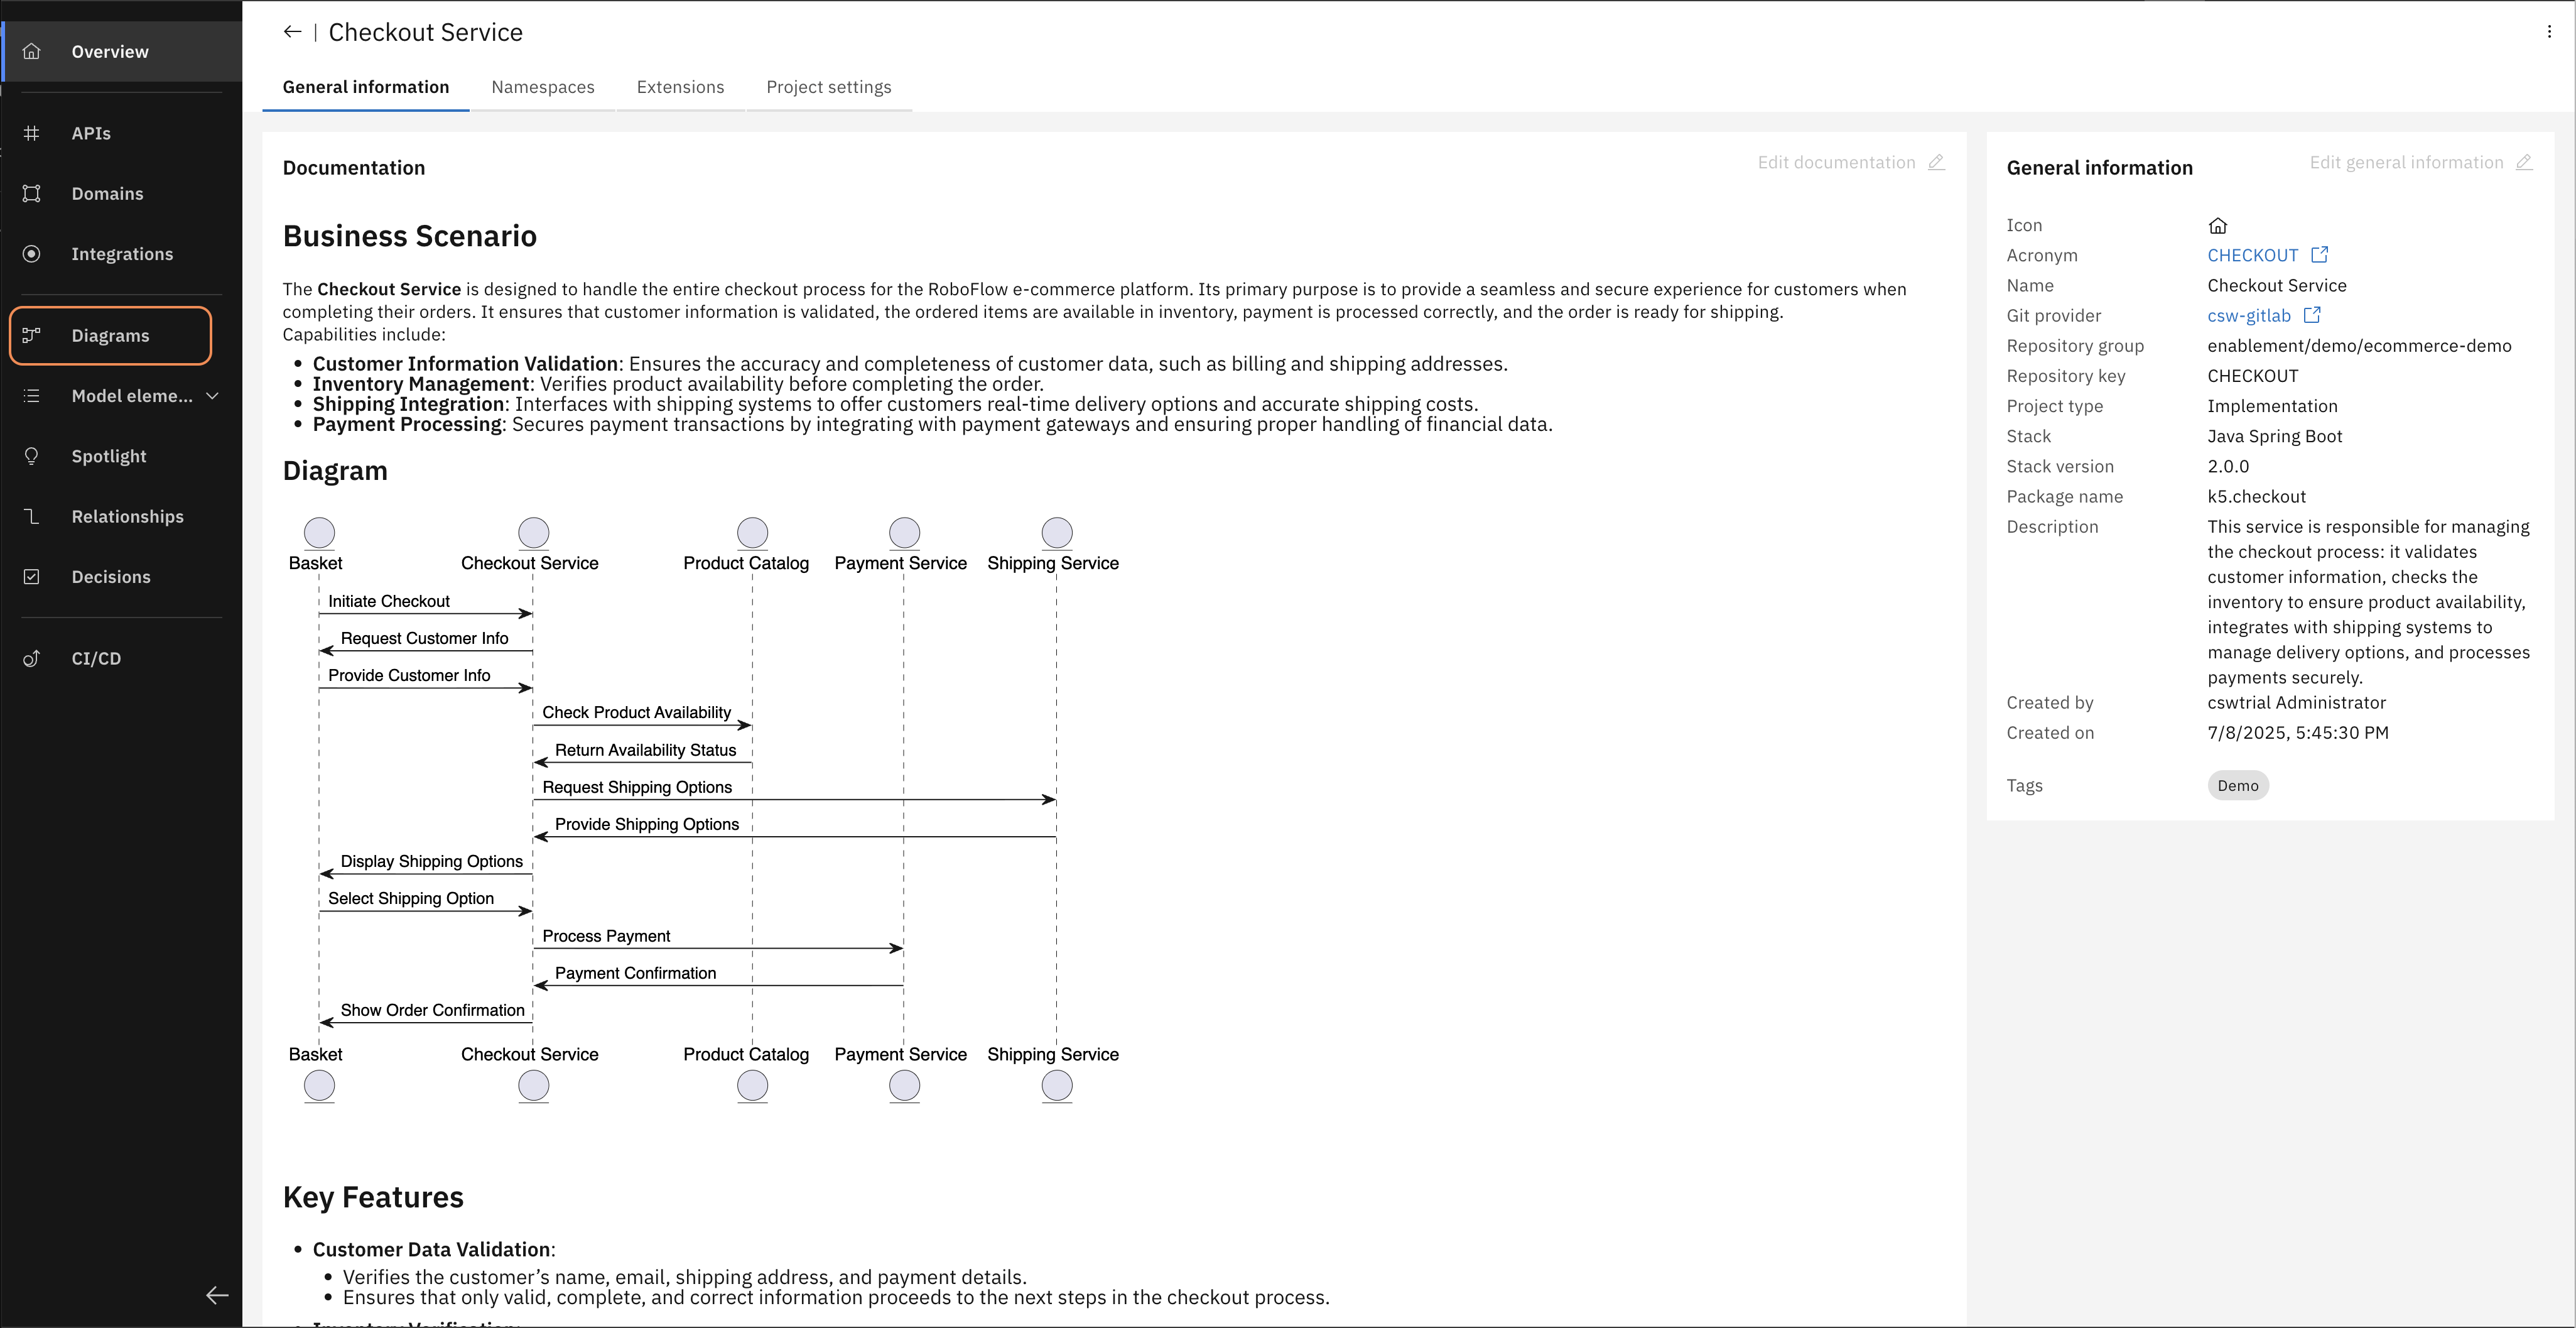
In the left navigation bar, open Diagrams and then open the "Checkout Service component diagram".
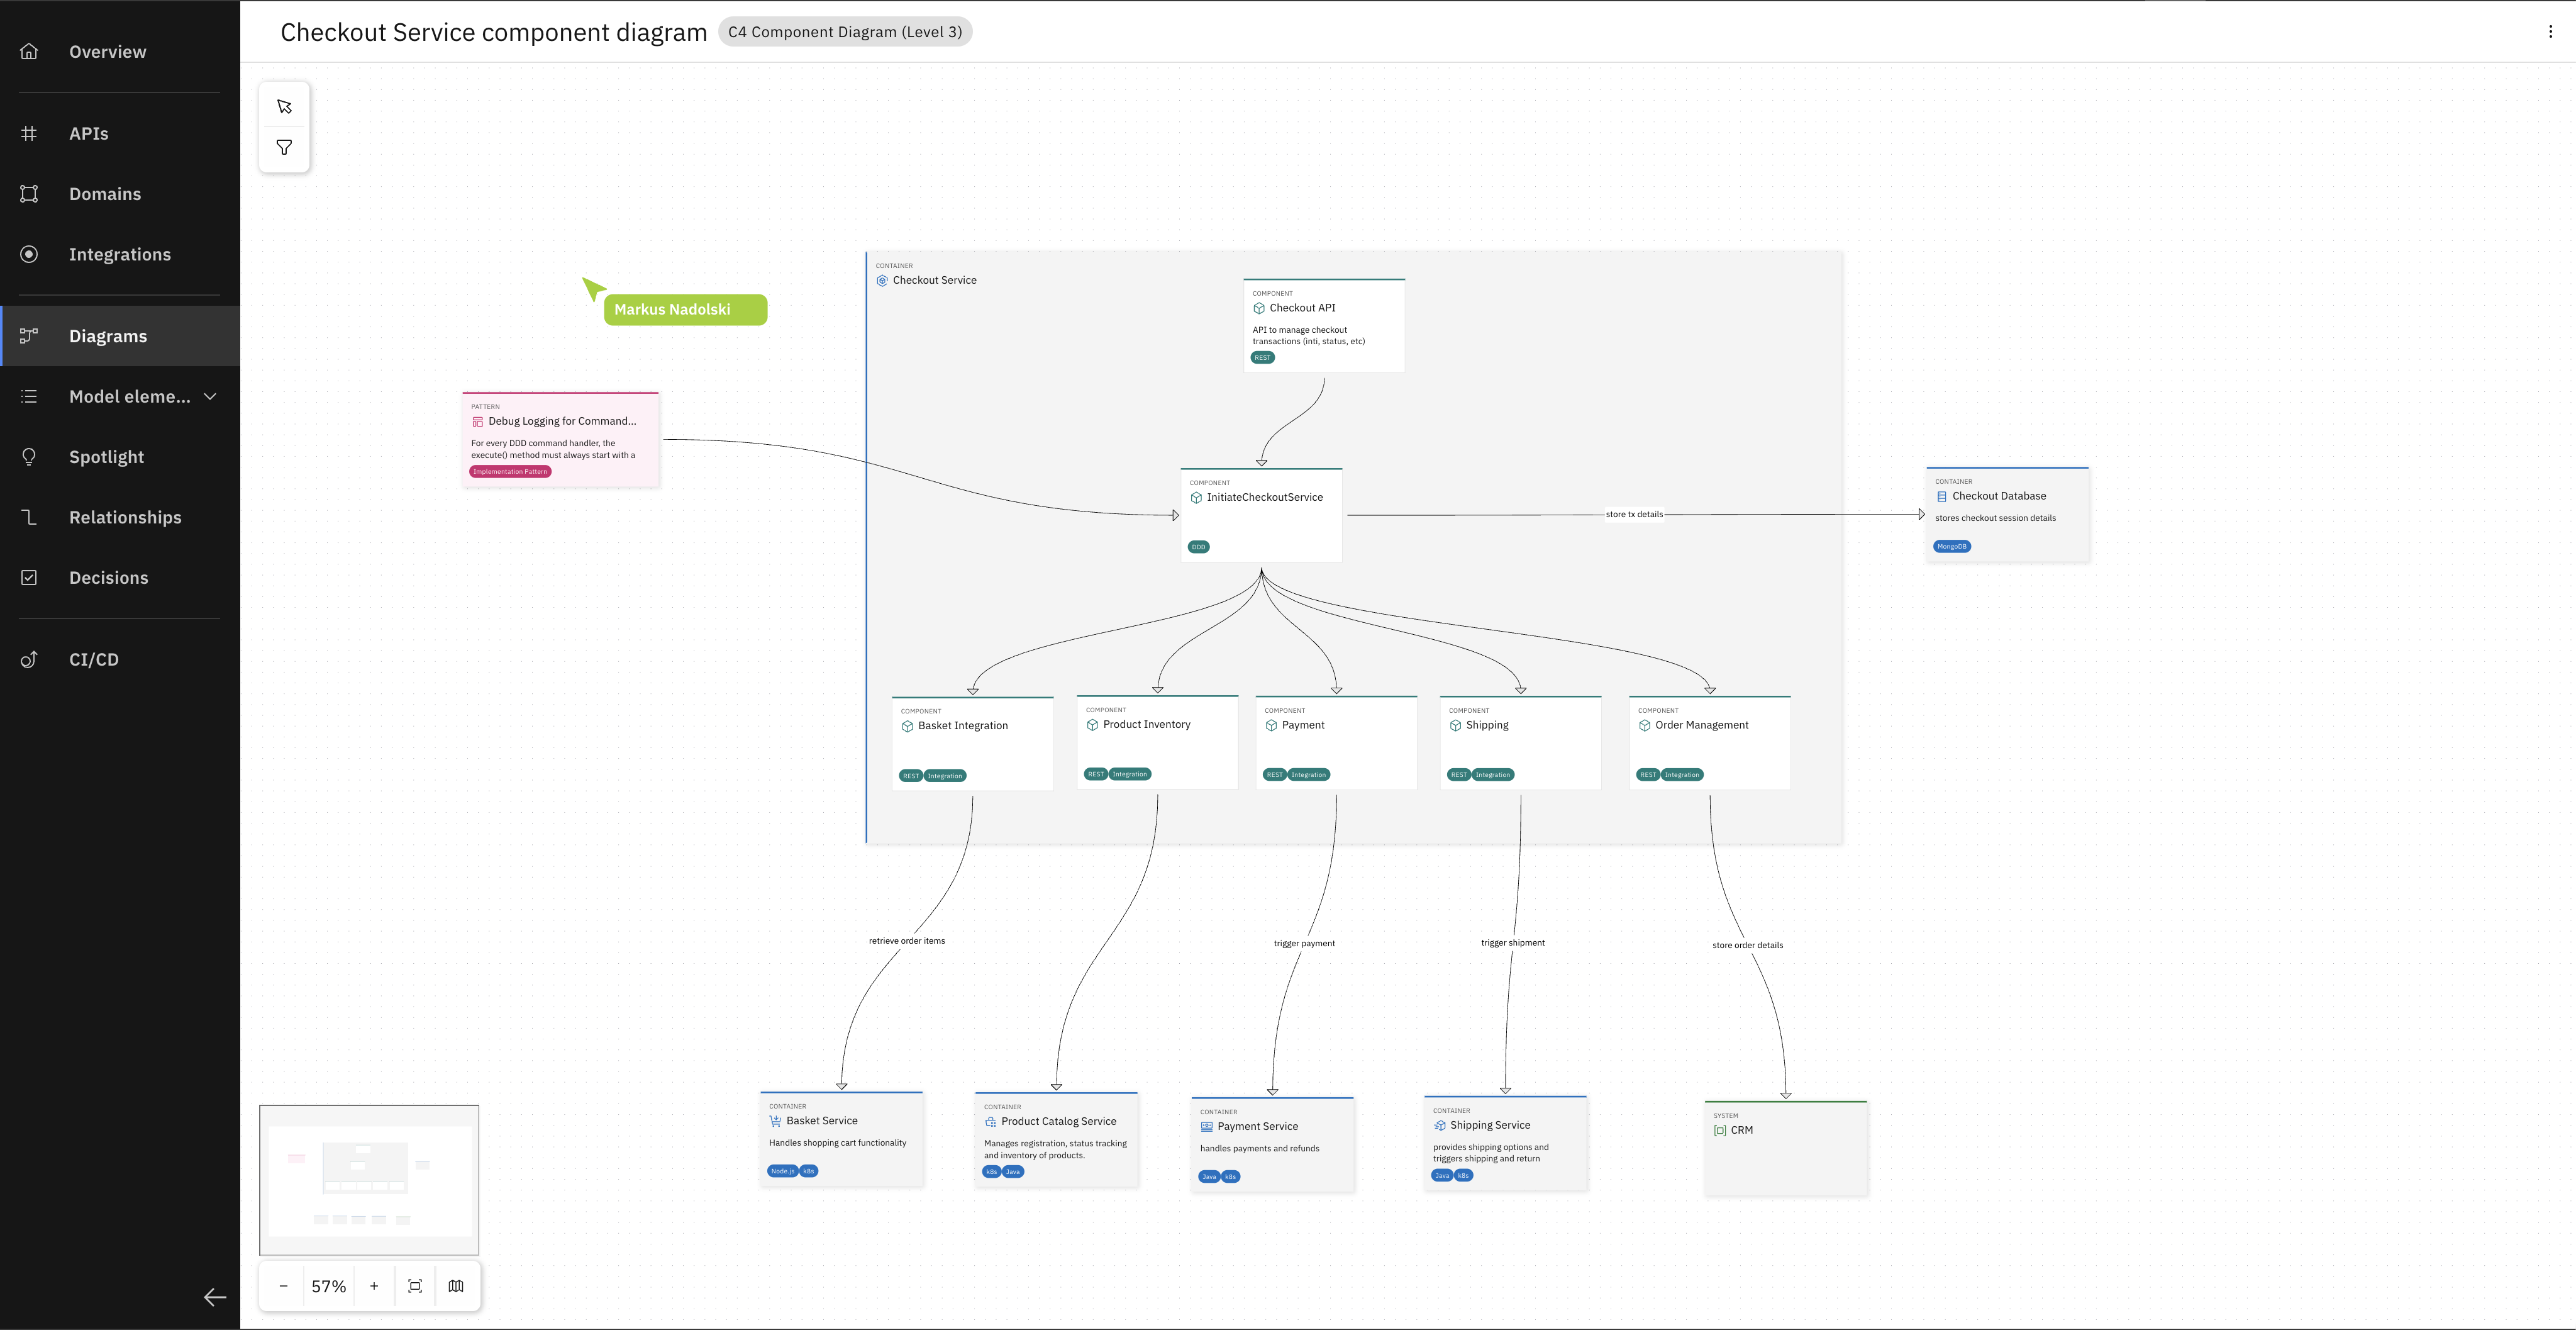
You can now explore the Component Diagram (Level 3 in the C4 model) of the Checkout Service.
In the RoboFlow system, the Payment Service handles all payment processing and talks to external payment providers. Today you will extend its modeling vocabulary so the design can also express business requirements and non-functional constraints.
Step 2 — Understand what's already there
Open the Payment Service in the Workbench and spend a few minutes exploring the Payment Service project.
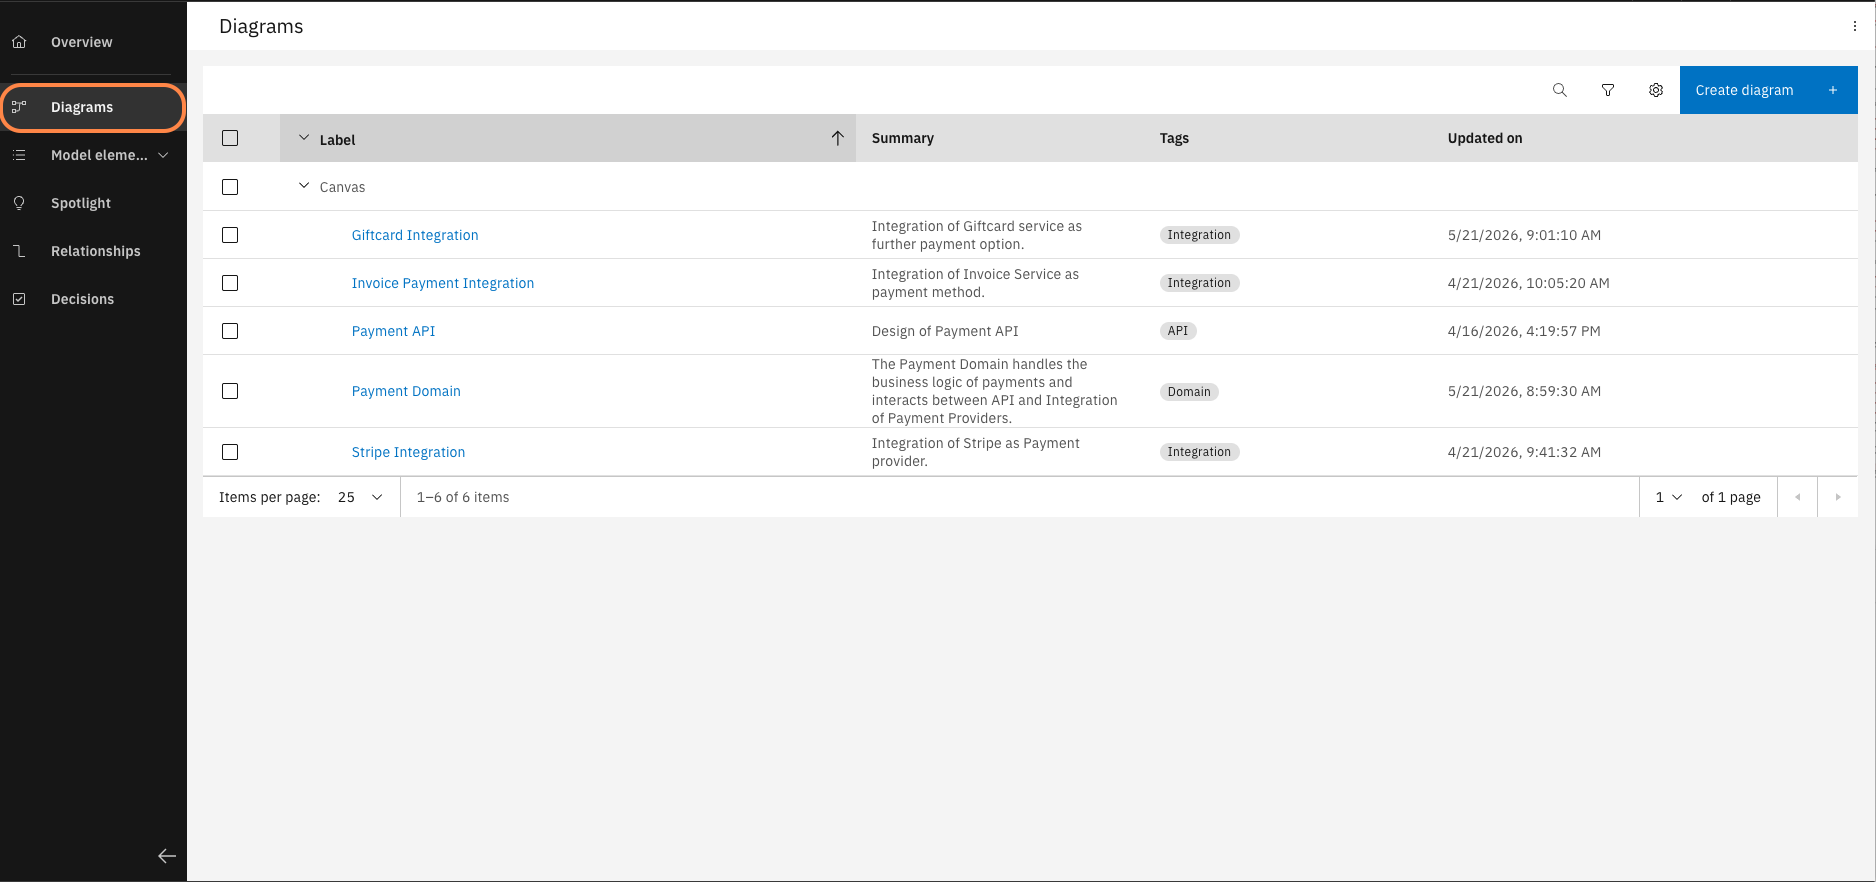
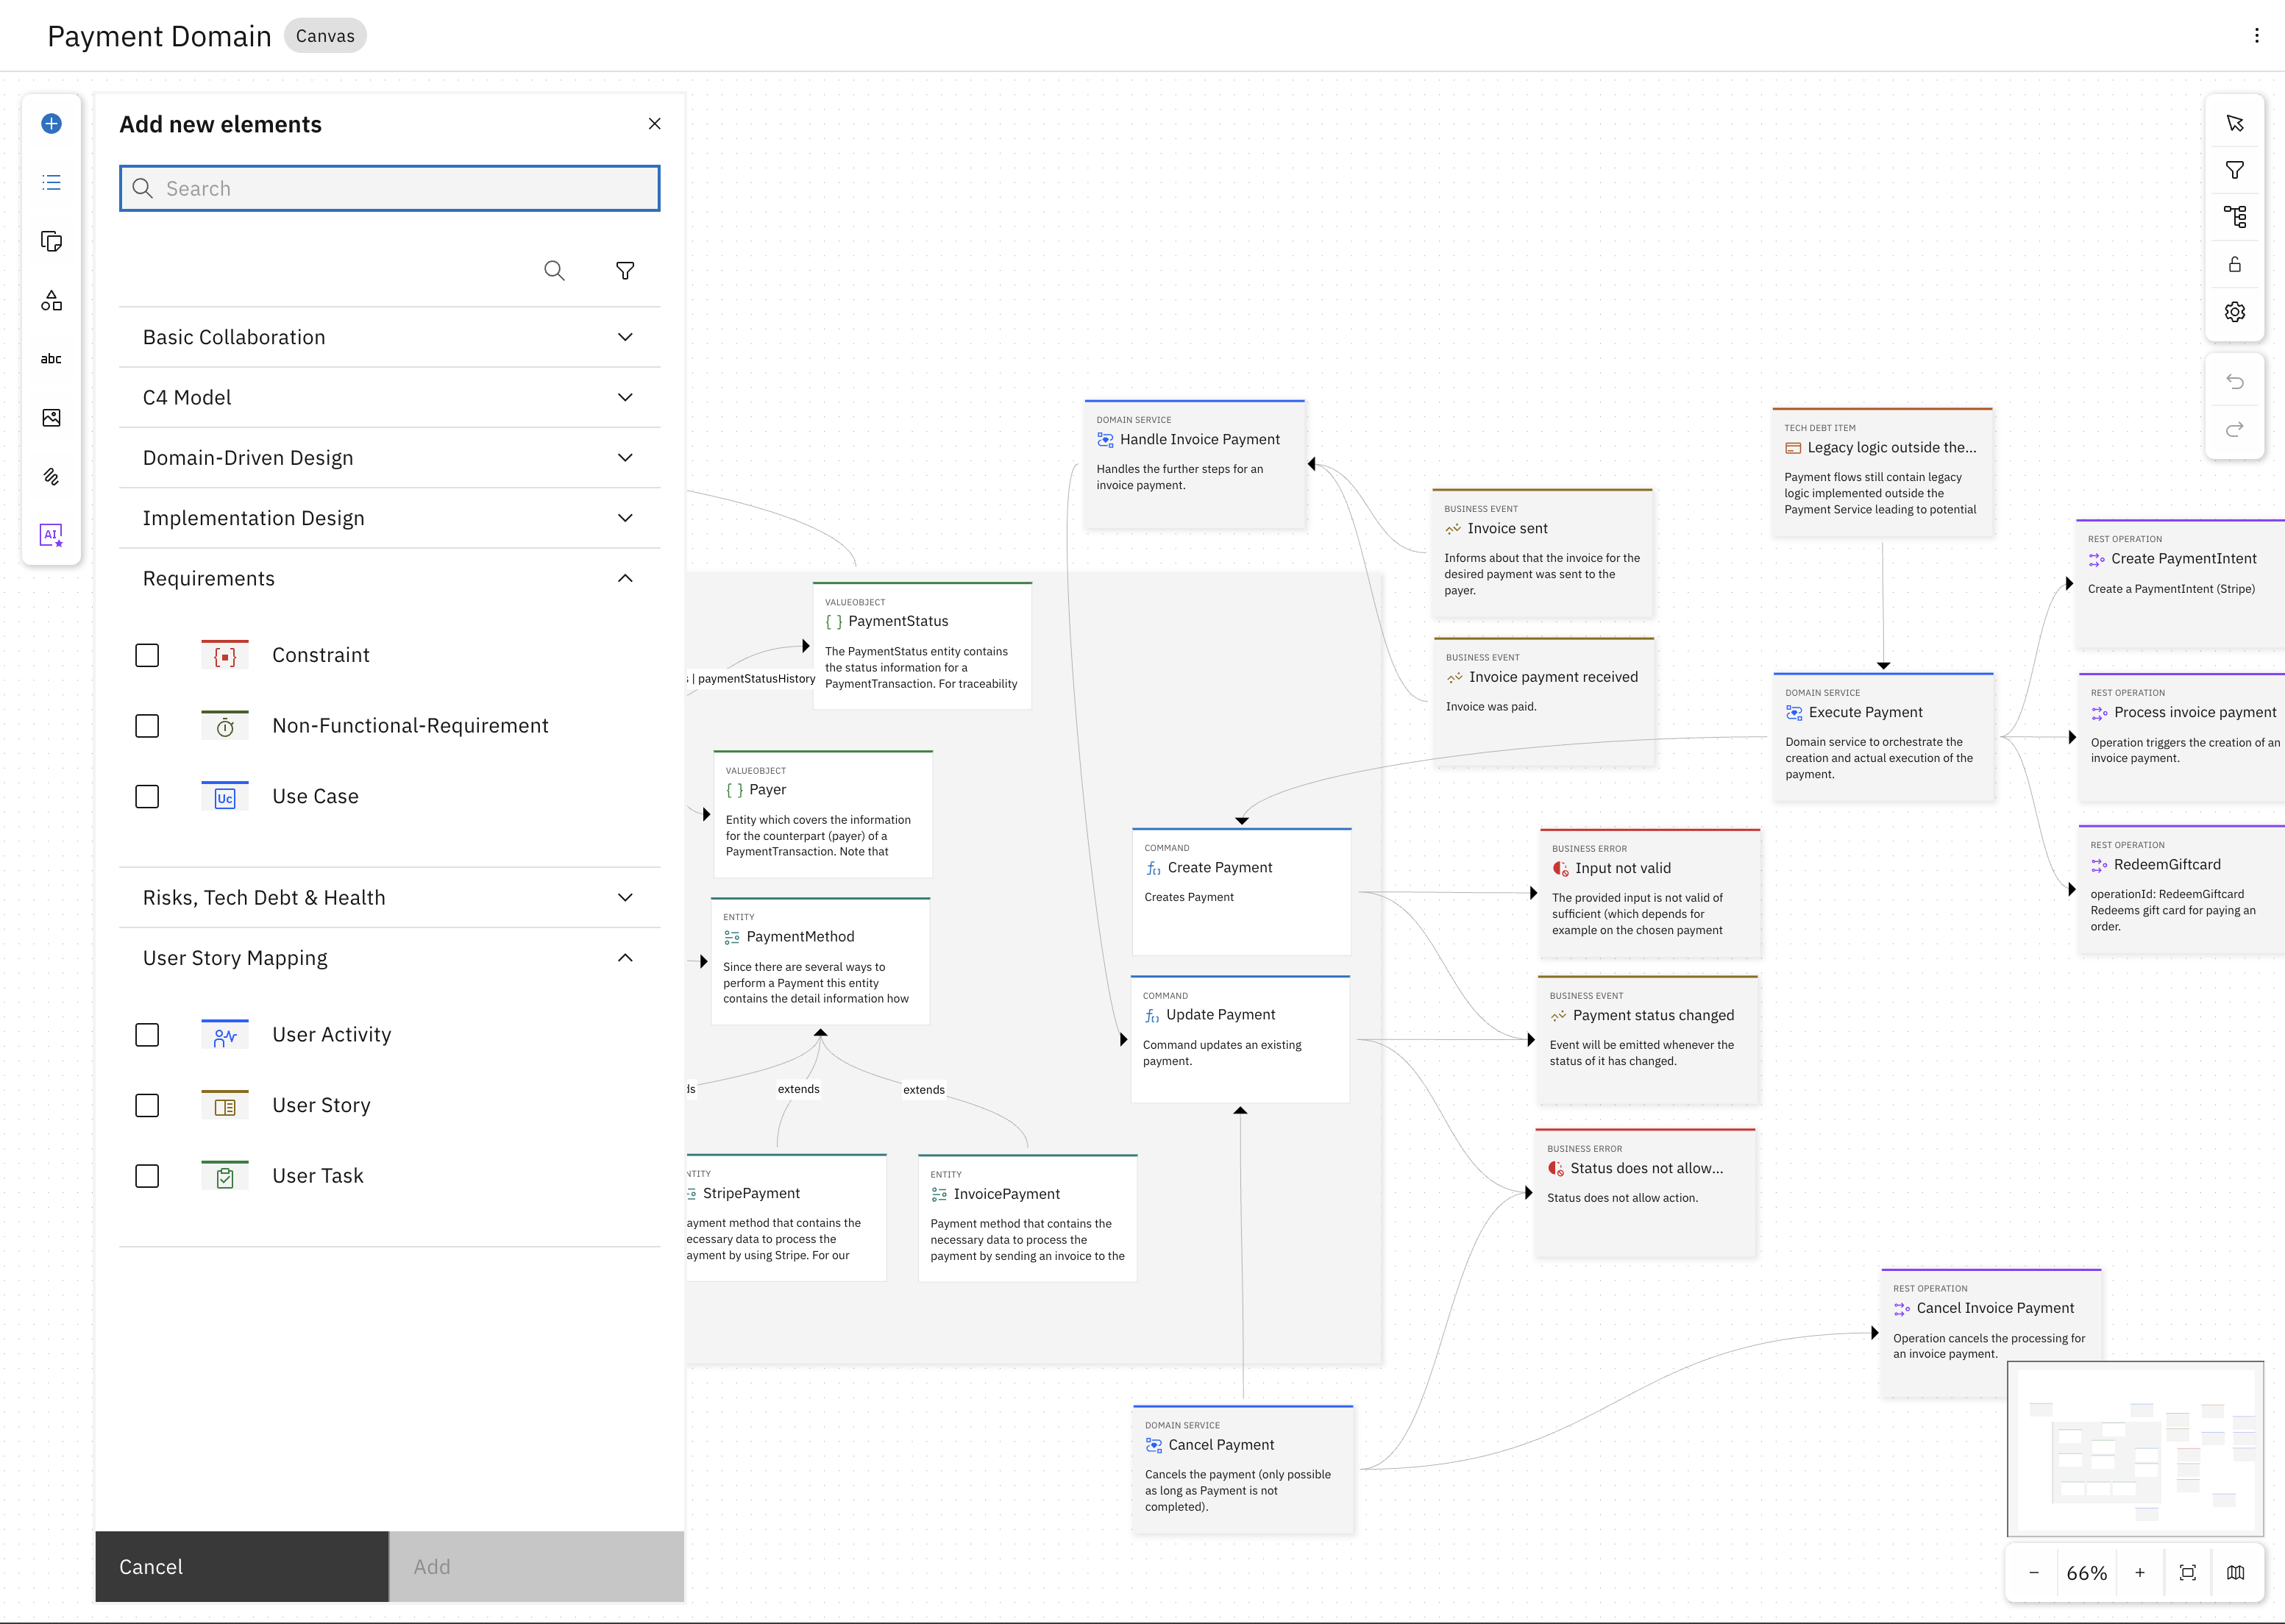
In the left navigation, open "Diagrams" and select the "Payment Domain" diagram. This is the diagram with the core business logic of the service.

You can see domain-driven design (DDD) model elements — aggregates, entities, value objects, commands, events, and business errors — describing the behaviour of the service.
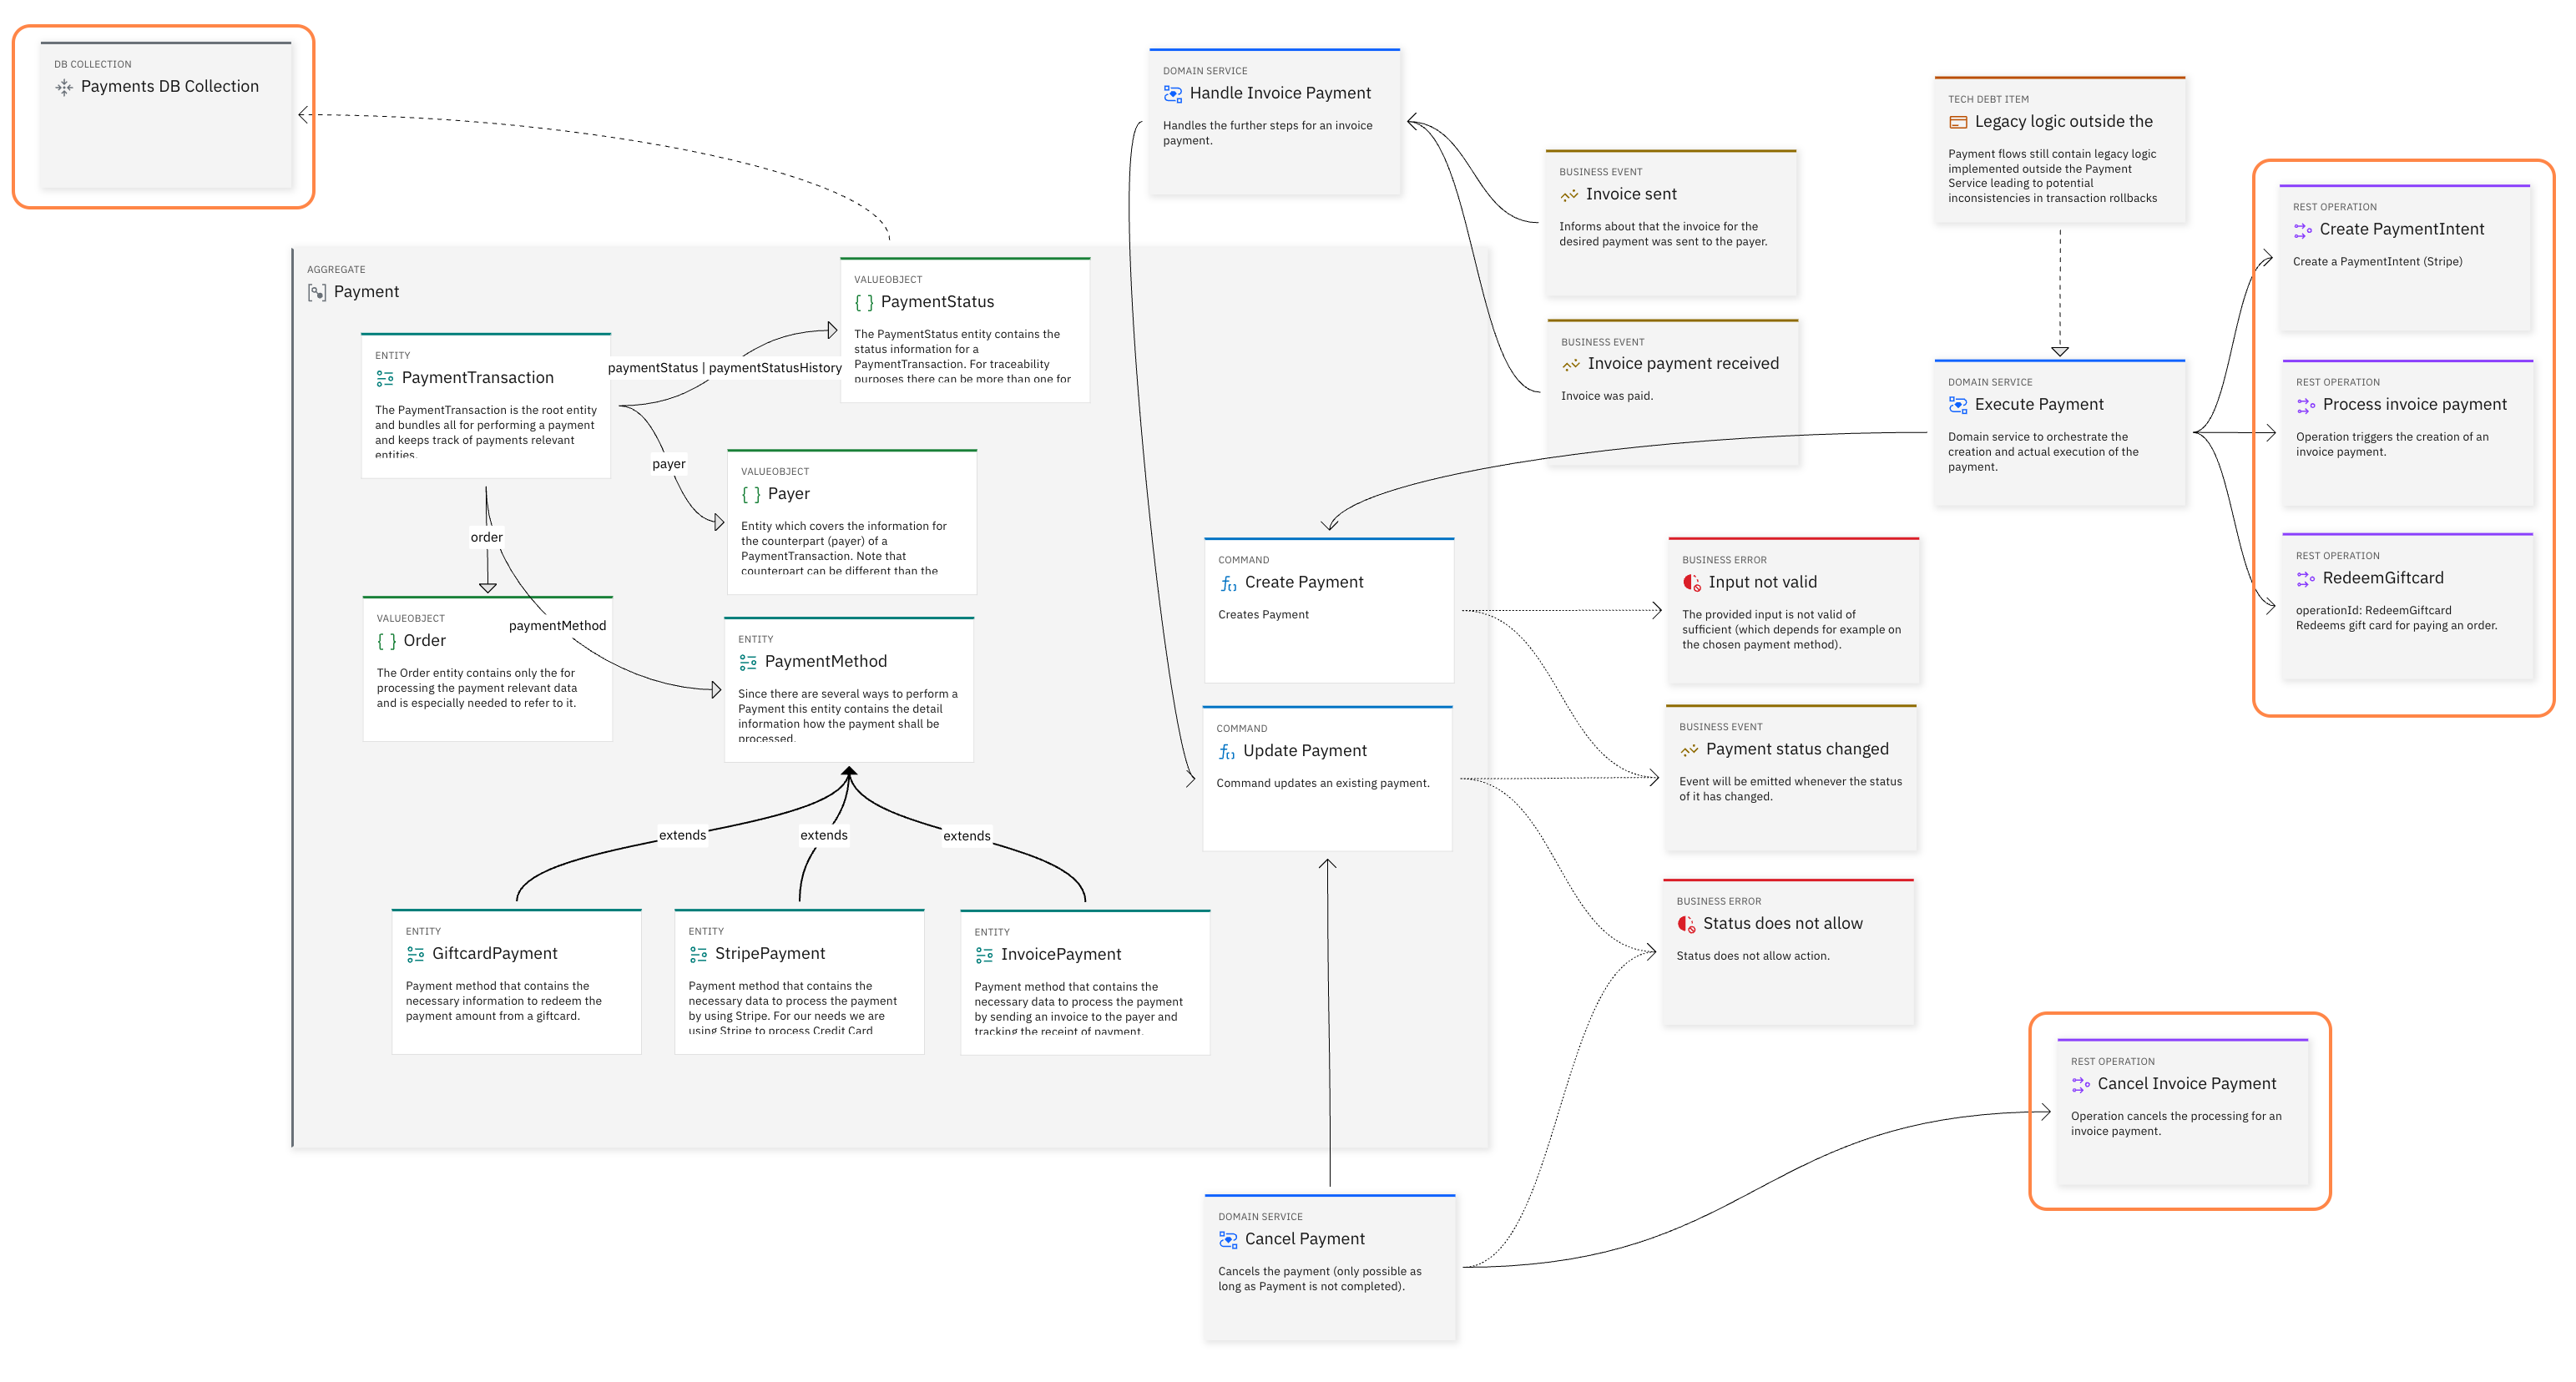
Alongside the DDD elements, you can see Implementation Design model elements that describe integration points of the service: REST APIs with REST operations, and database collections.
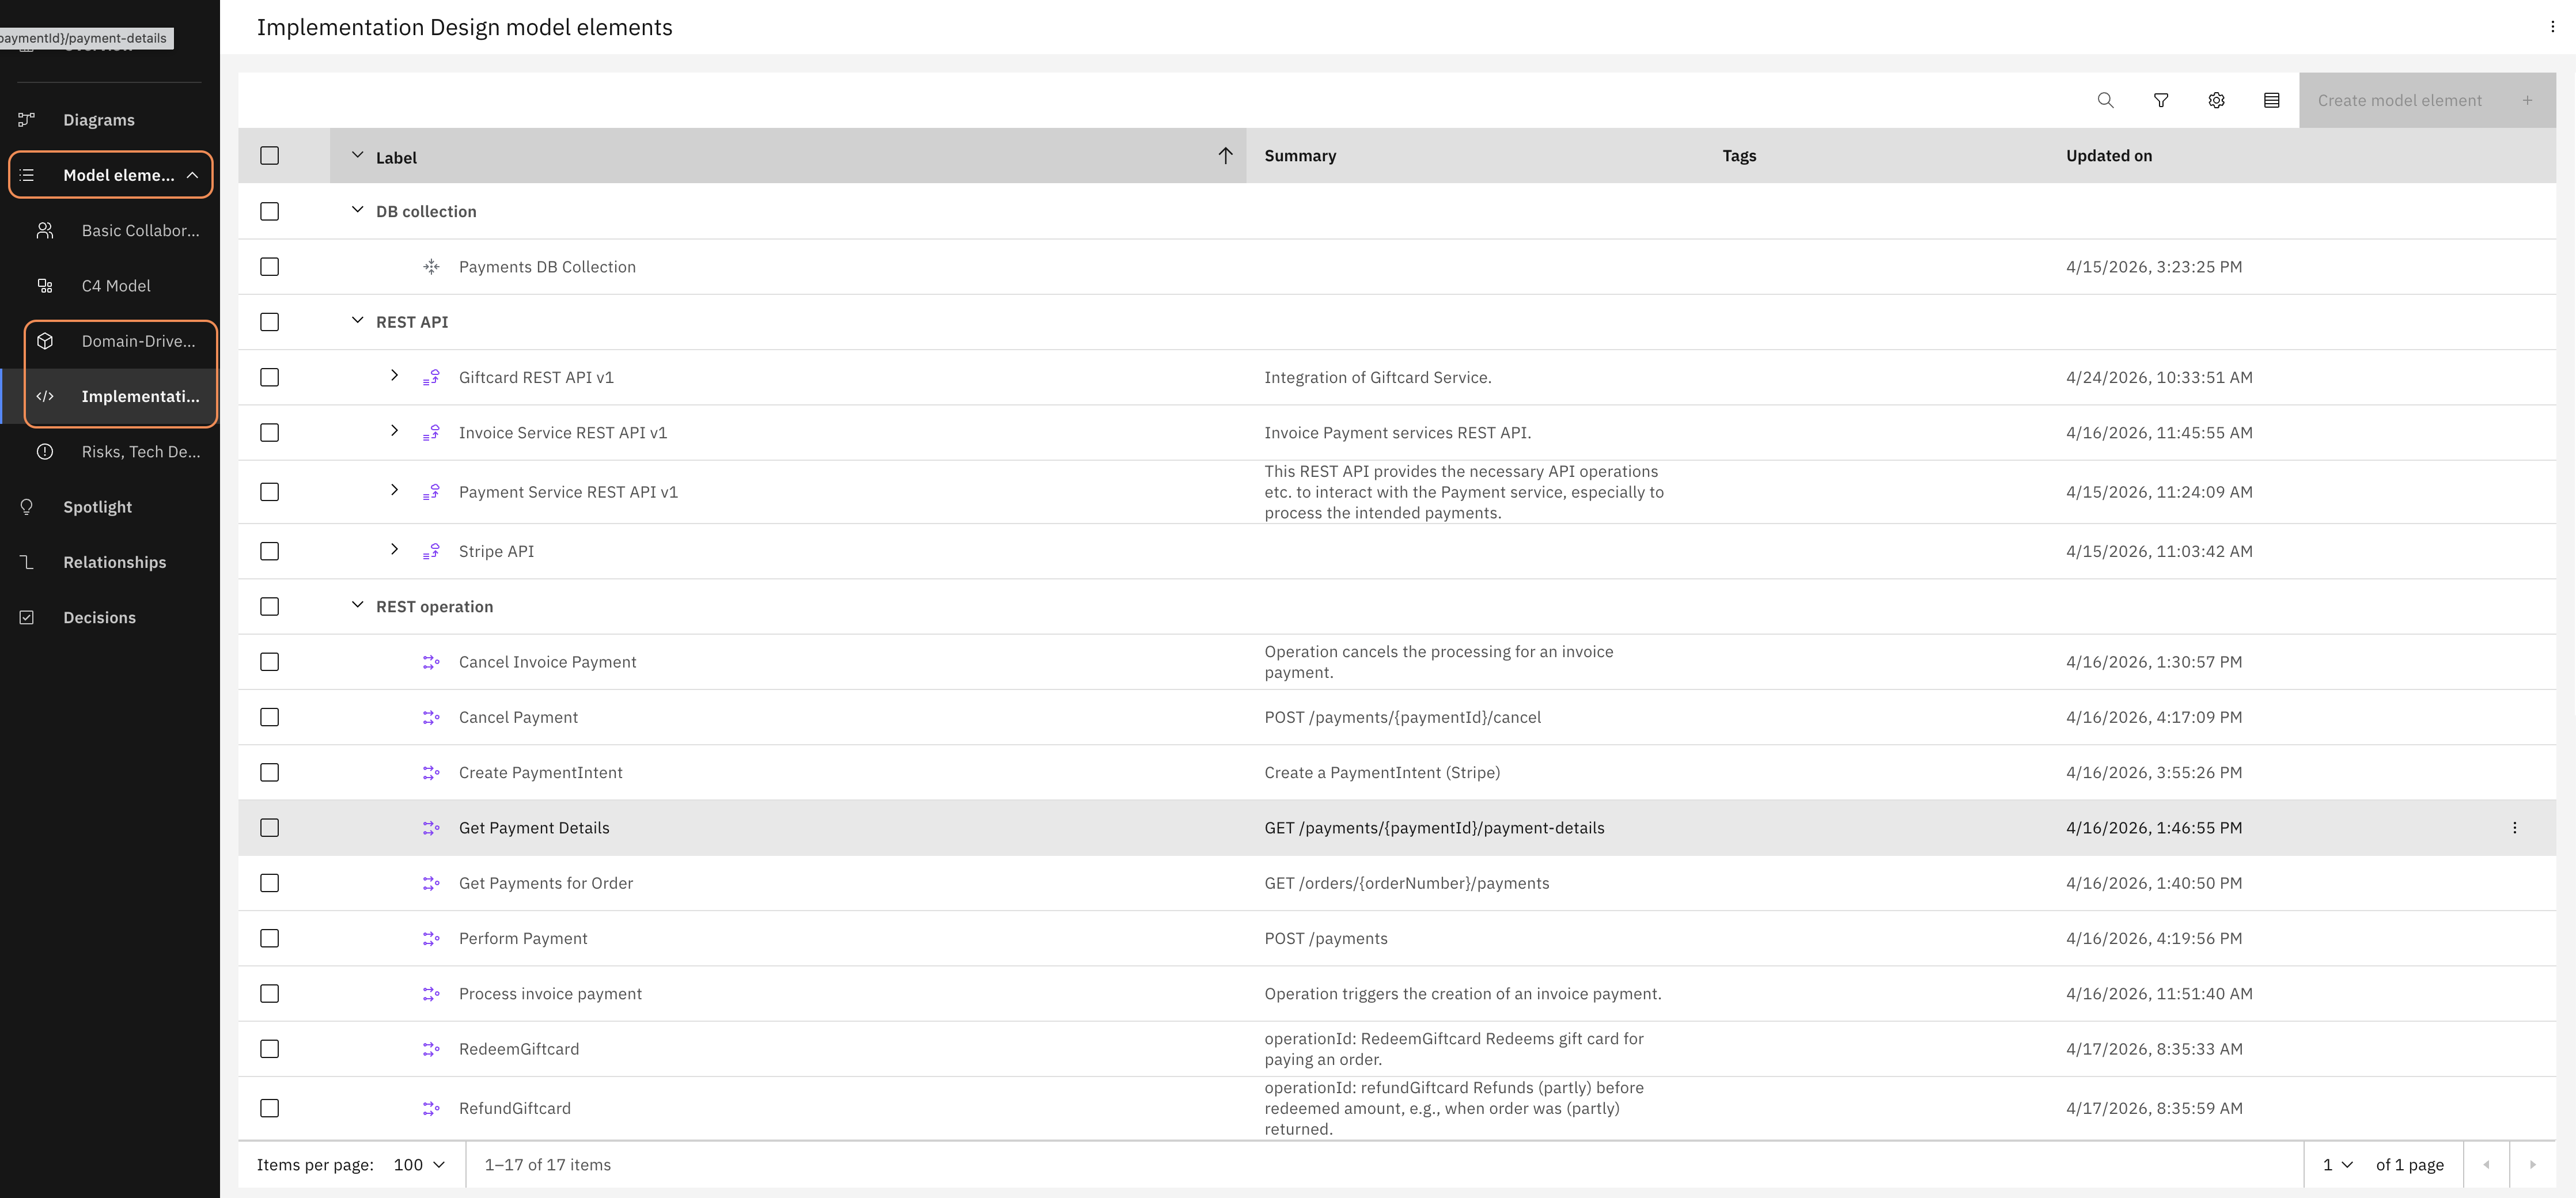
Navigate to "Model Elements" in the left sidebar to see all element types currently in use across the project. The elements are grouped by their OML profile.
Together, these two profiles — Domain-Driven Design and Implementation Design — give developer teams and architects everything they need to specify a service. The profiles speak a technical language — intentionally. The people who work with this model today are technical personas.
This works well but now a new requirement is coming from a different perspective:
"As a customer, I want gift card payments to complete without noticeable delay at checkout, even during peak season."
— Product Owner
The product owner has a new requirement for the gift card feature. They think in terms of customer experience and business outcomes — and they cannot capture that in the technical vocabulary of the existing model since they don't speak that language.
The architect translates this requirement into a technical concern. They think in terms of system qualities and constraints:
"Payment execution must be fast and reliable under high load — max. 200ms response time, max. 10,000 concurrent users."
— Architect
Right now, neither form of requirement has a home in the Payment Service design. The product owner can't add a user story and the architect cannot document the non-functional requirements.
The developer implementing the gift card payment would have to look for these requirements in other systems. They're not in the model and not attached to the code, leading to missing context, assumptions and potential technical debt down the line.
Extending the modeling vocabulary fixes that. In Workbench, the vocabulary available in a project is controlled by its Project Baseline — and adding two new profiles to it takes just a few minutes. After that, both the product owner and the architect can work in the same model — in their own language — and the developer (and their coding assistant) finds everything they need without having to assume anything.
Let's do it!
Step 3 — Extend the vocabulary
The Payment Service baseline currently only knows about a subset of profiles available in Workbench. To give the product owner and architect a place to work, you need to add two new profiles to it: one for user stories, one for non-functional requirements and constraints.
Download the baseline, add the two profiles, upload this baseline version, and update the baseline in the Payment Service project to use this new version.
Download the baseline
The baseline is a configuration package that lives in Workbench — not in your codebase. Downloading it gives you a local copy that you can edit and re-upload to make it part of Workbench's configuration.
Click on the gear symbol at the top right and then on "Admin settings".
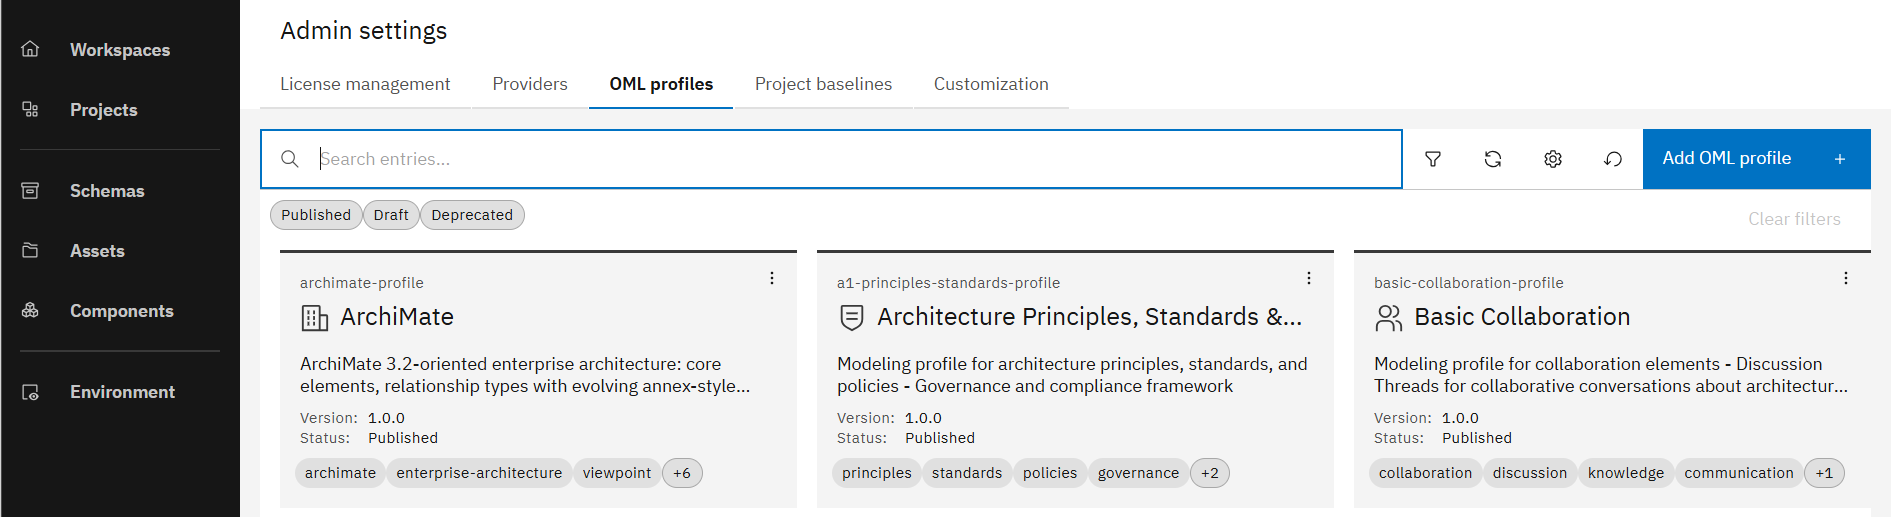
In the Admin settings, when you switch to tab "OML Profiles" you can see all OML profiles currently available in Workbench.
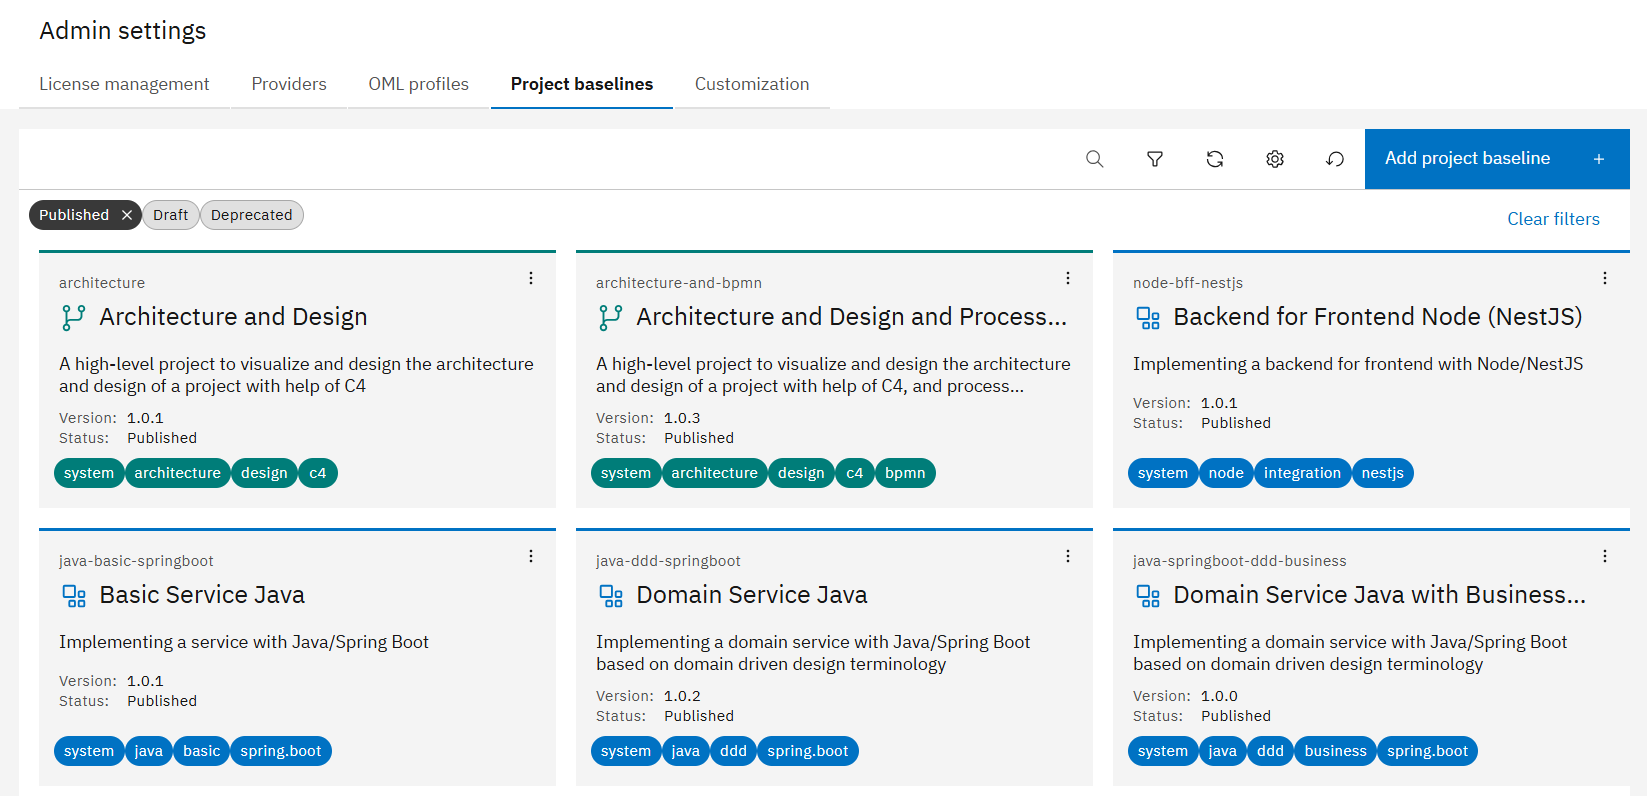
In the Admin settings, switch to tab "Project baselines".
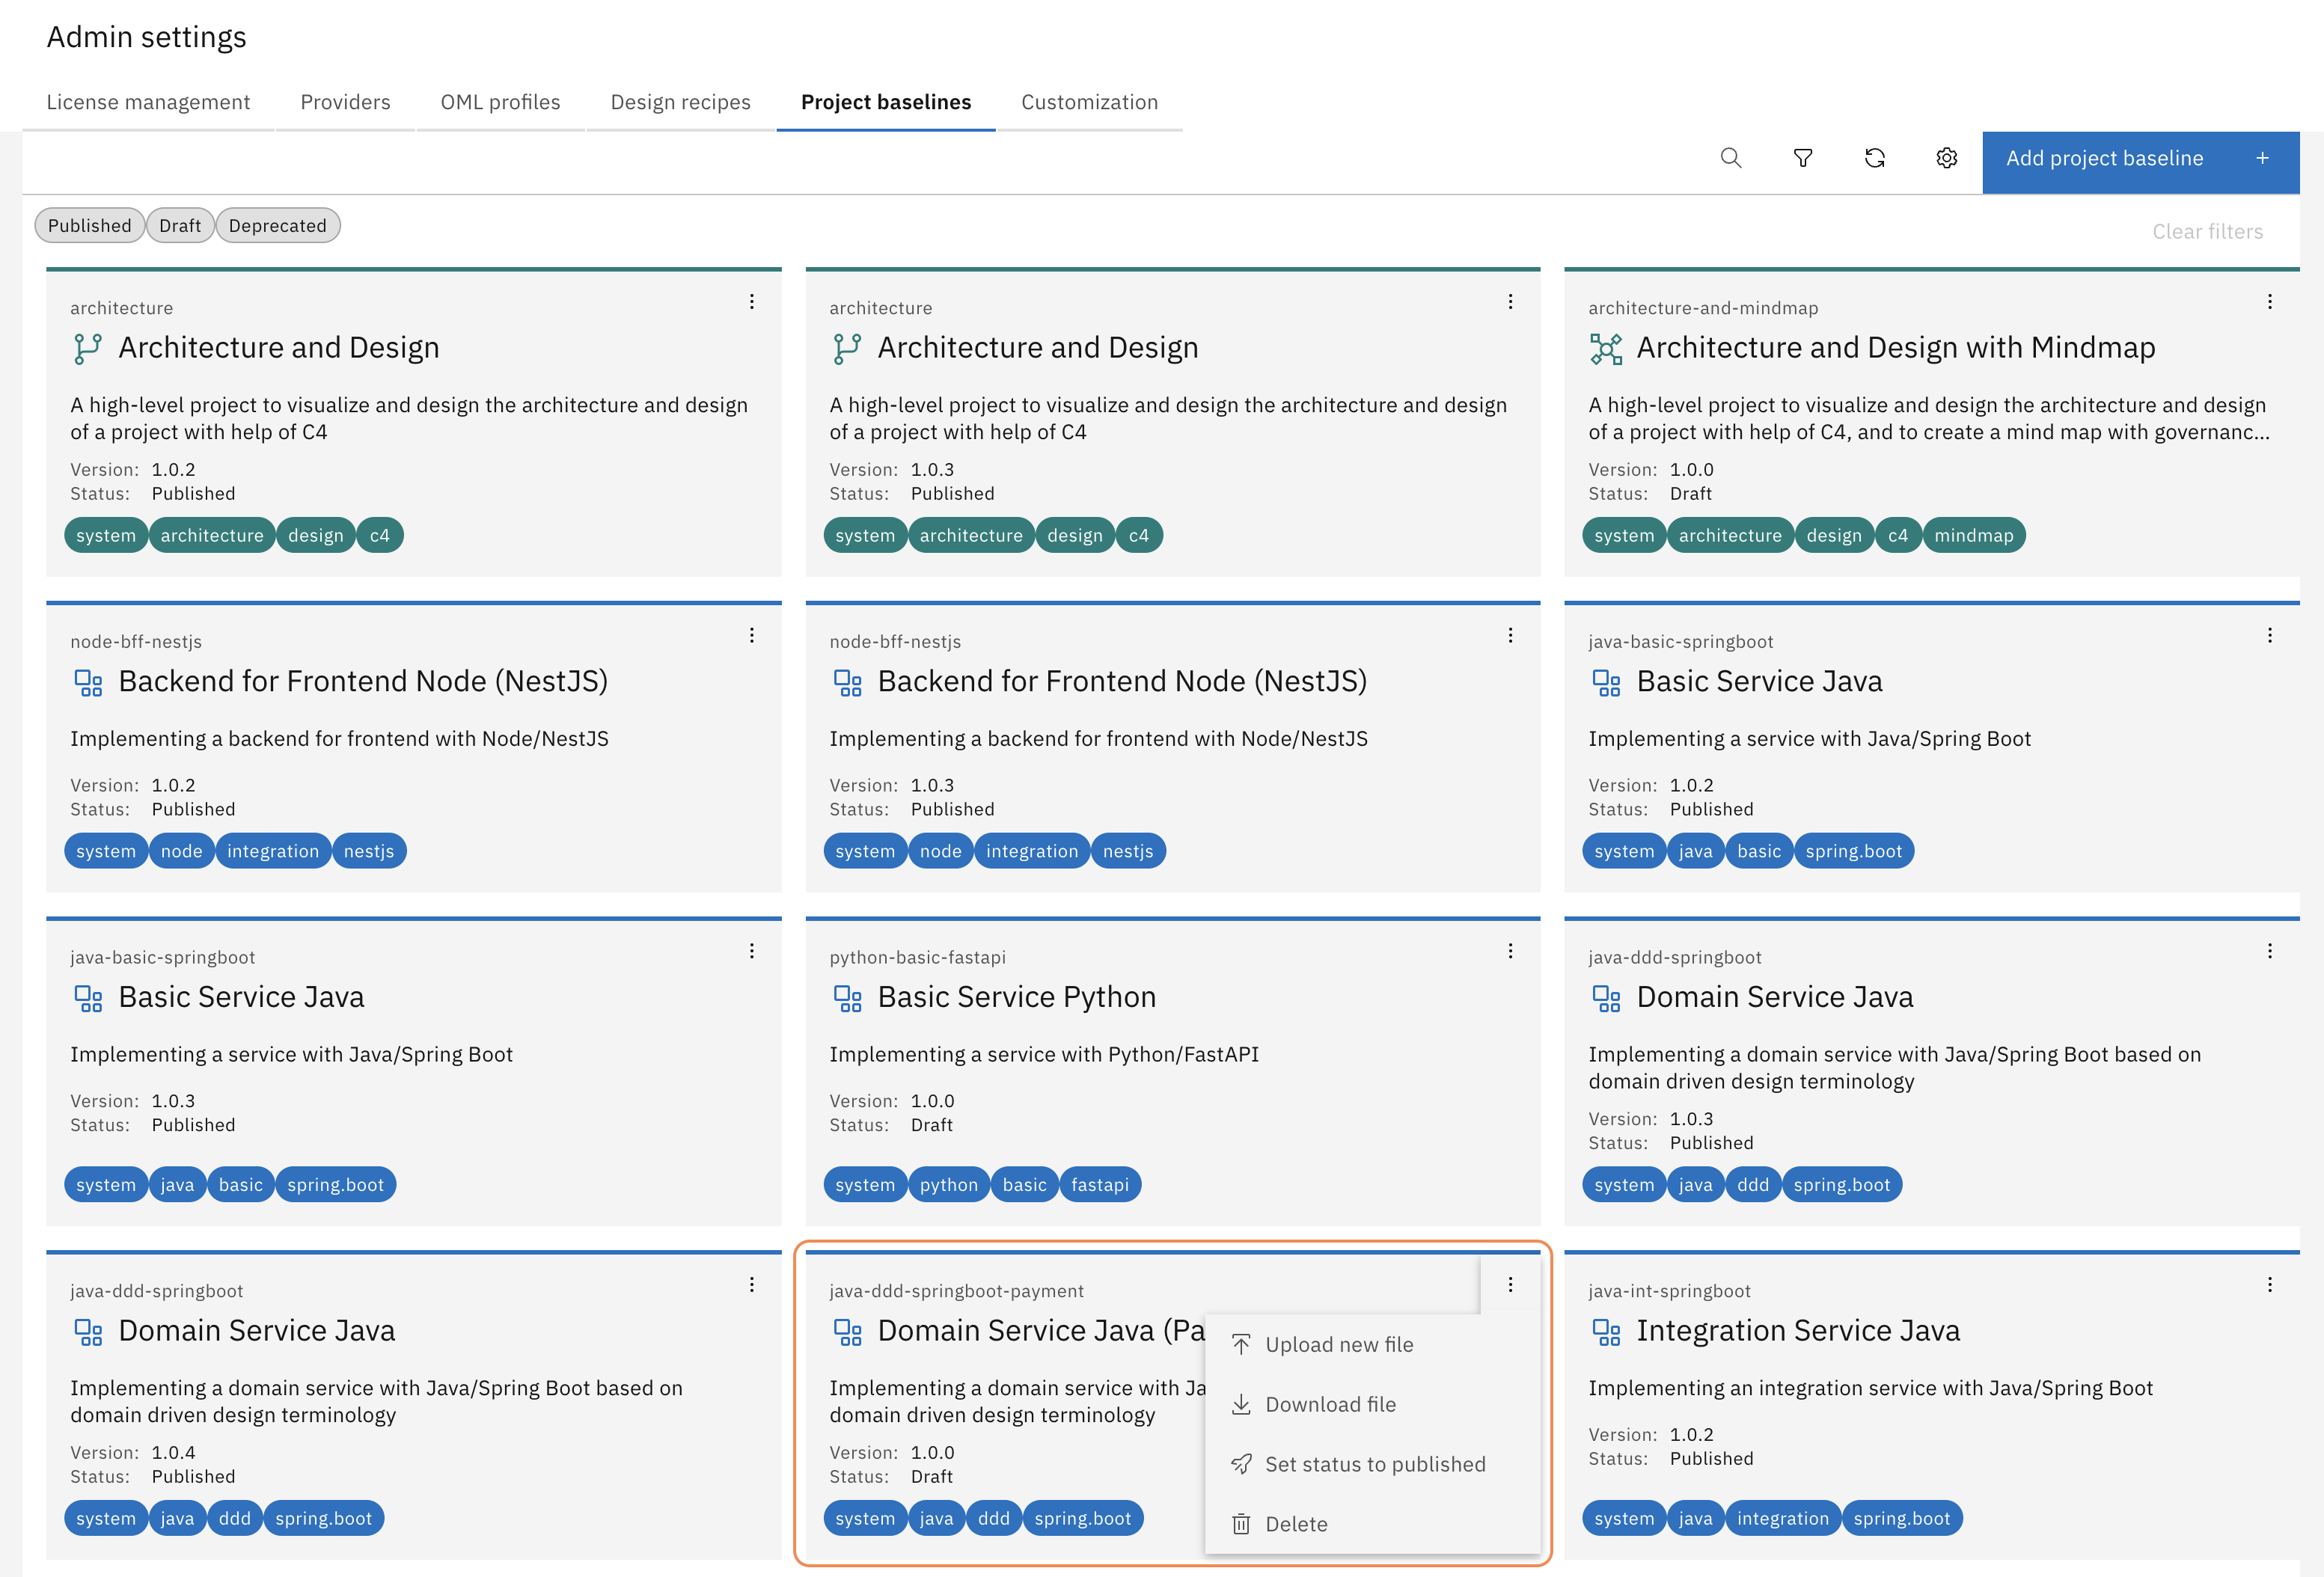
Select the project baseline "Domain Service Java (Payment)", click on the three dots at the top right corner of the corresponding card and then click on "Download file".
You now downloaded the baseline attached to the Payment Service. Unzip the downloaded file into a new directory on your machine. You will find two key files:
k5-baseline.yaml— the baseline metadata and configurationk5-oml.yaml— the list of OML profiles enabled for this baseline
Update the baseline version
Baselines are versioned so that we can trace which projects are using which baseline configuration. Increasing the version before re-uploading means your change is traceable — and if something goes wrong, you can always roll back to the previous version. So don't forget to update the version number before uploading the modified baseline - it's good practice.
Open k5-baseline.yaml and increase the version number:
id: "java-ddd-springboot-payment"
version: "1.0.1"
Add the two new profiles
The k5-oml.yaml file is the actual vocabulary list — it tells Workbench which element types and relationships are available in this baseline. Adding a profile here is all it takes to make a
new modeling language available to every project that uses this baseline.
Open k5-oml.yaml and add the two new profiles to the profiles section:
profiles:
  # ... existing profiles ...

  # User Story Mapping
  - id: "user-story-mapping"
    version: "1.0.0"

  # Requirements Modeling
  - id: "requirements-profile"
    version: "1.0.0"
Save both files. Then create a new zip file from the contents of your baseline directory — not the directory itself, but everything inside it. Name it following this pattern: <baseline-id>-<version>.zip.
So in this case, it would be java-ddd-springboot-payment-1.0.1.zip.
The zip file must contain the files directly at its root — not inside a subfolder. If the structure is wrong, the upload will fail.
Upload and publish
Publishing makes the new baseline version available to all users in Workbench.
Go back to the Admin settings, switch to tab "Project Baselines" and then click on "Add Project Baseline" on the right.
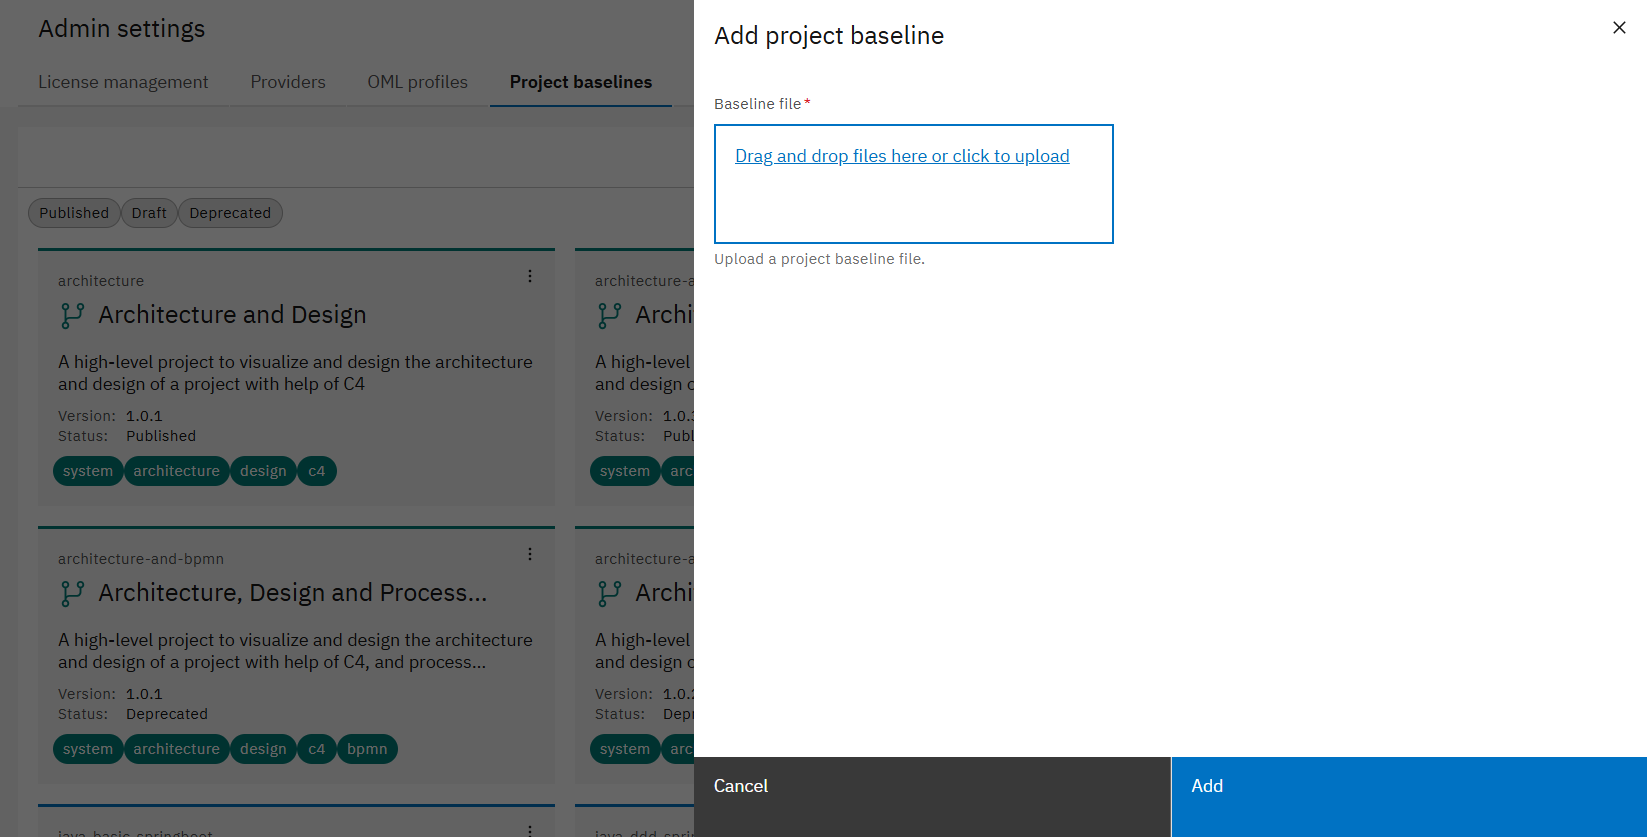
A modal opens where you can upload the file for the project baseline.
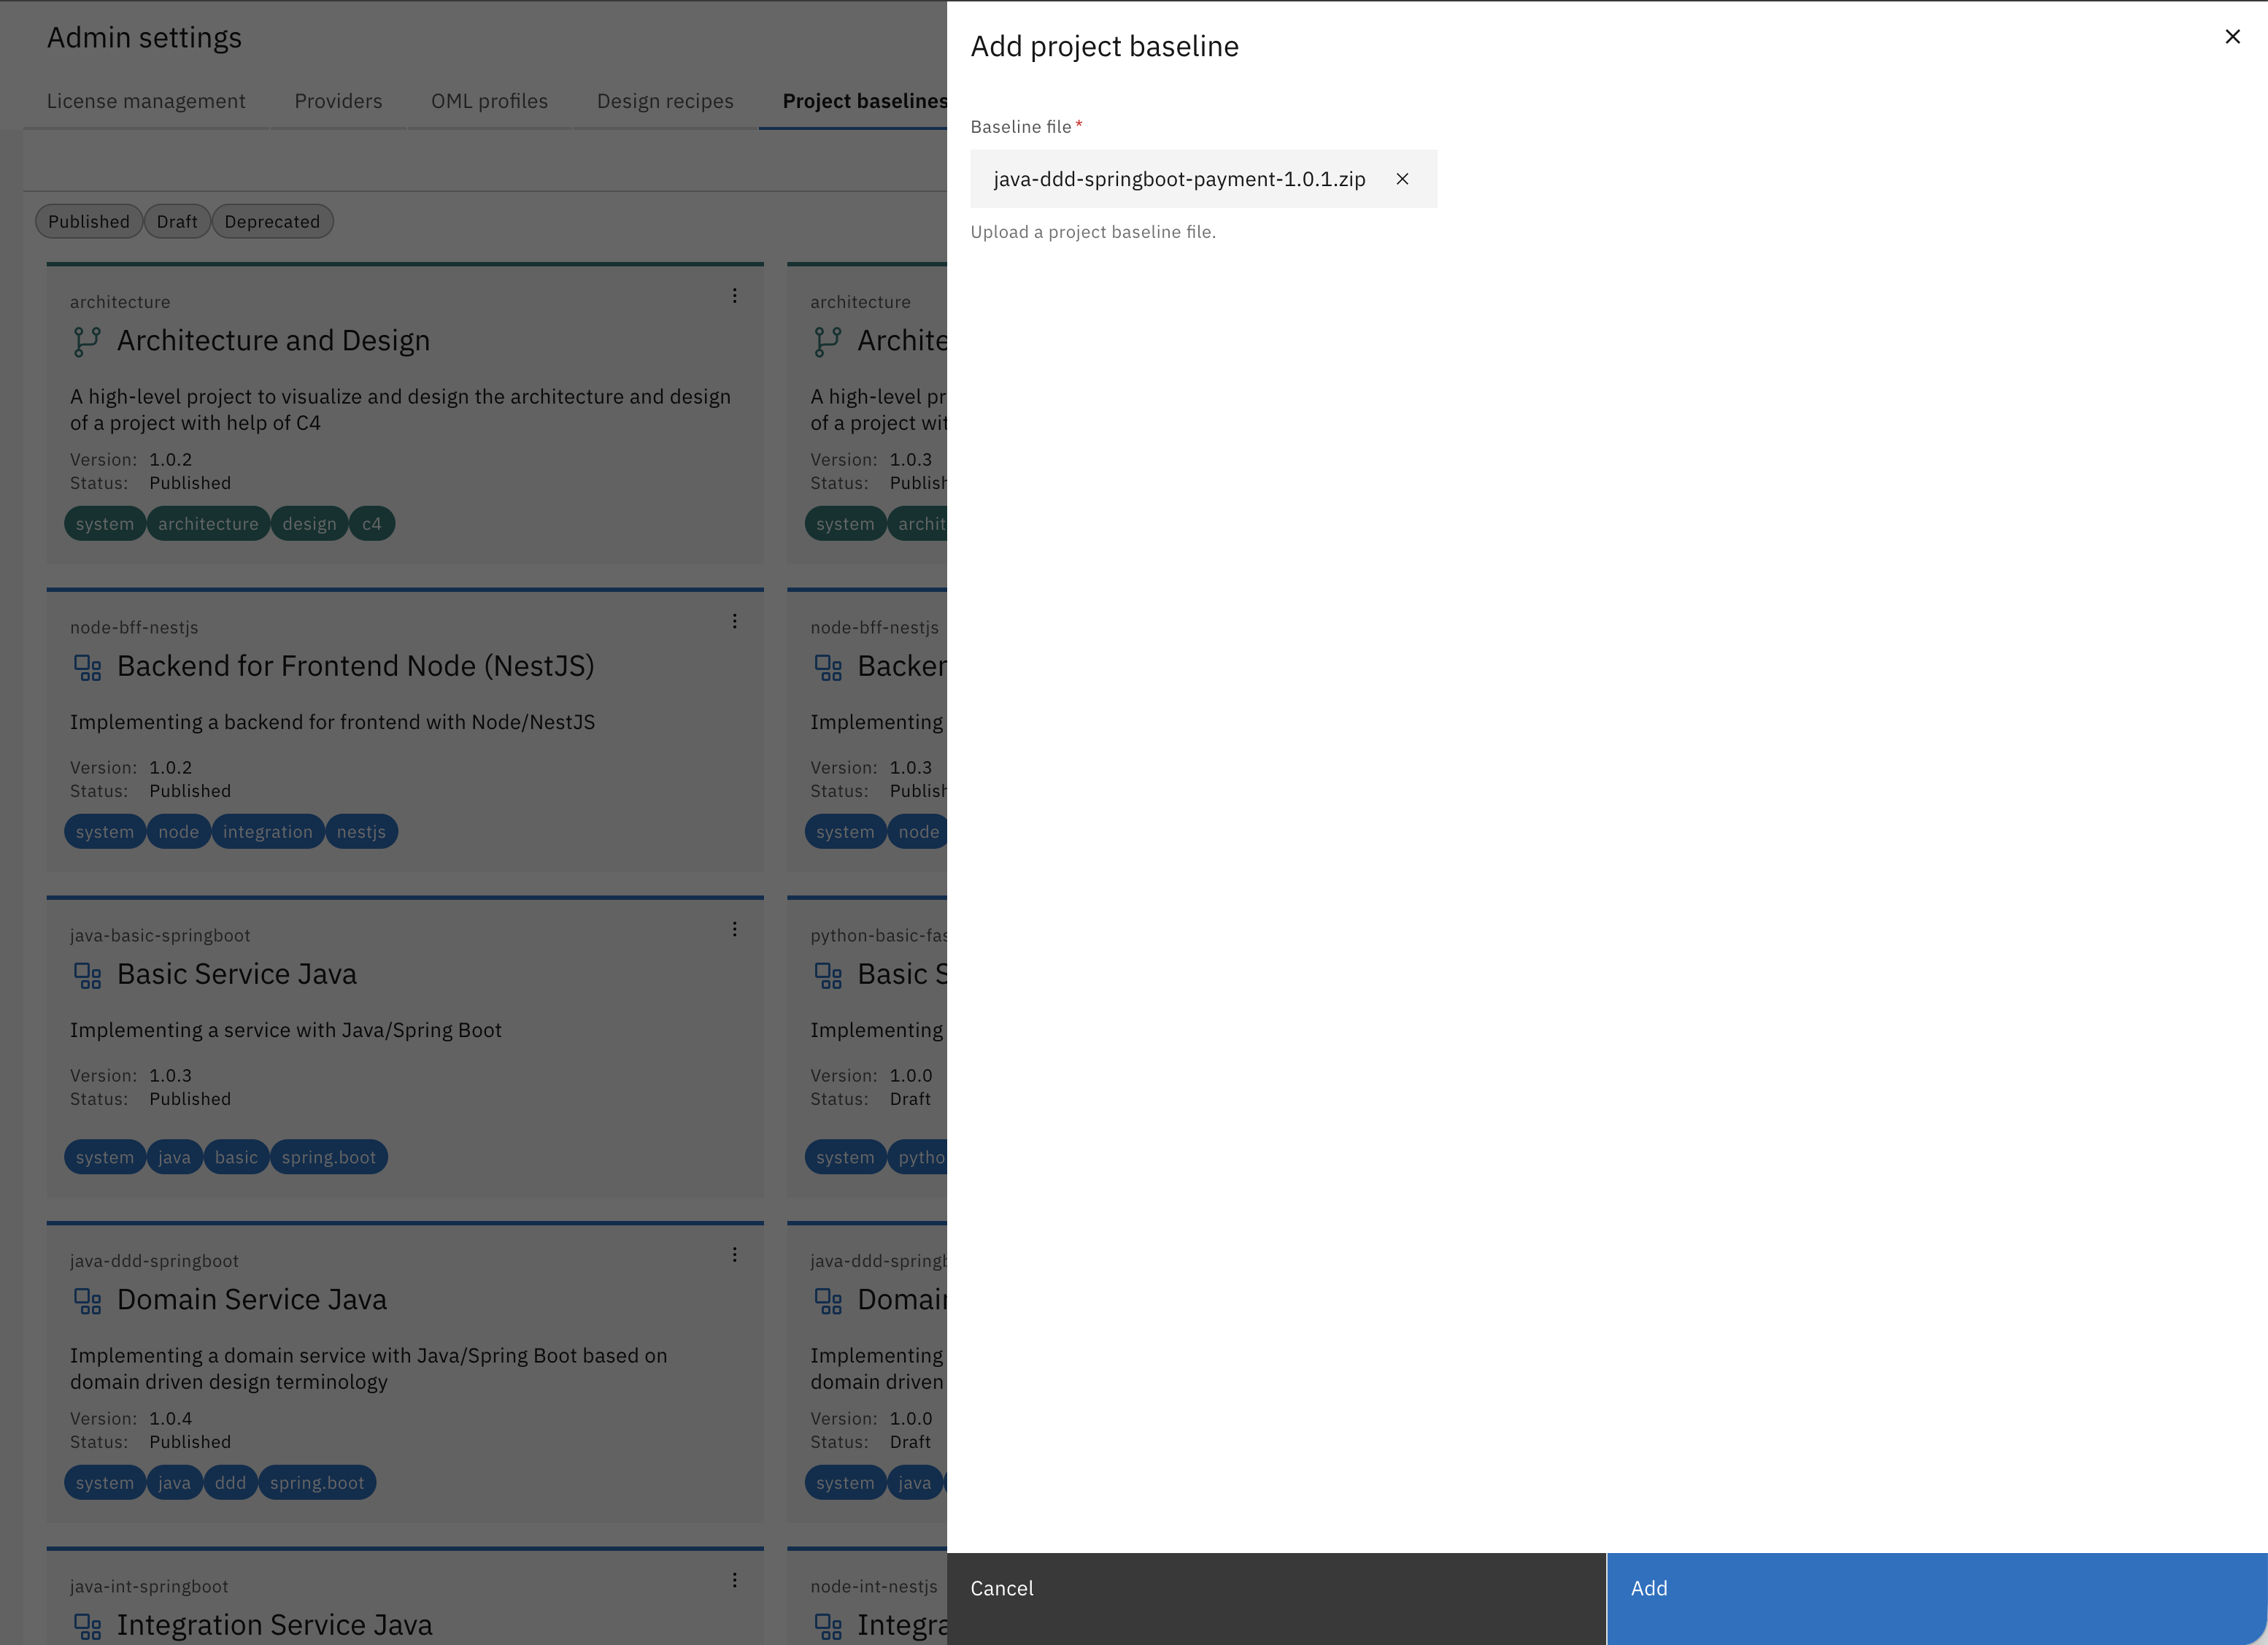
Upload your project baseline zip-file and click on "Add".
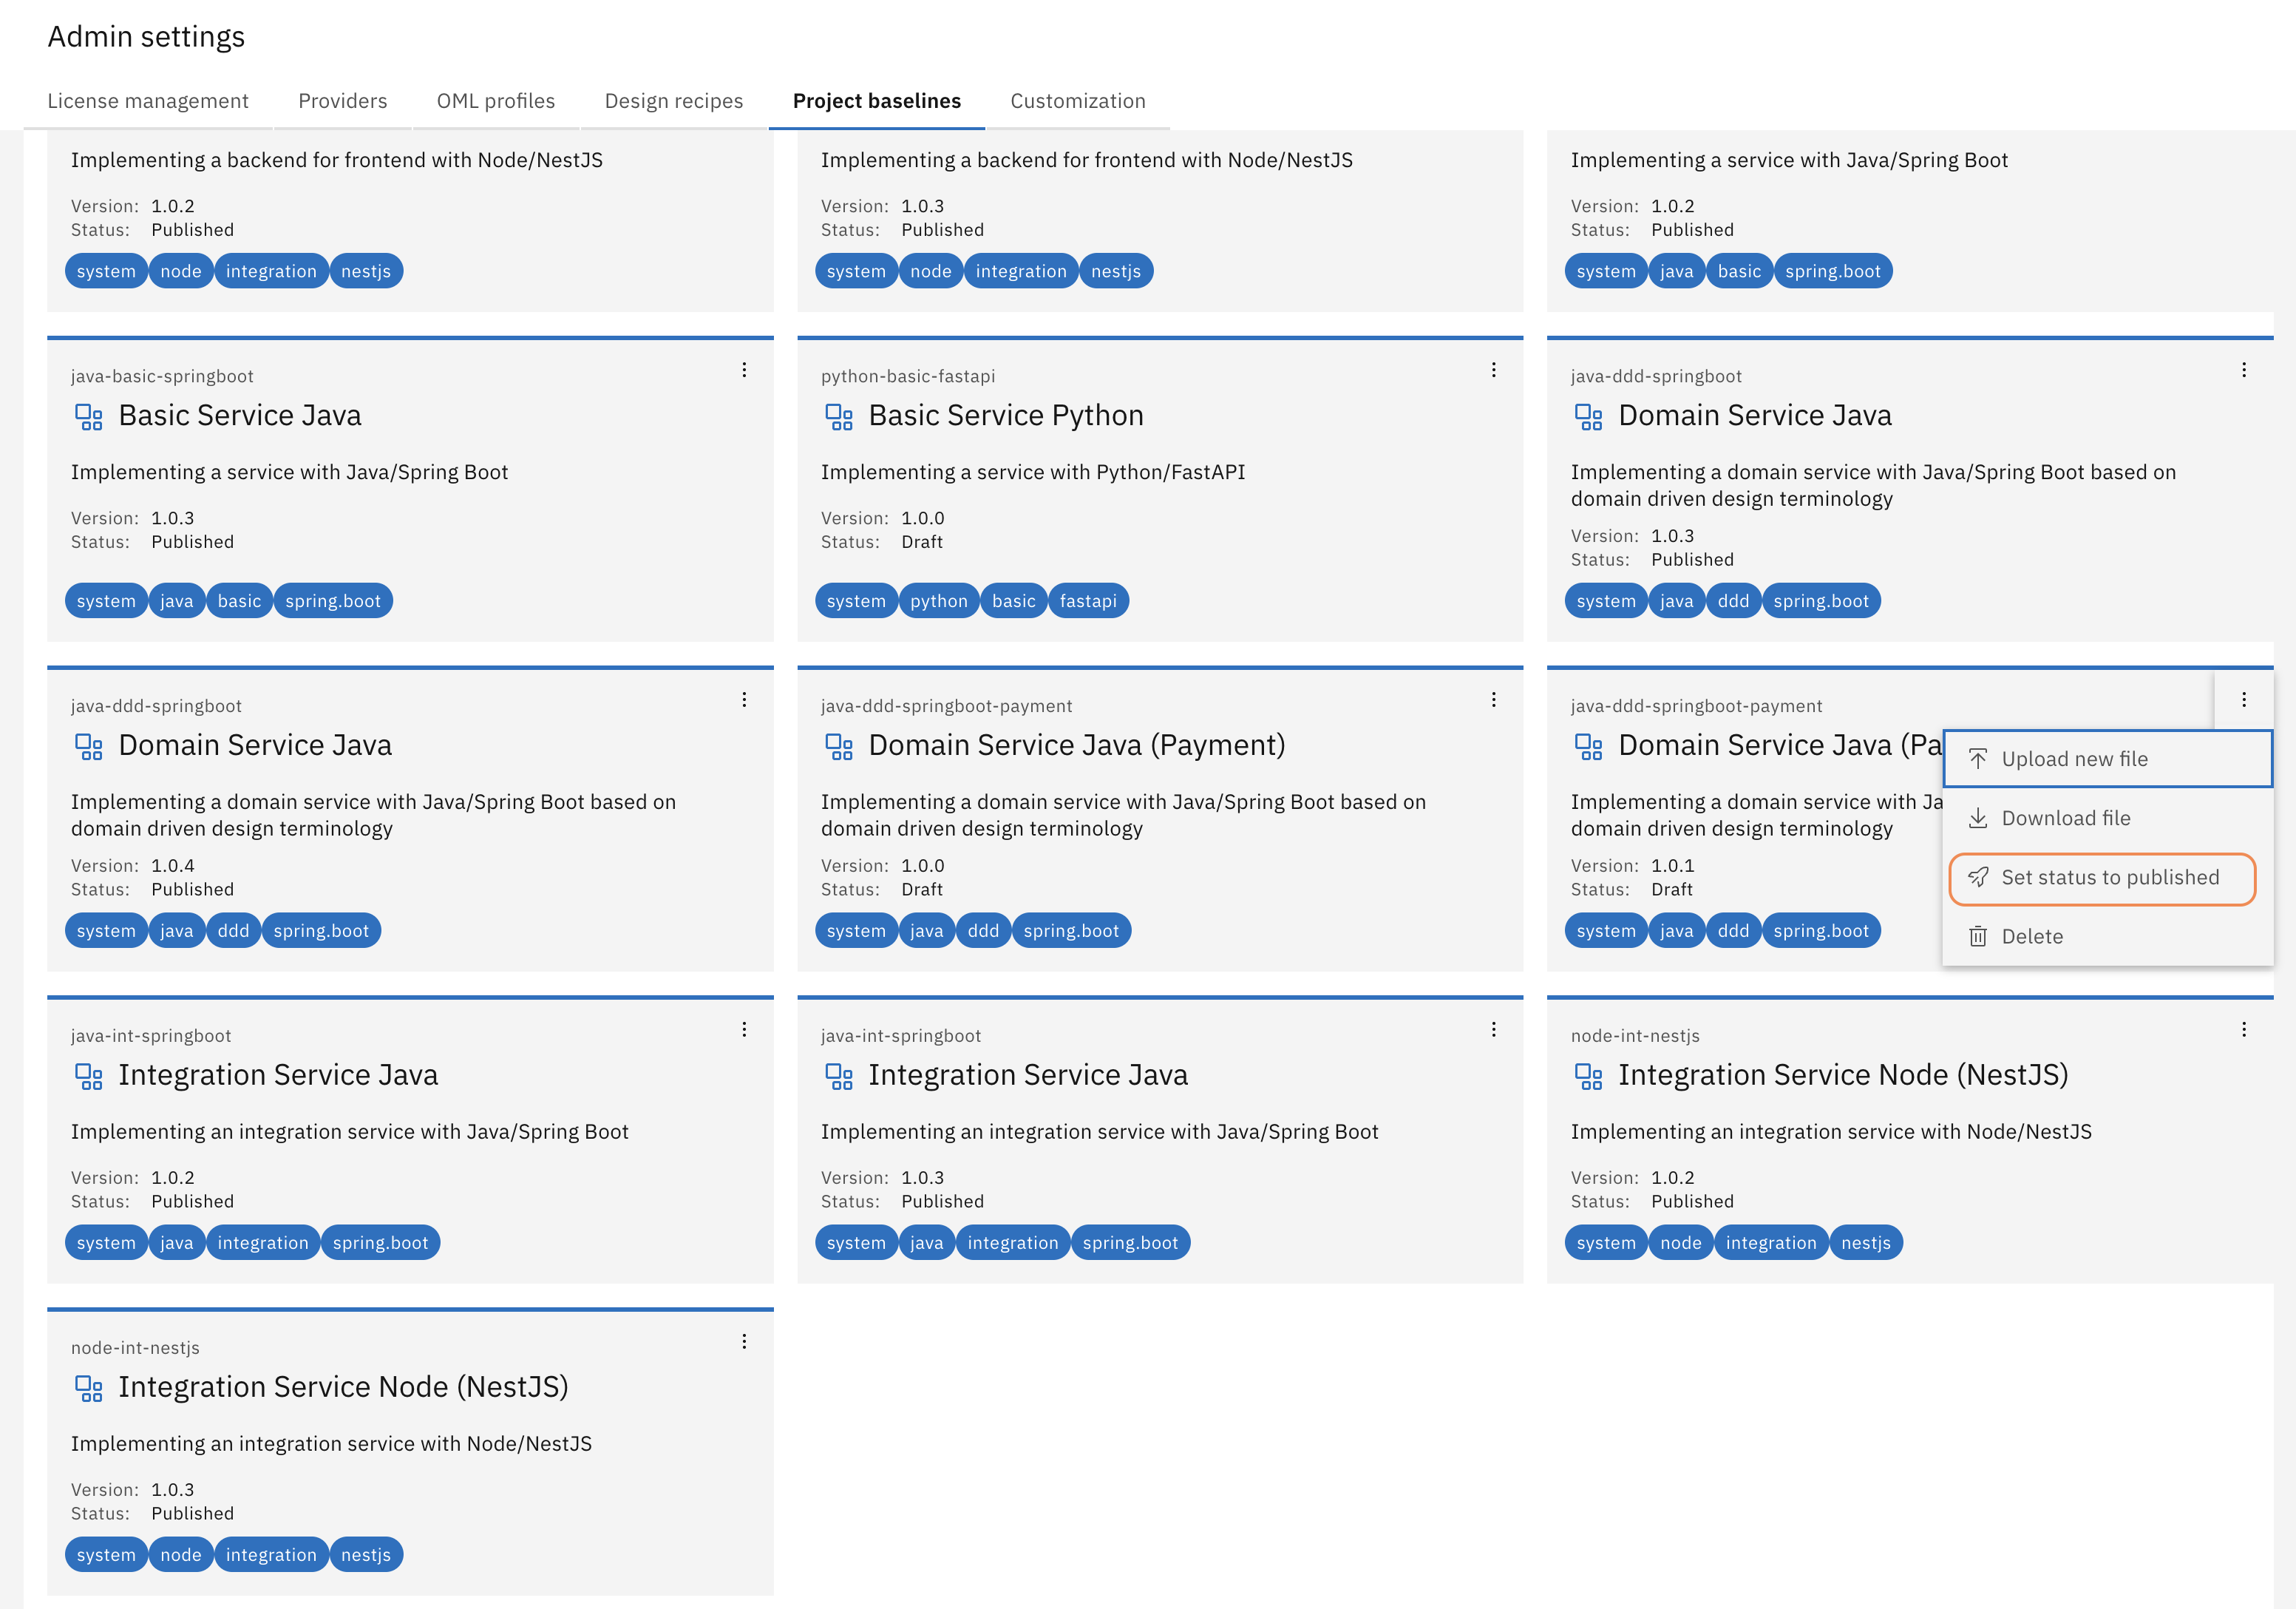
Search for the baseline you just uploaded, click on the three dots at the top right corner of the corresponding card and then click on "Set status to published".
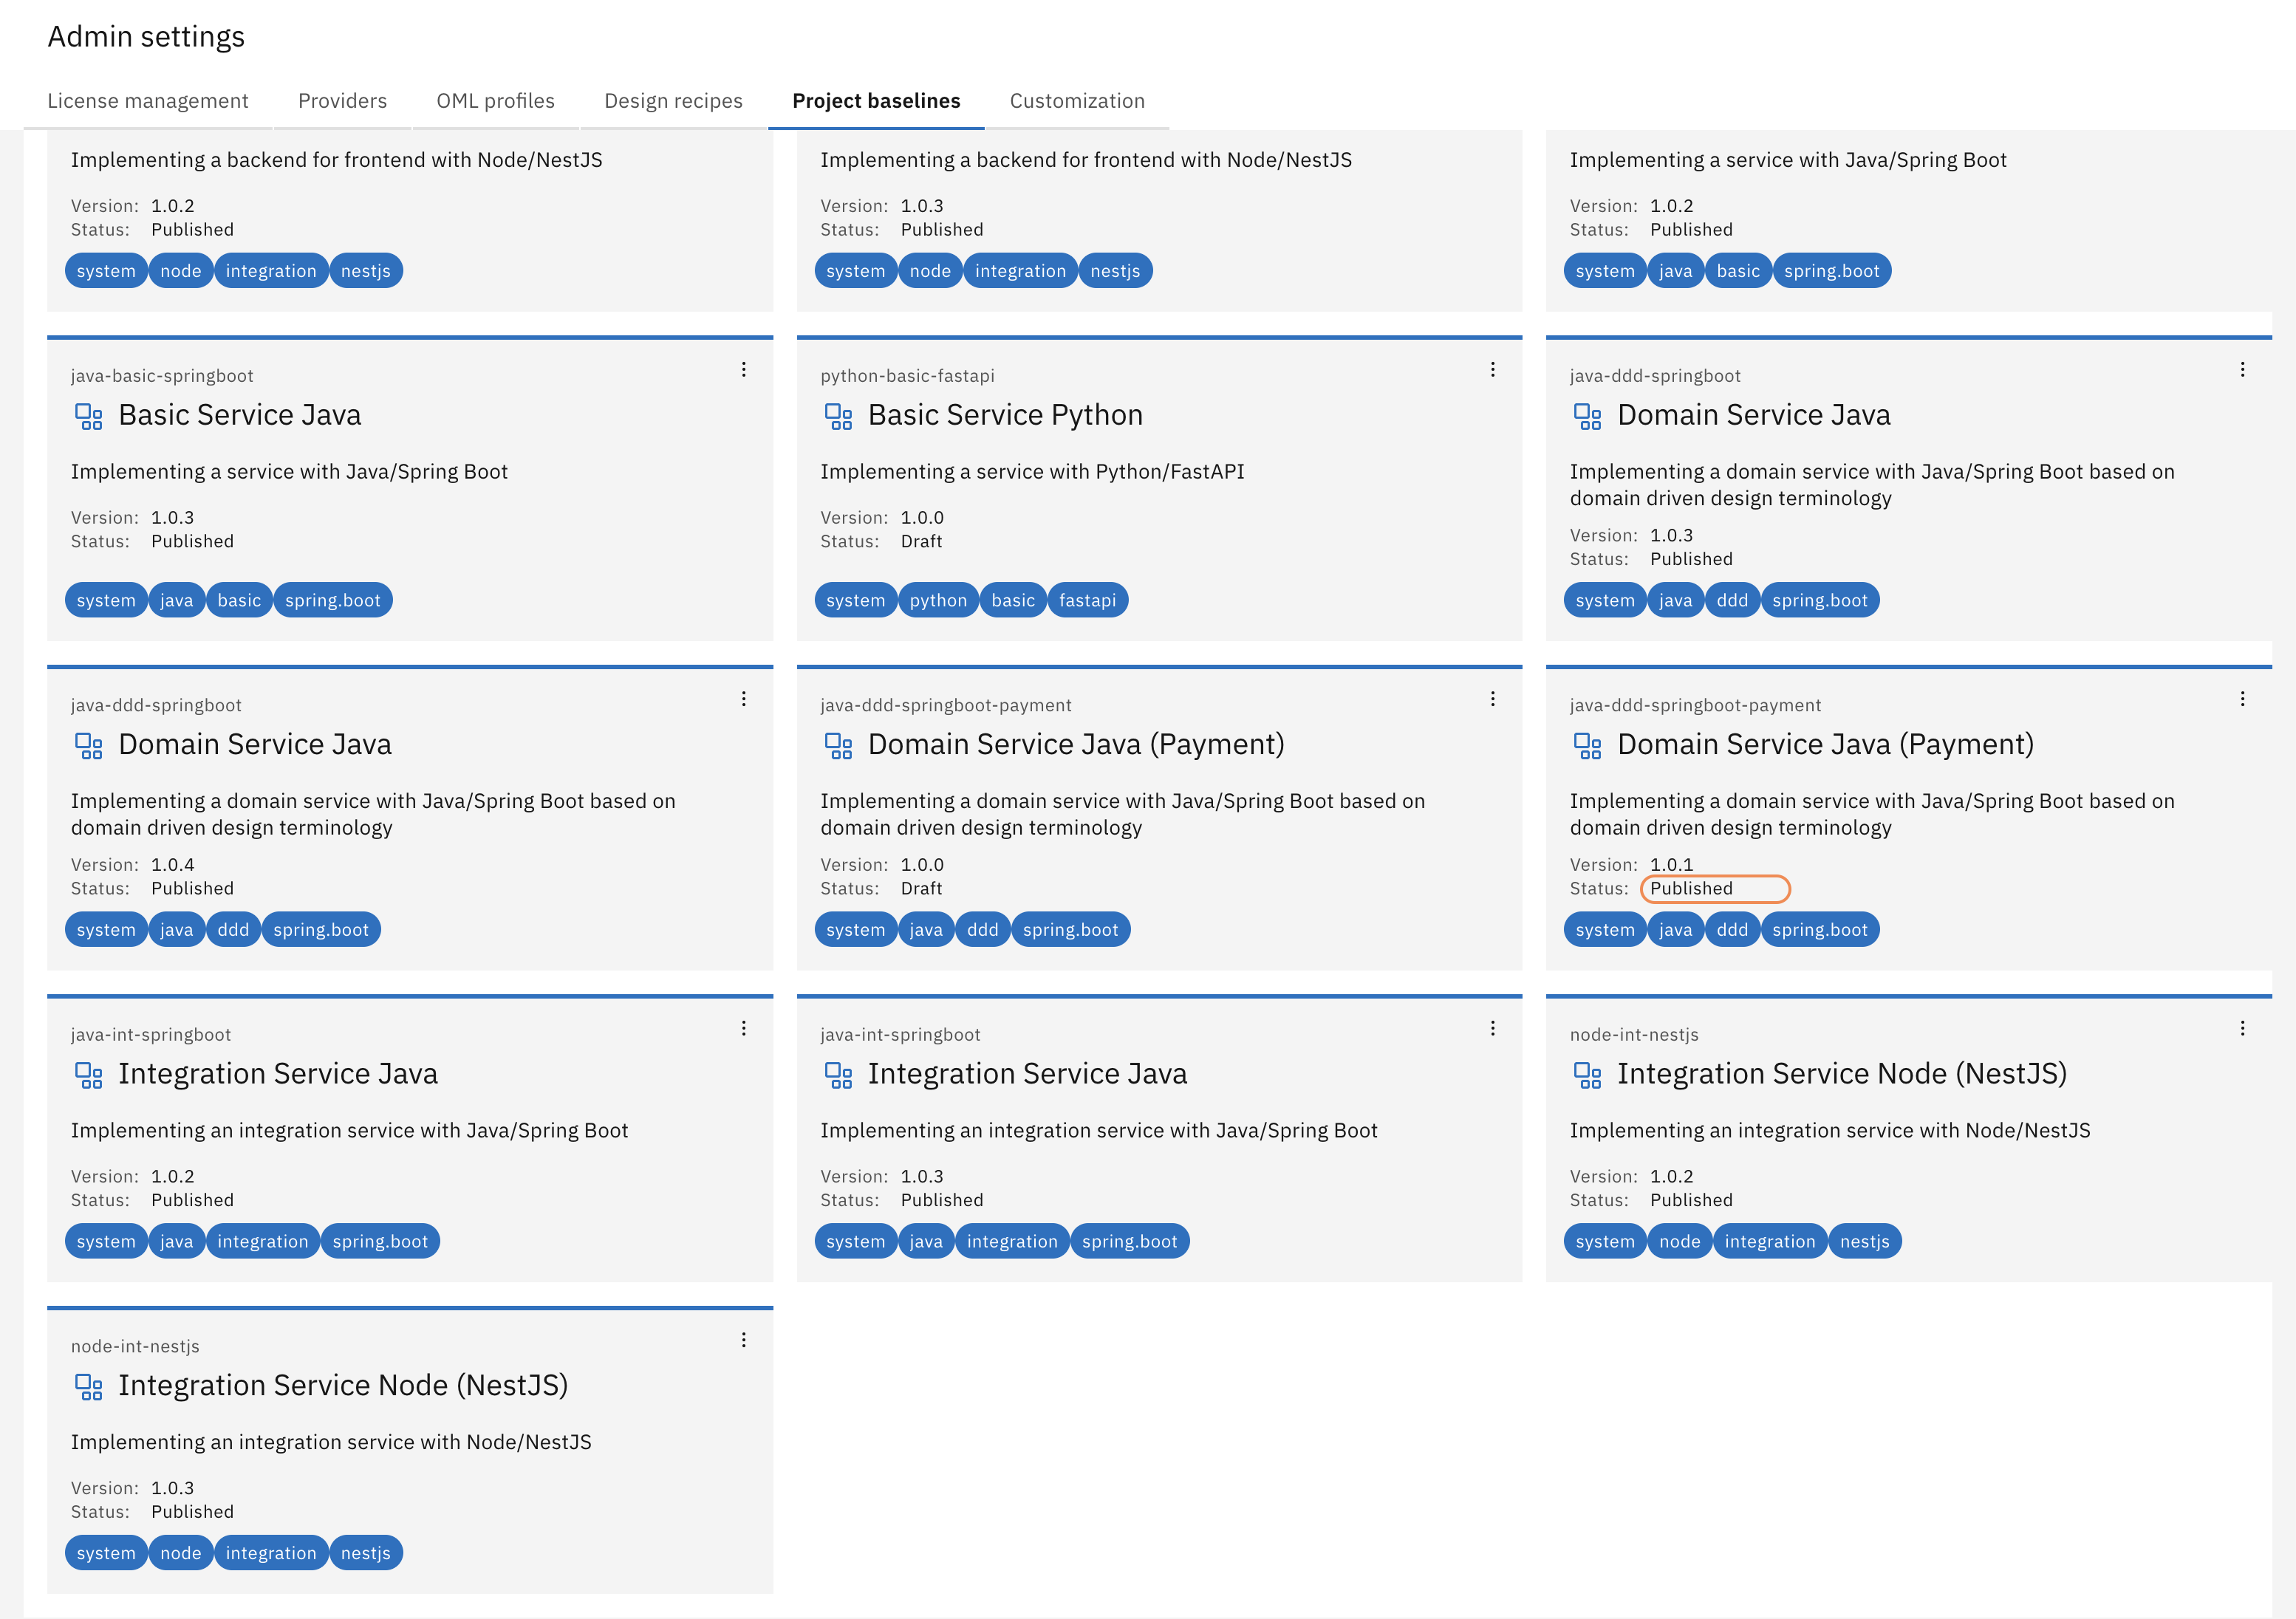
The project baseline is now available for all users in the Workbench.
Enable the new baseline version in the Payment Service
The project doesn't update automatically when a new baseline version is published — you explicitly switch to it. This is intentional: teams control when they adopt changes, so a baseline update never breaks a project without warning.
Open the Payment Service again.
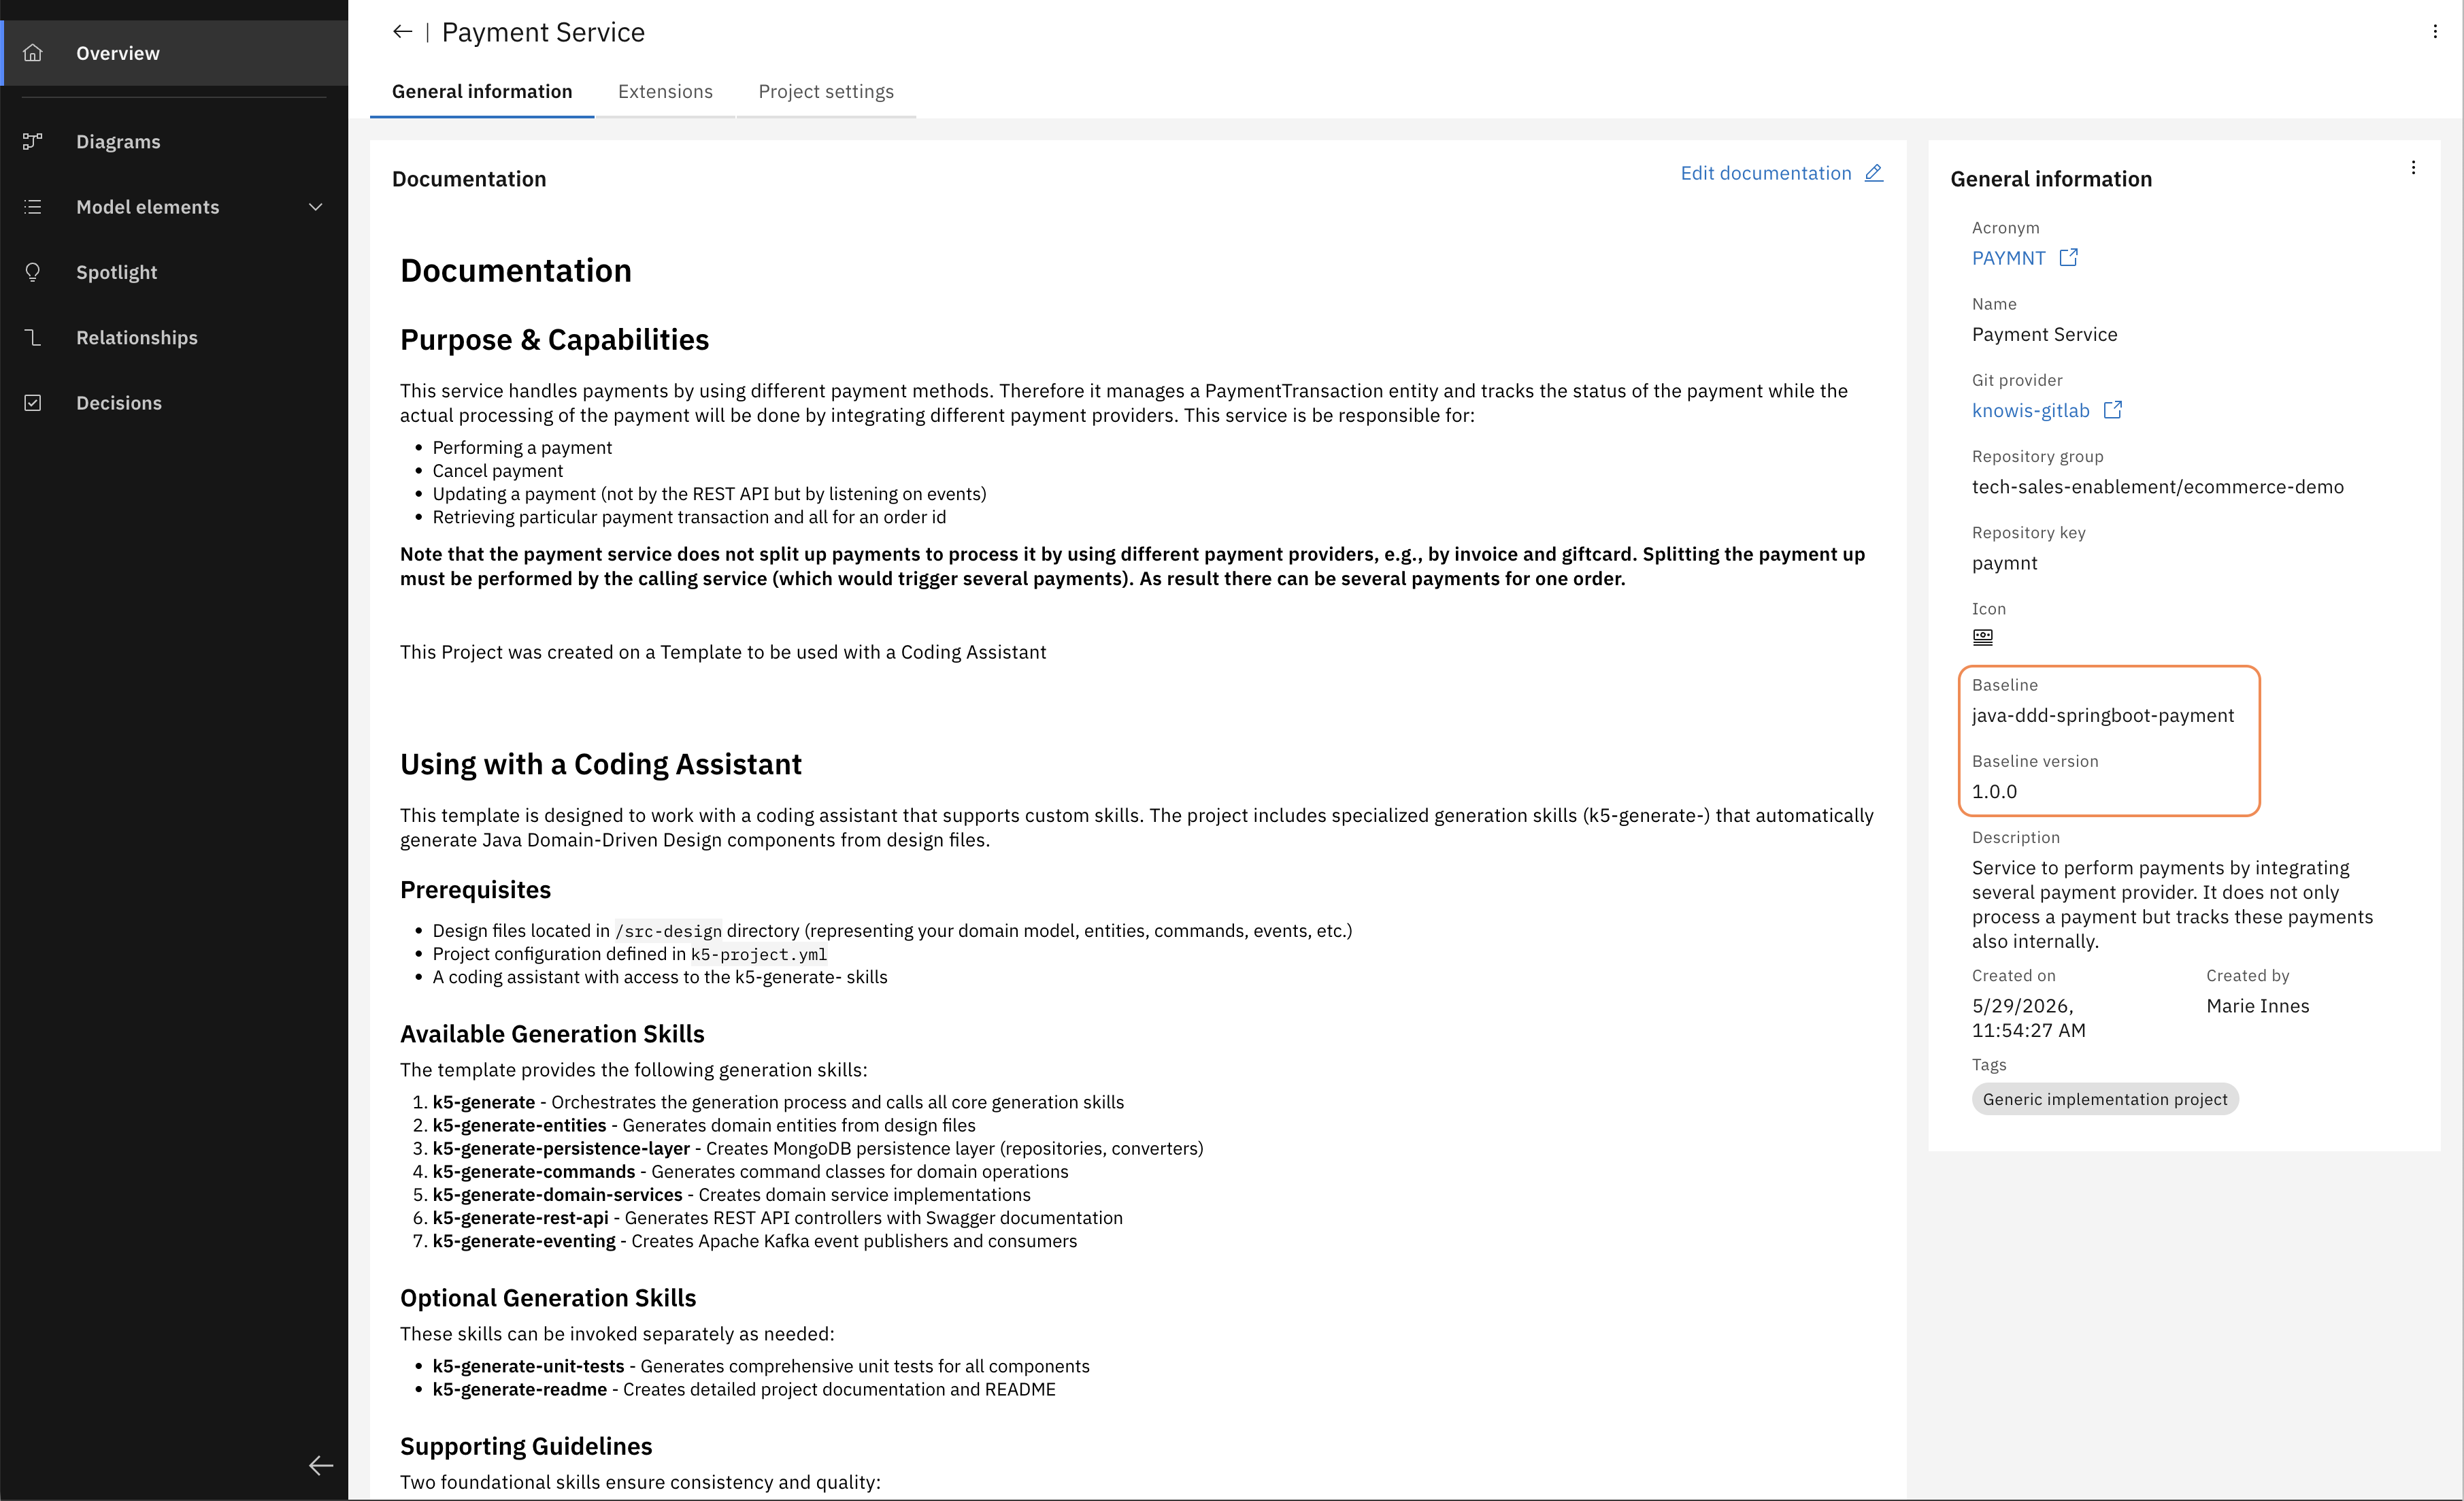
In the Overview page, find the General Information panel on the right. It shows the baseline currently attached to the project — version 1.0.0.
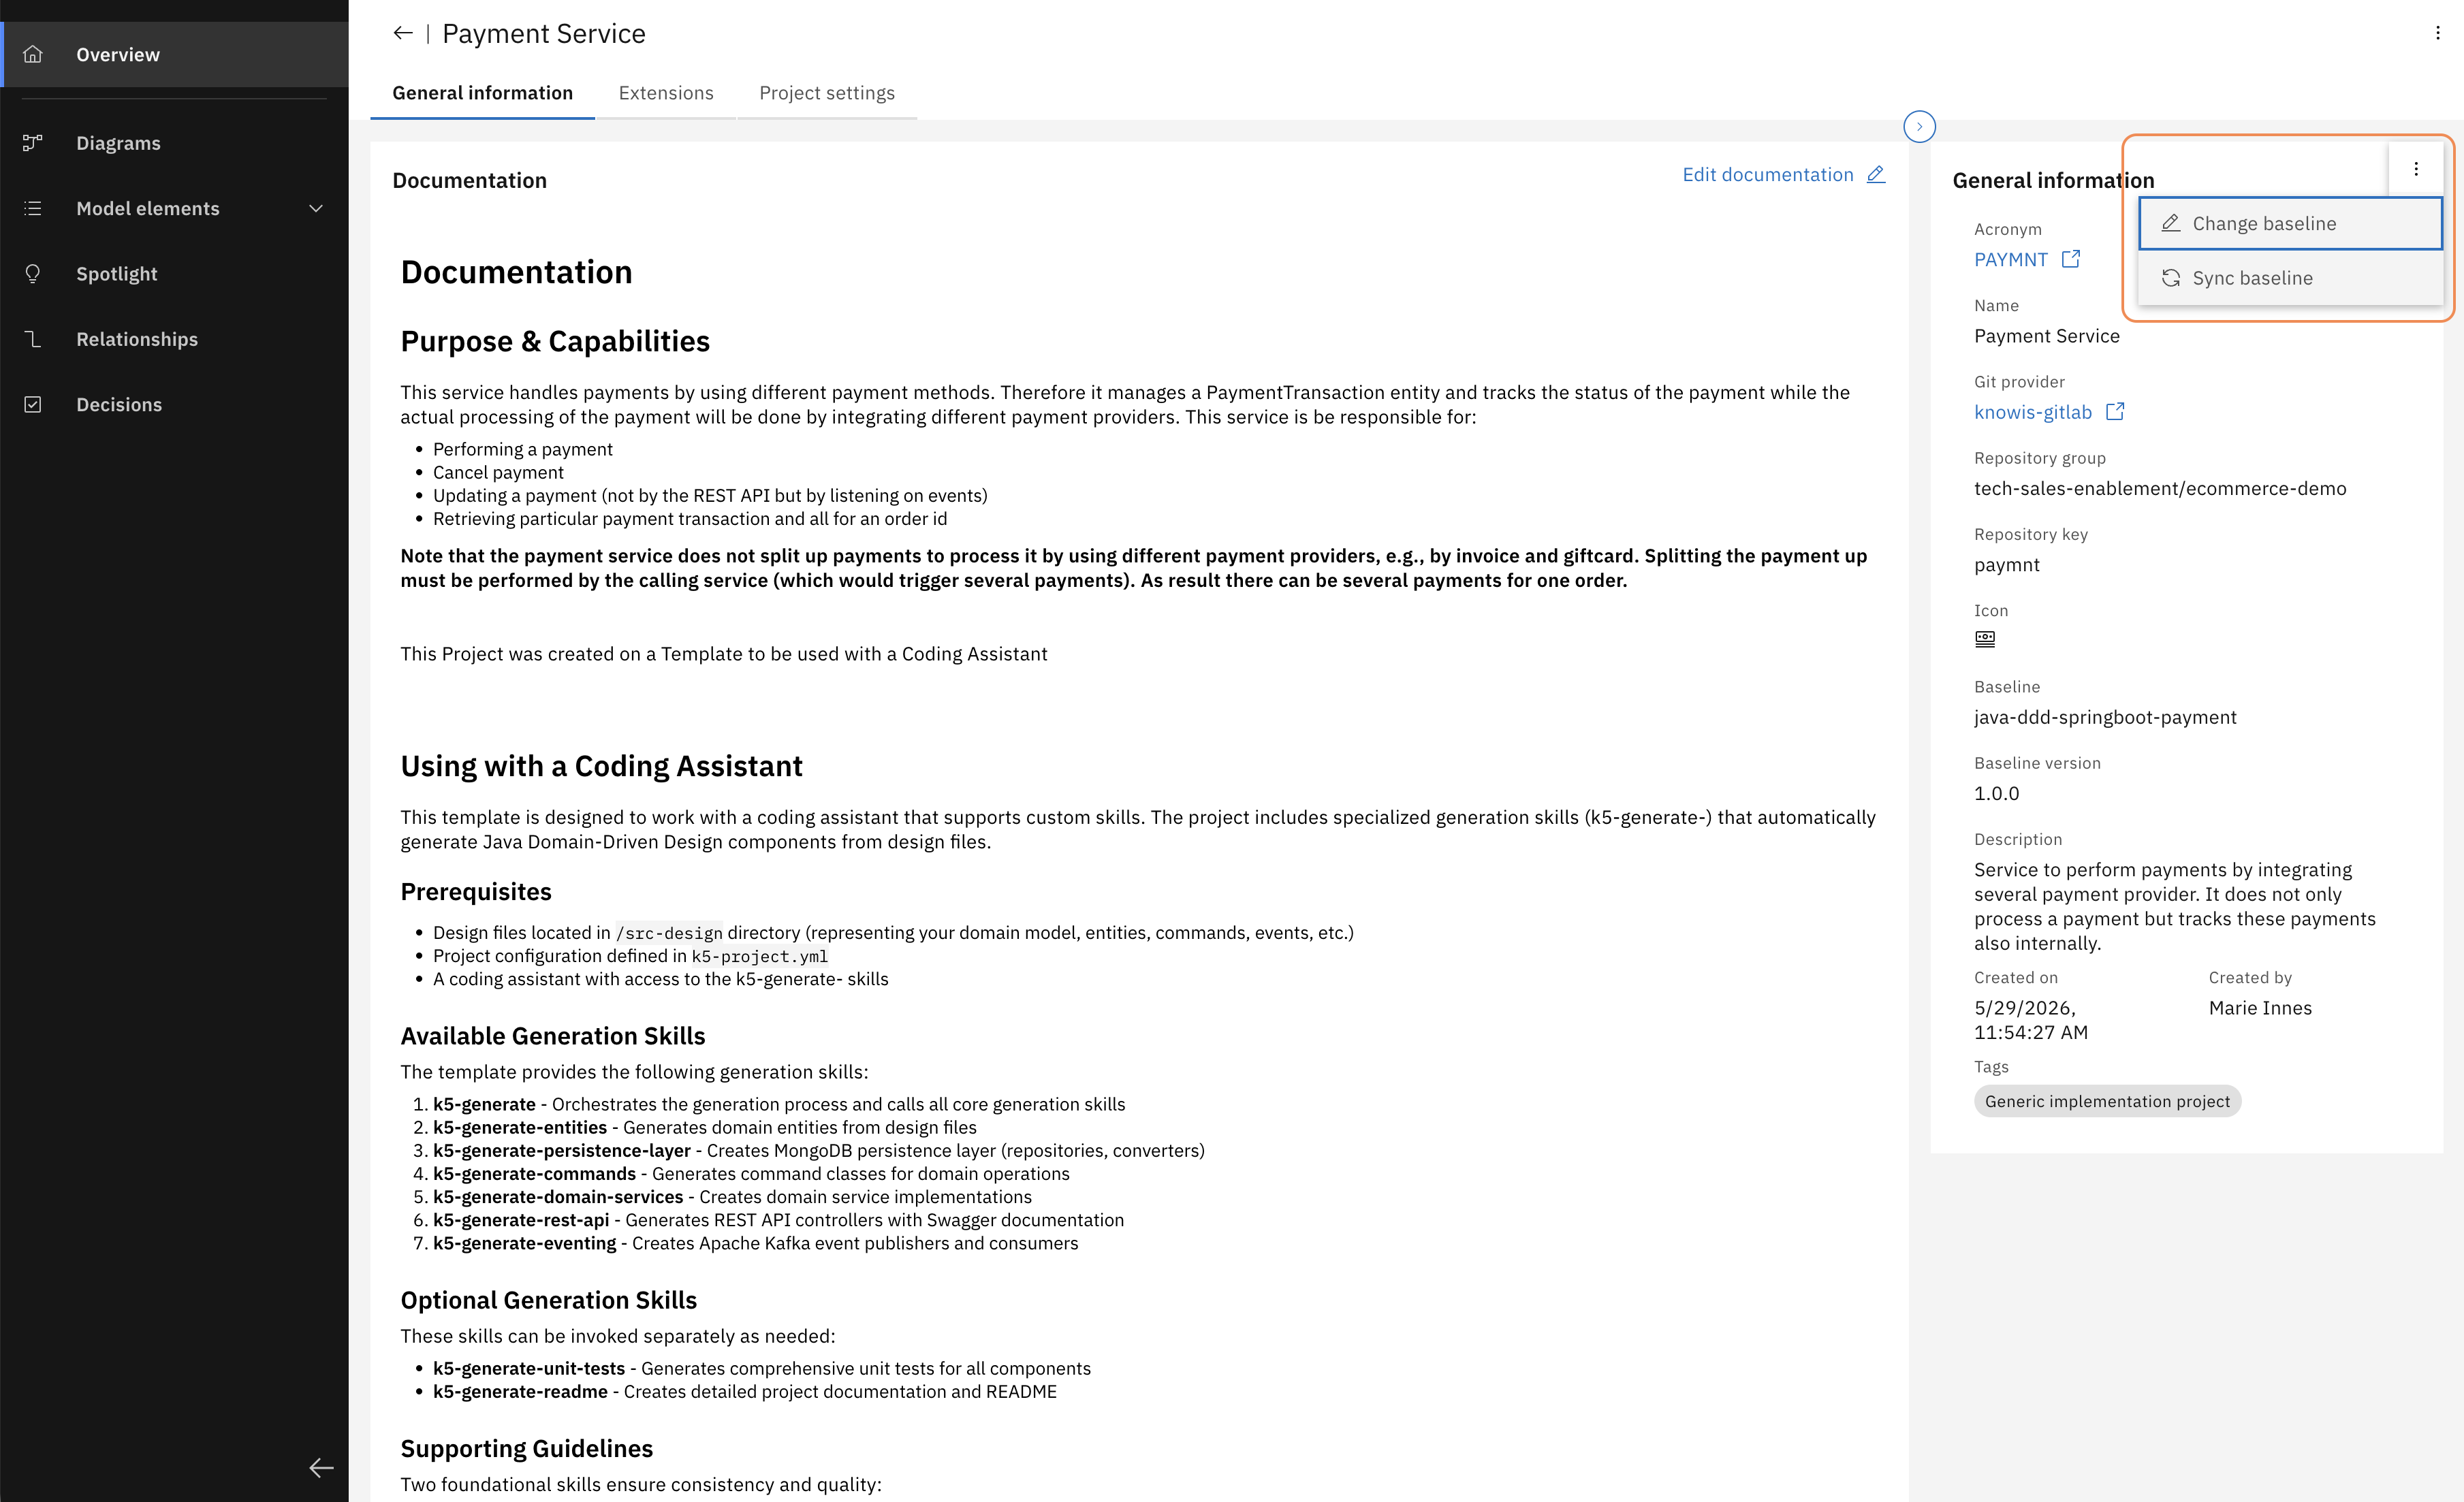
Click the three-dot menu at the top right of the General Information panel and select "Change baseline".
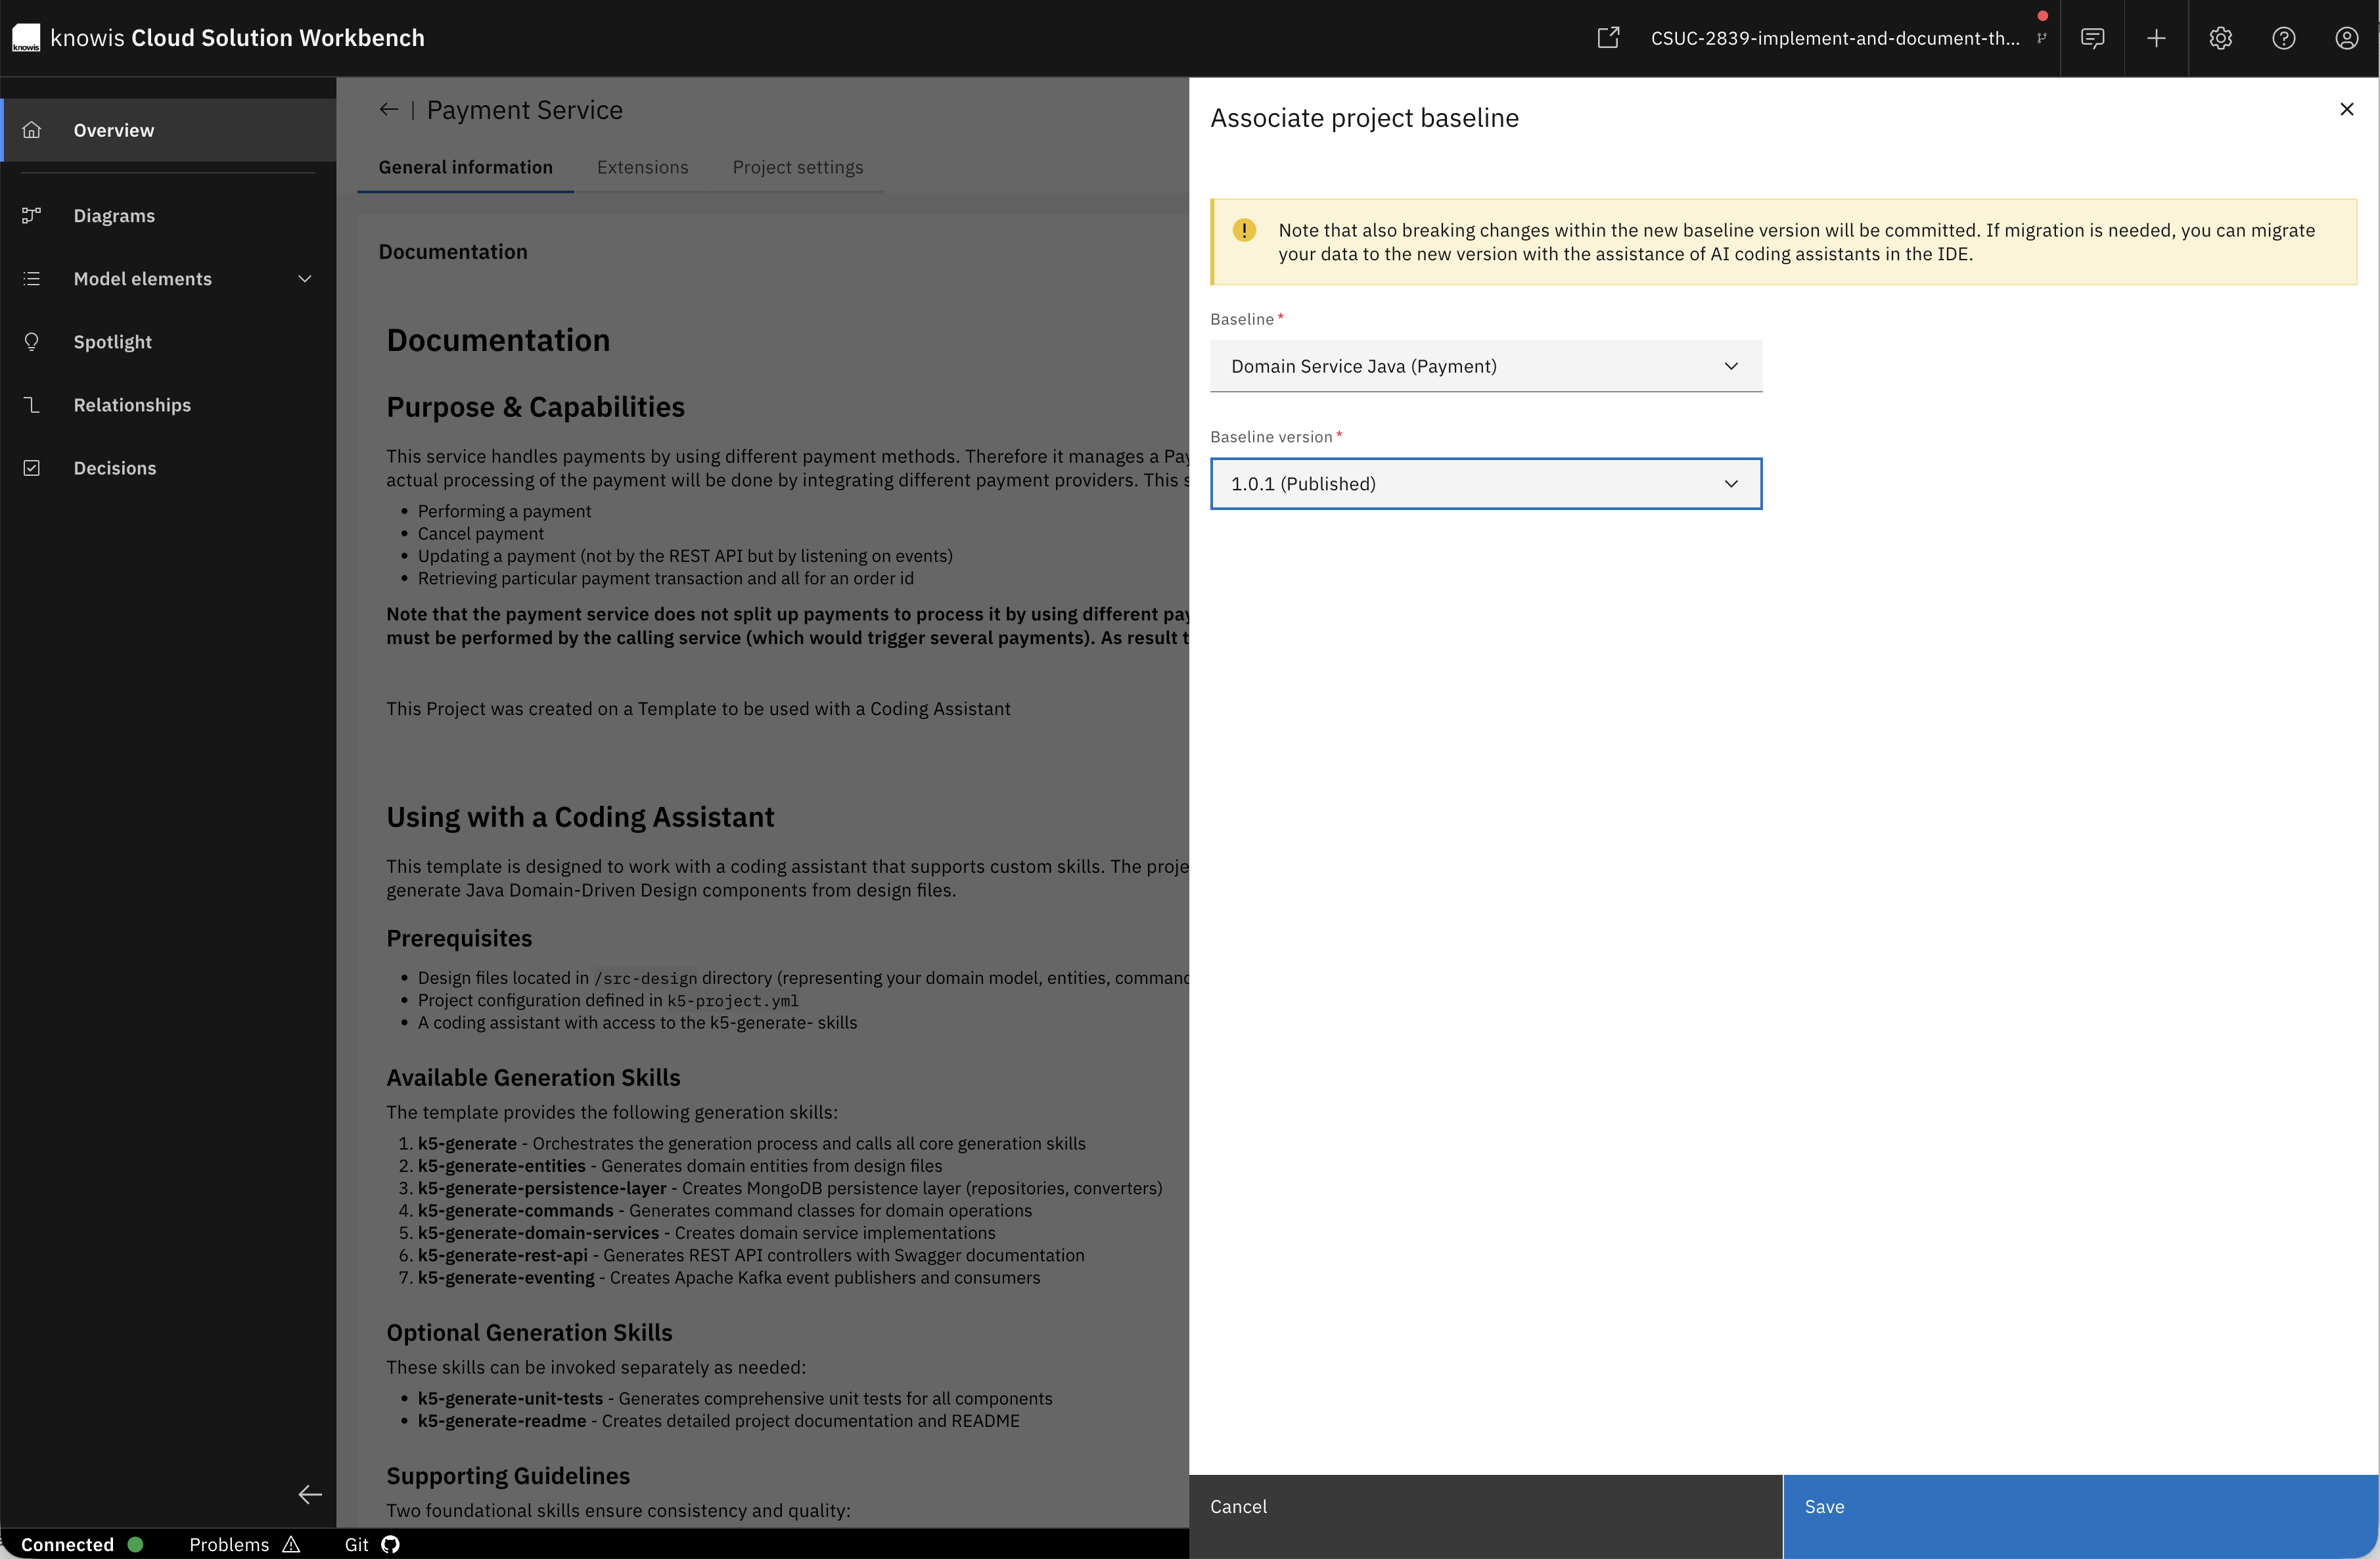
The "Associate project baseline" modal opens. Select your updated baseline version (1.0.1) from the dropdown and click "Save".
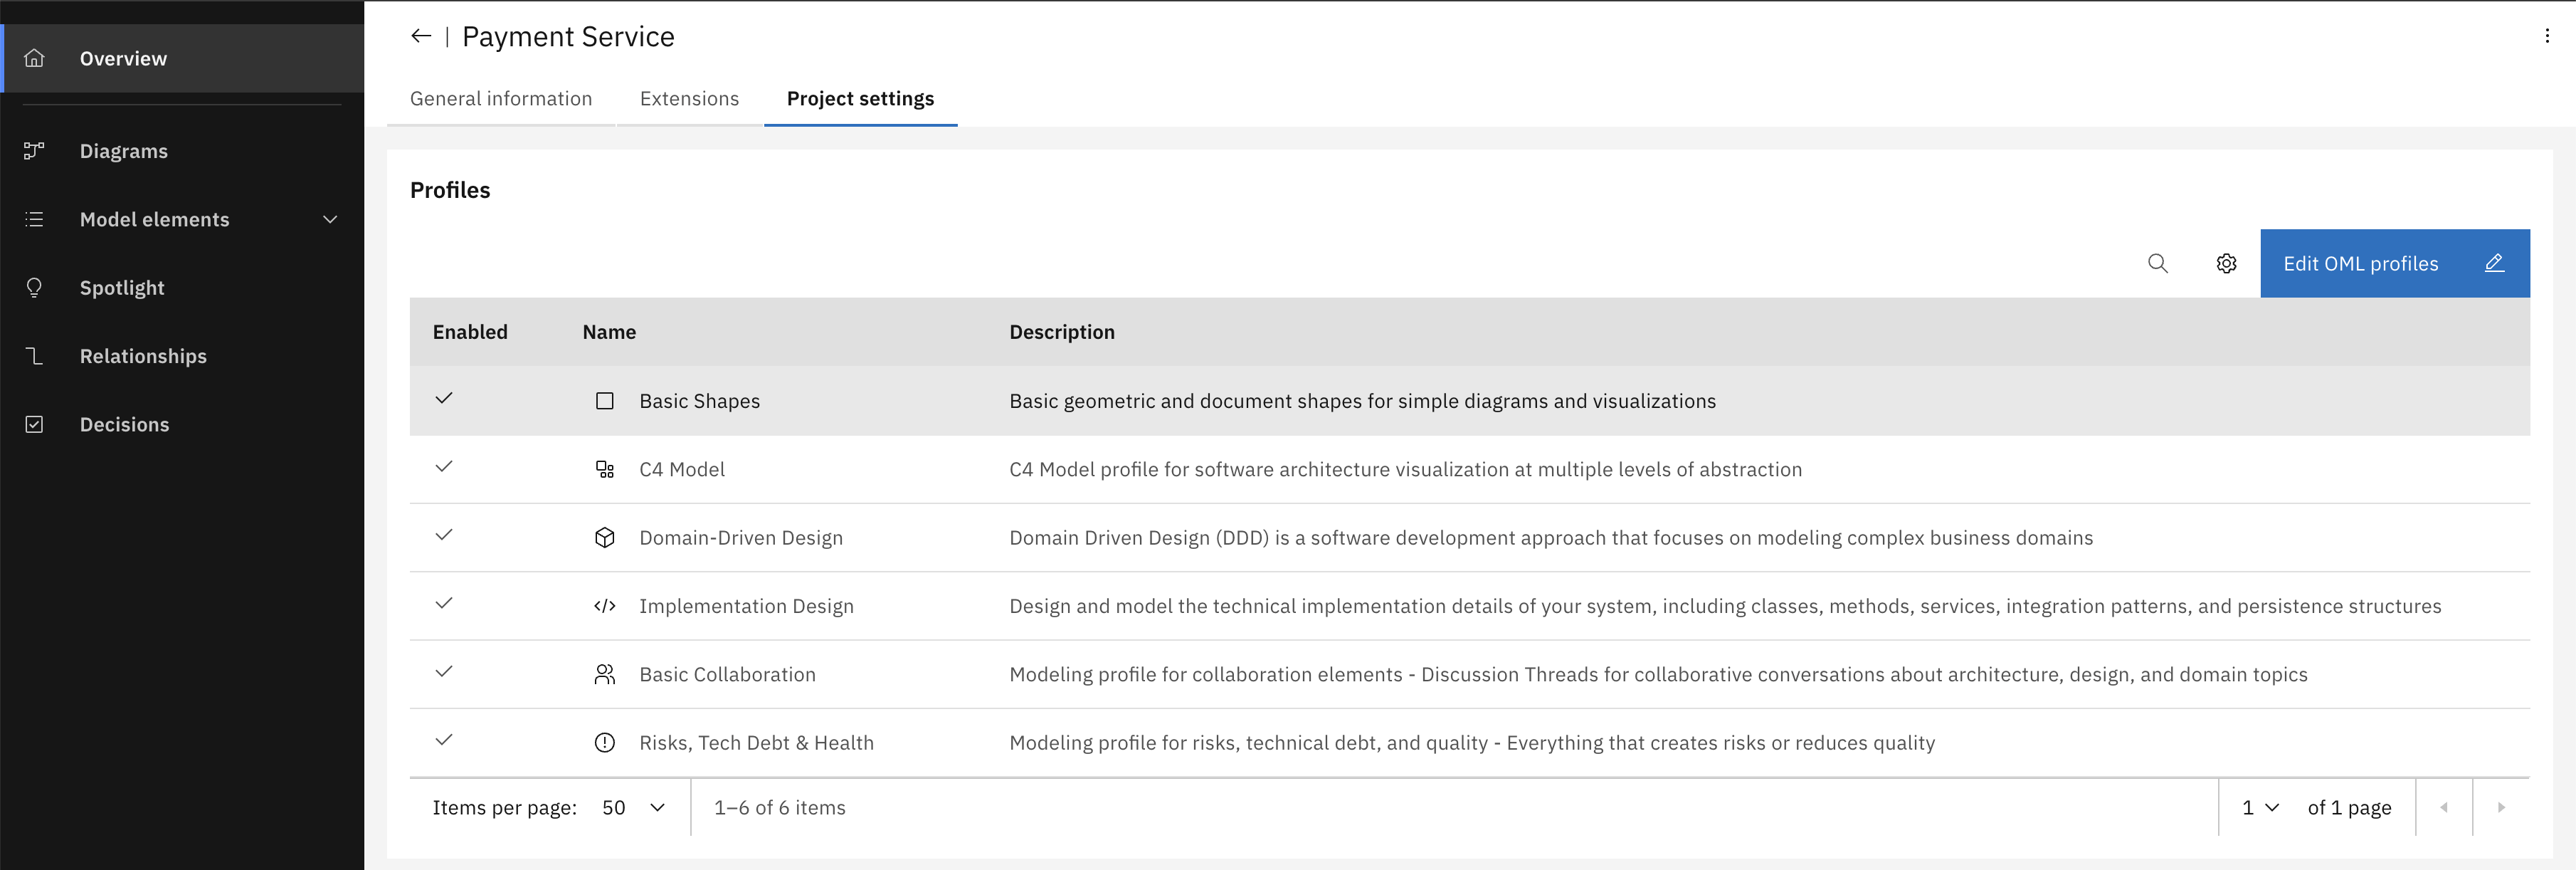
Navigate to "Project settings" and open the "Profiles" tab. Before the update, the project had 6 profiles enabled.
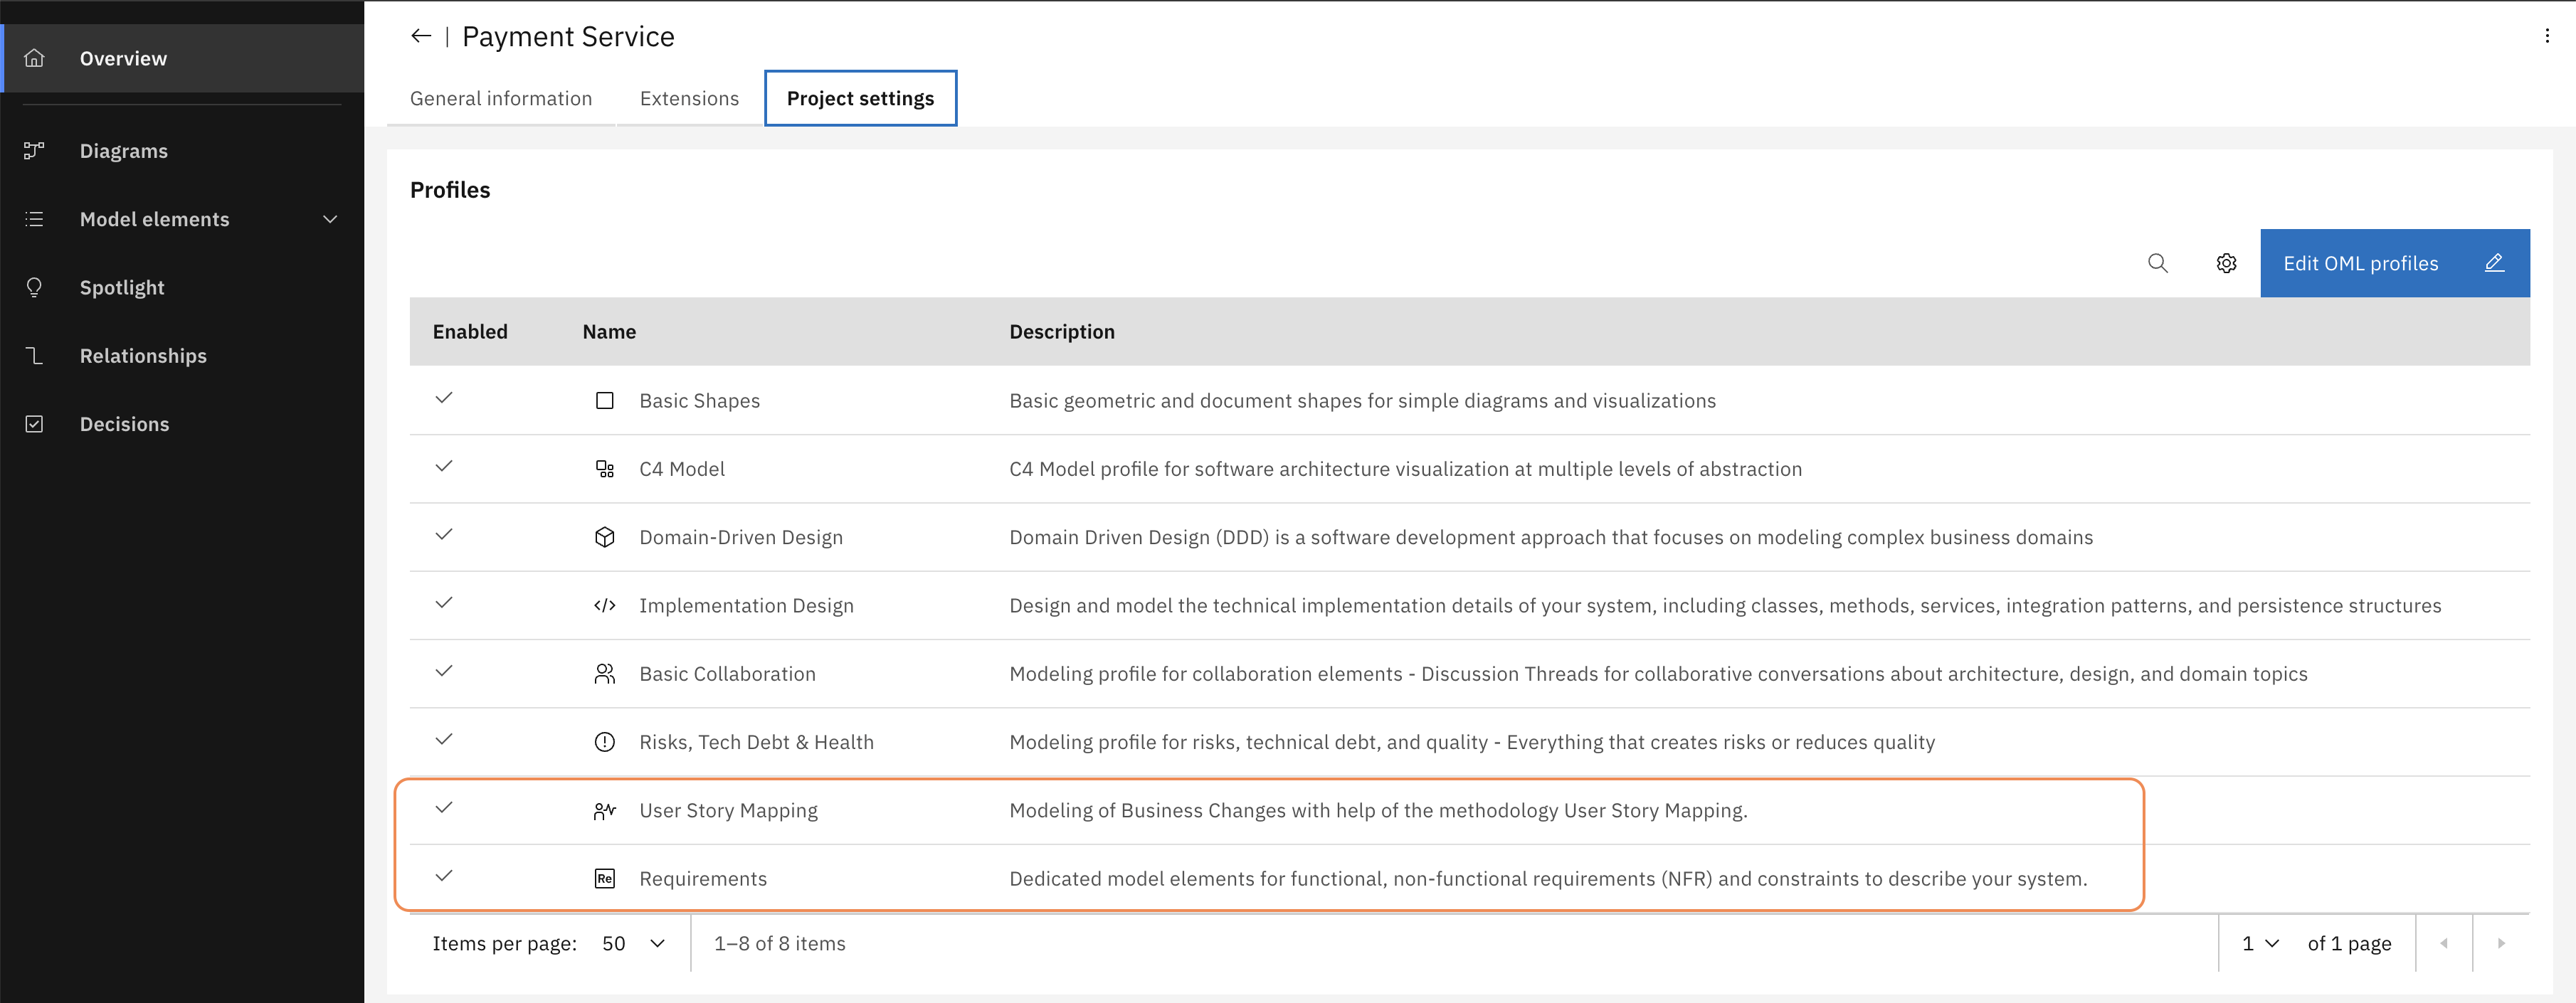
After switching to the new baseline version, two new profiles appear: User Story Mapping and Requirements. Both are enabled automatically.
The Payment Service now understands user stories, non-functional requirements, and constraints. Time to use them.
Step 4 — Model the requirements
The baseline work is done, the new vocabulary is in place. Let's put it to work and see what this enables us to do. You will add the product owner's user story and the architect's constraints directly to the Payment Service design — attached to the component they govern.
Open the Payment Domain diagram of the Payment Service and open the "Add new elements" menu (+ on the left side of the canvas).
The "Add new elements" panel now shows two new sections: Requirements and User Story Mapping. These are the profiles you added in Step 3 — the vocabulary is in place.
Put yourself in the product owner's shoes first, then switch to the architect's perspective.
The product owner opens the diagram and adds a User Story — their way of capturing what the customer needs:
- Title:
Pay with gift card - Summary:
As a customer, I want gift card payments to complete without noticeable delay at checkout, even during peak season.
The architect sees the same requirement and translates it into something the system has to guarantee. They add a Non-Functional-Requirement:
- Title:
Max. API response time - Summary:
Response Time < 200ms - Category:
Performance - Metric:
< 200ms
And a Constraint to go with it:
- Title:
Concurrent users - Summary:
< 10.000 concurrent users - Constraint type:
Concurrency constraint - Value:
max. 10,000 concurrent users
All three connect to Execute Payment — the domain service that will have to deliver on these requirements.
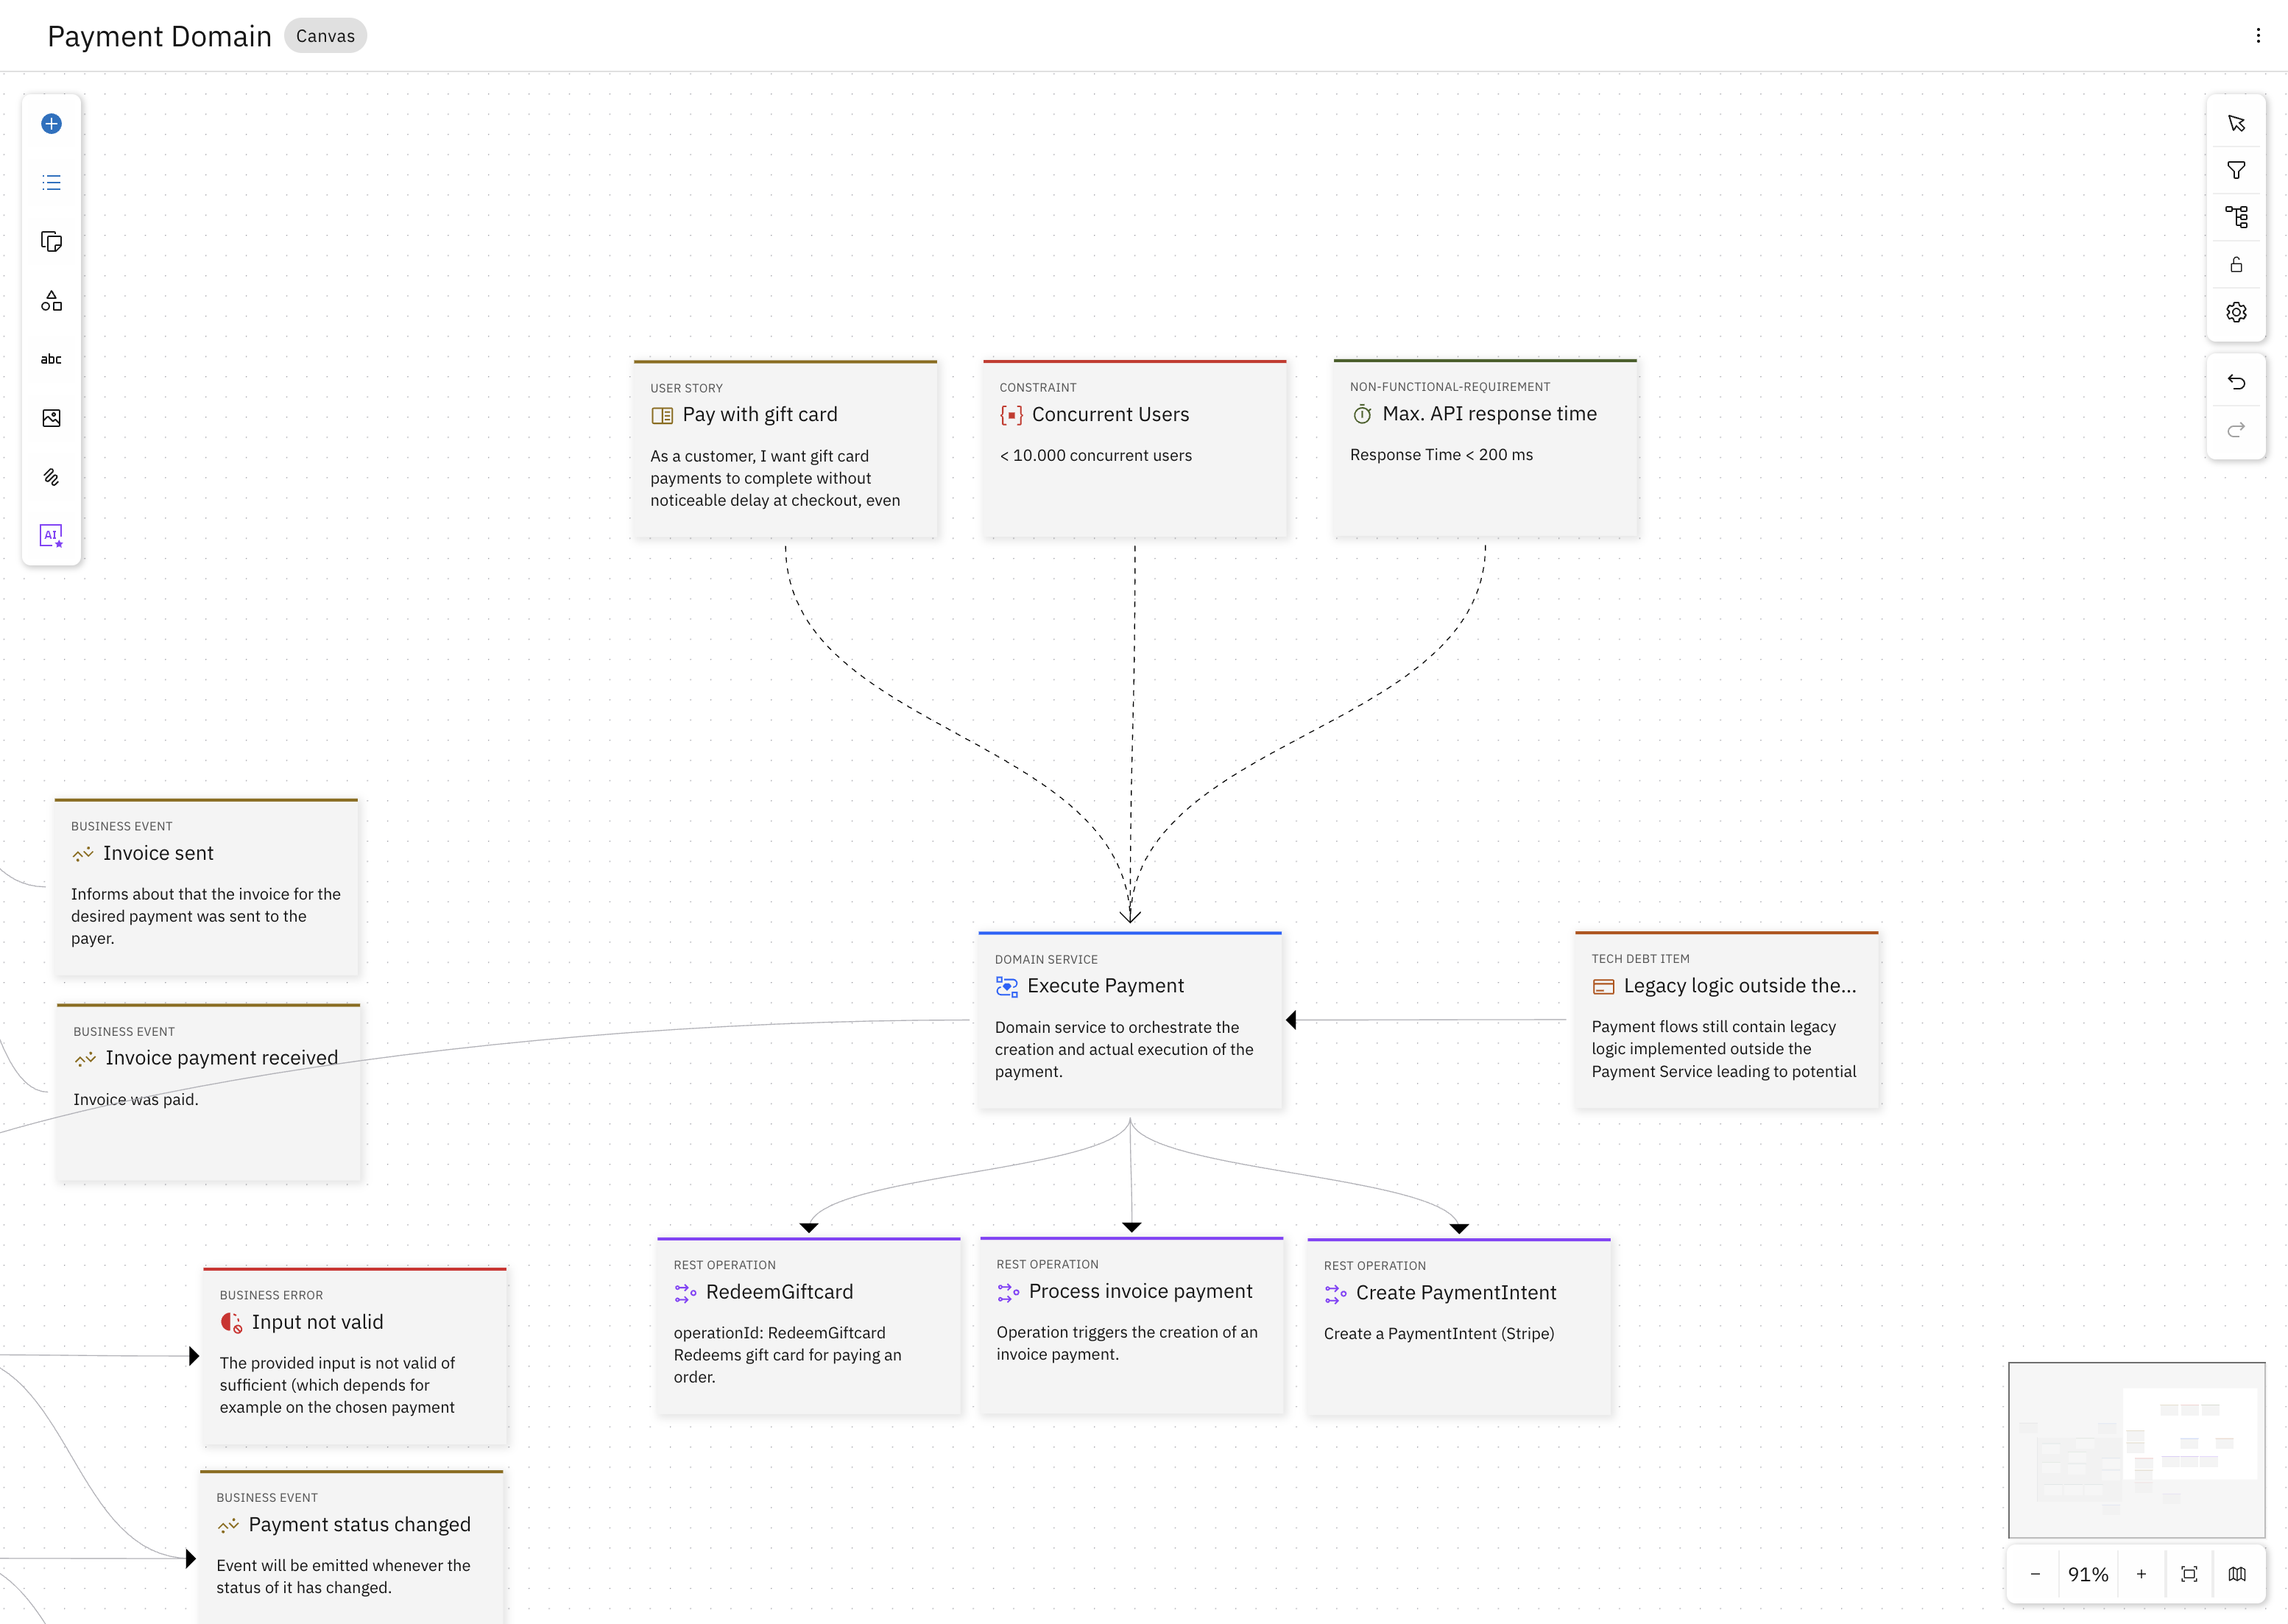
The finished diagram: the product owner's user story and the architect's constraints are now part of the service design, attached to the component they govern.
The product owner added their user story, the architect added their constraints — each in the language that makes sense to them, without learning the other's notation. Extending the vocabulary made this possible: adding two OML profiles to the project's baseline allows to now express concepts from different perspectives.
Step 5 — Ask what the model knows
Open the Design Assistant in Workbench by clicking the chat icon in the top right.
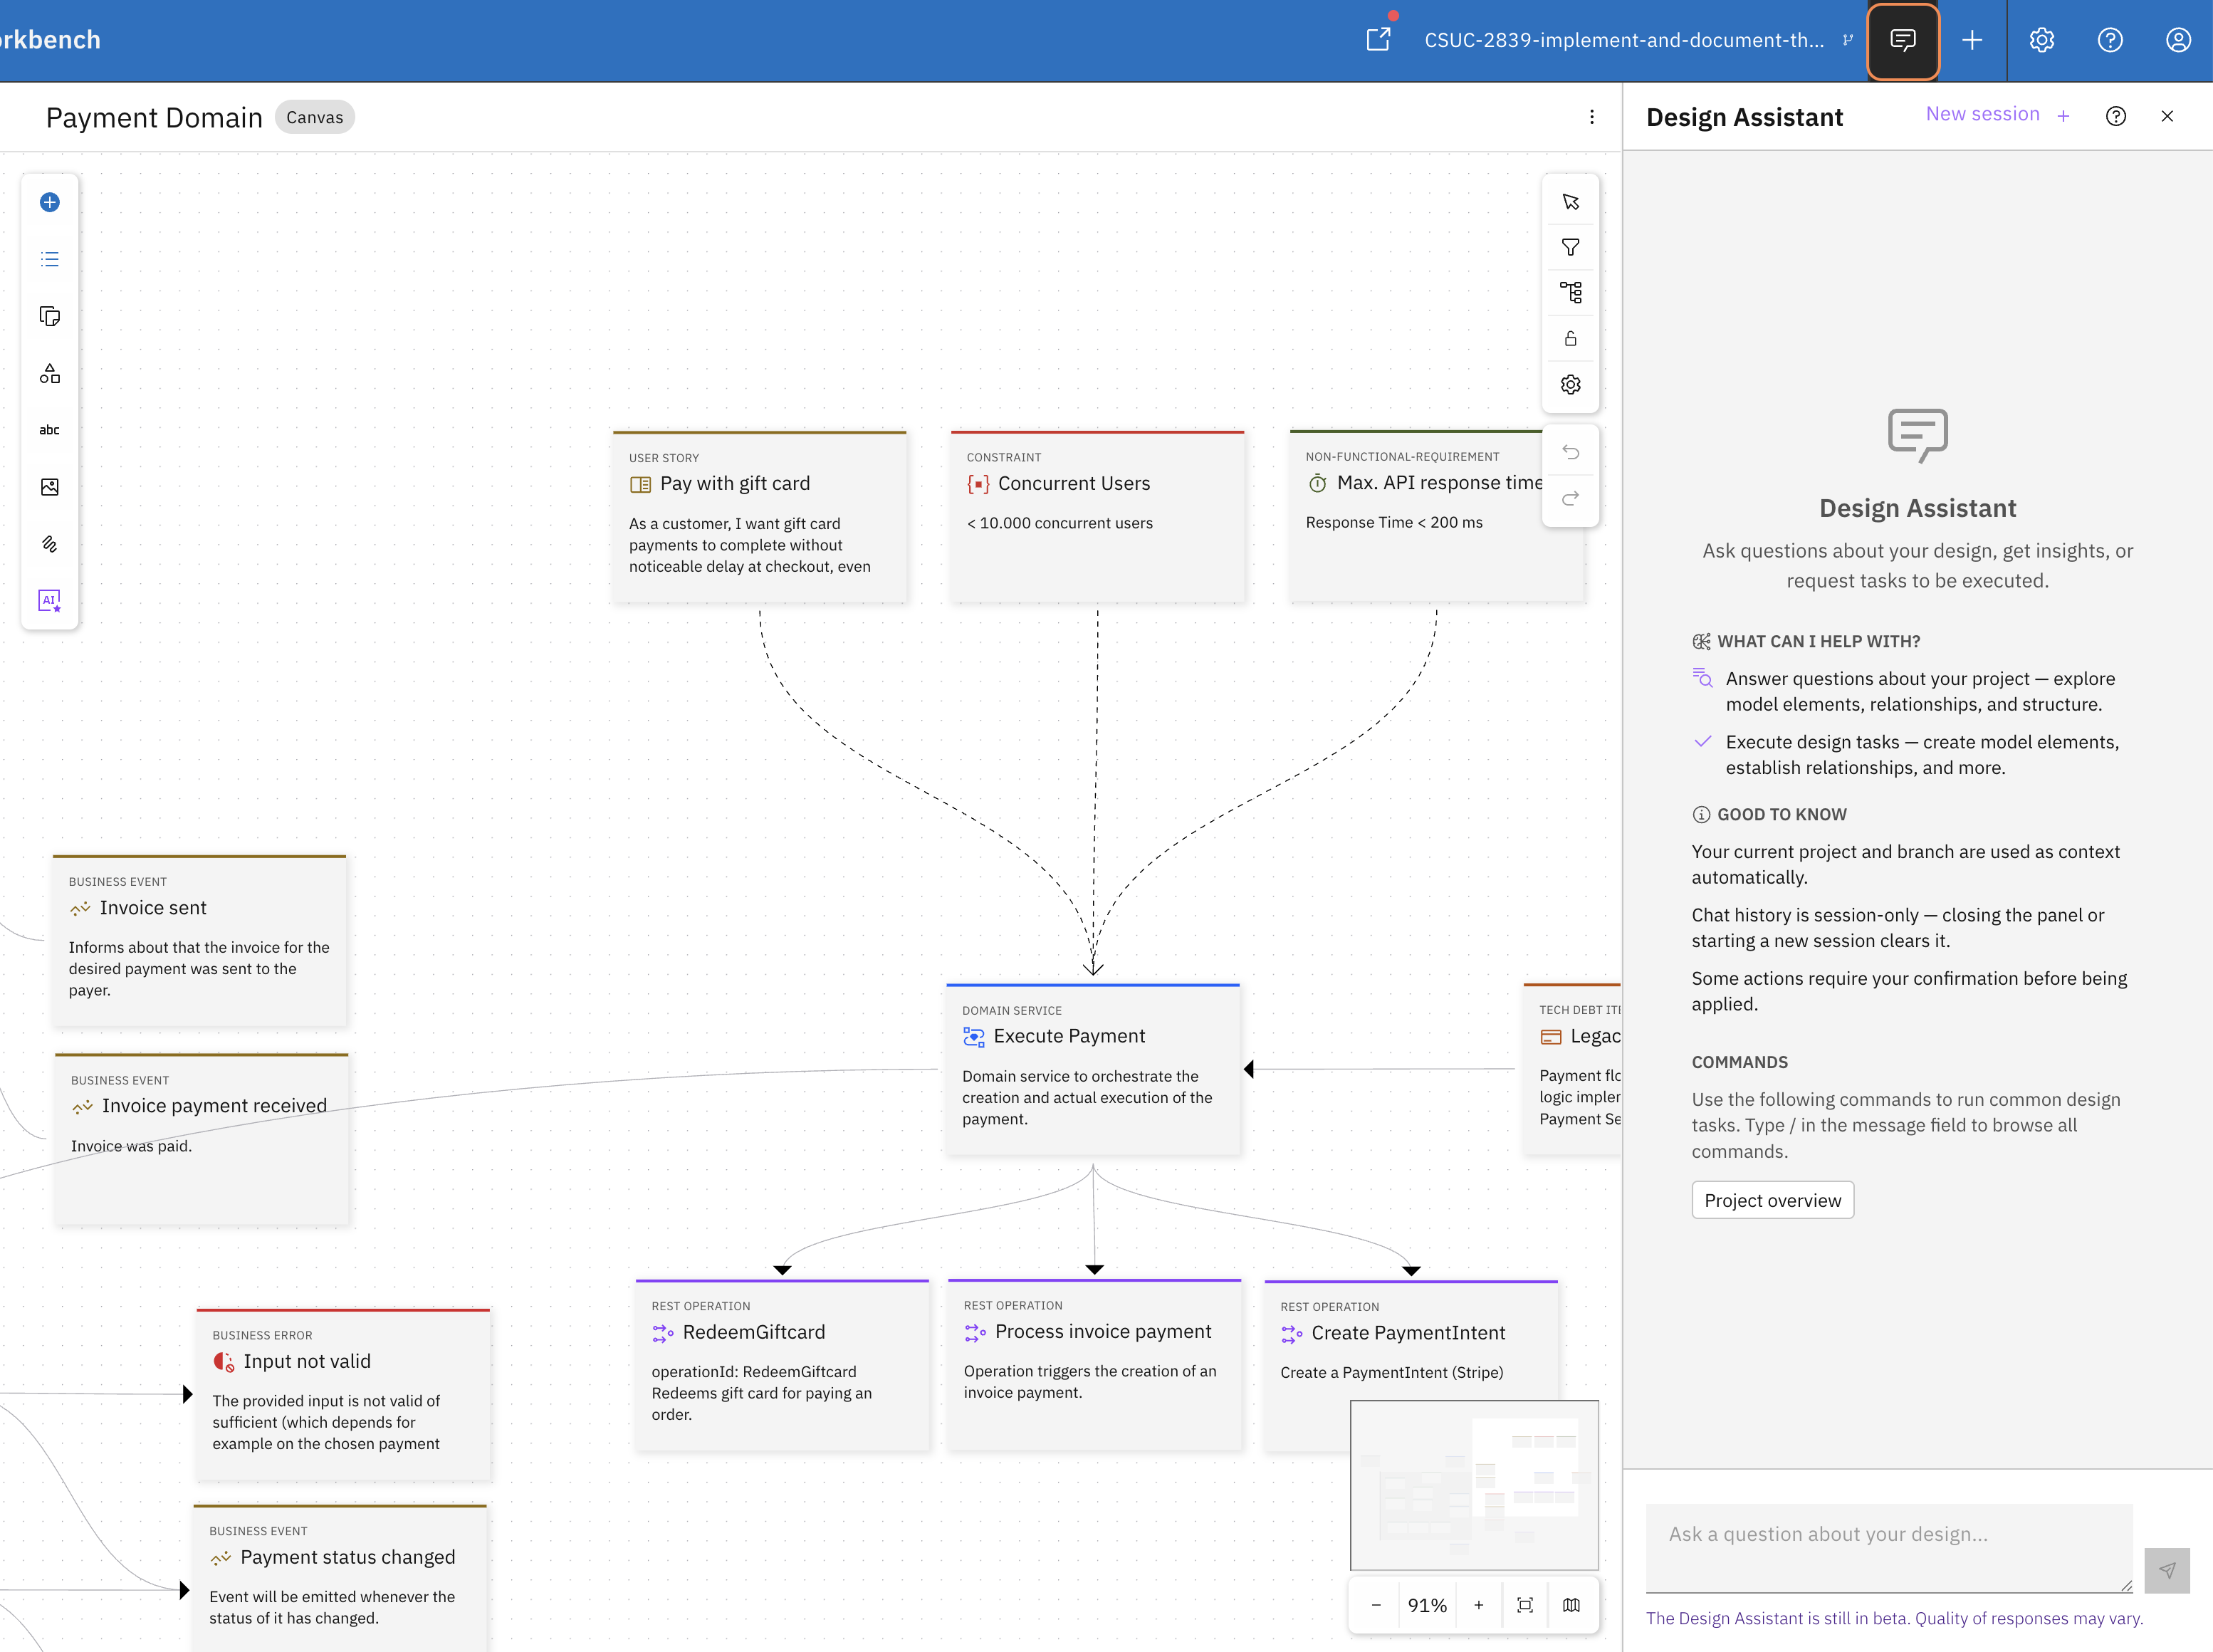
The Design Assistant opens as a panel next to your diagram. It uses the current project and branch as context automatically.
Try this prompt:
"Which Requirements (functional like User Stories and non-functional) need to be fulfilled for Domain Service 'Execute Payment'?"
The assistant finds the three elements you just added and returns them. Then go deeper:
"Give me the details of the non-functional requirement and the constraint."
It returns the actual values from the model: 200ms response time, 10,000 concurrent users — exactly what the architect entered.
The product owner's intent, the architect's constraints — both in the model, both queryable, both in the same place. That's what it means to make Workbench speak your language.
Step 6 — See it in your IDE
The Design Assistant in Workbench can read your model - but what about your Coding Assistant?
To check that, you need to commit and push the changes you made in Step 4, then checkout the Payment Service project locally.
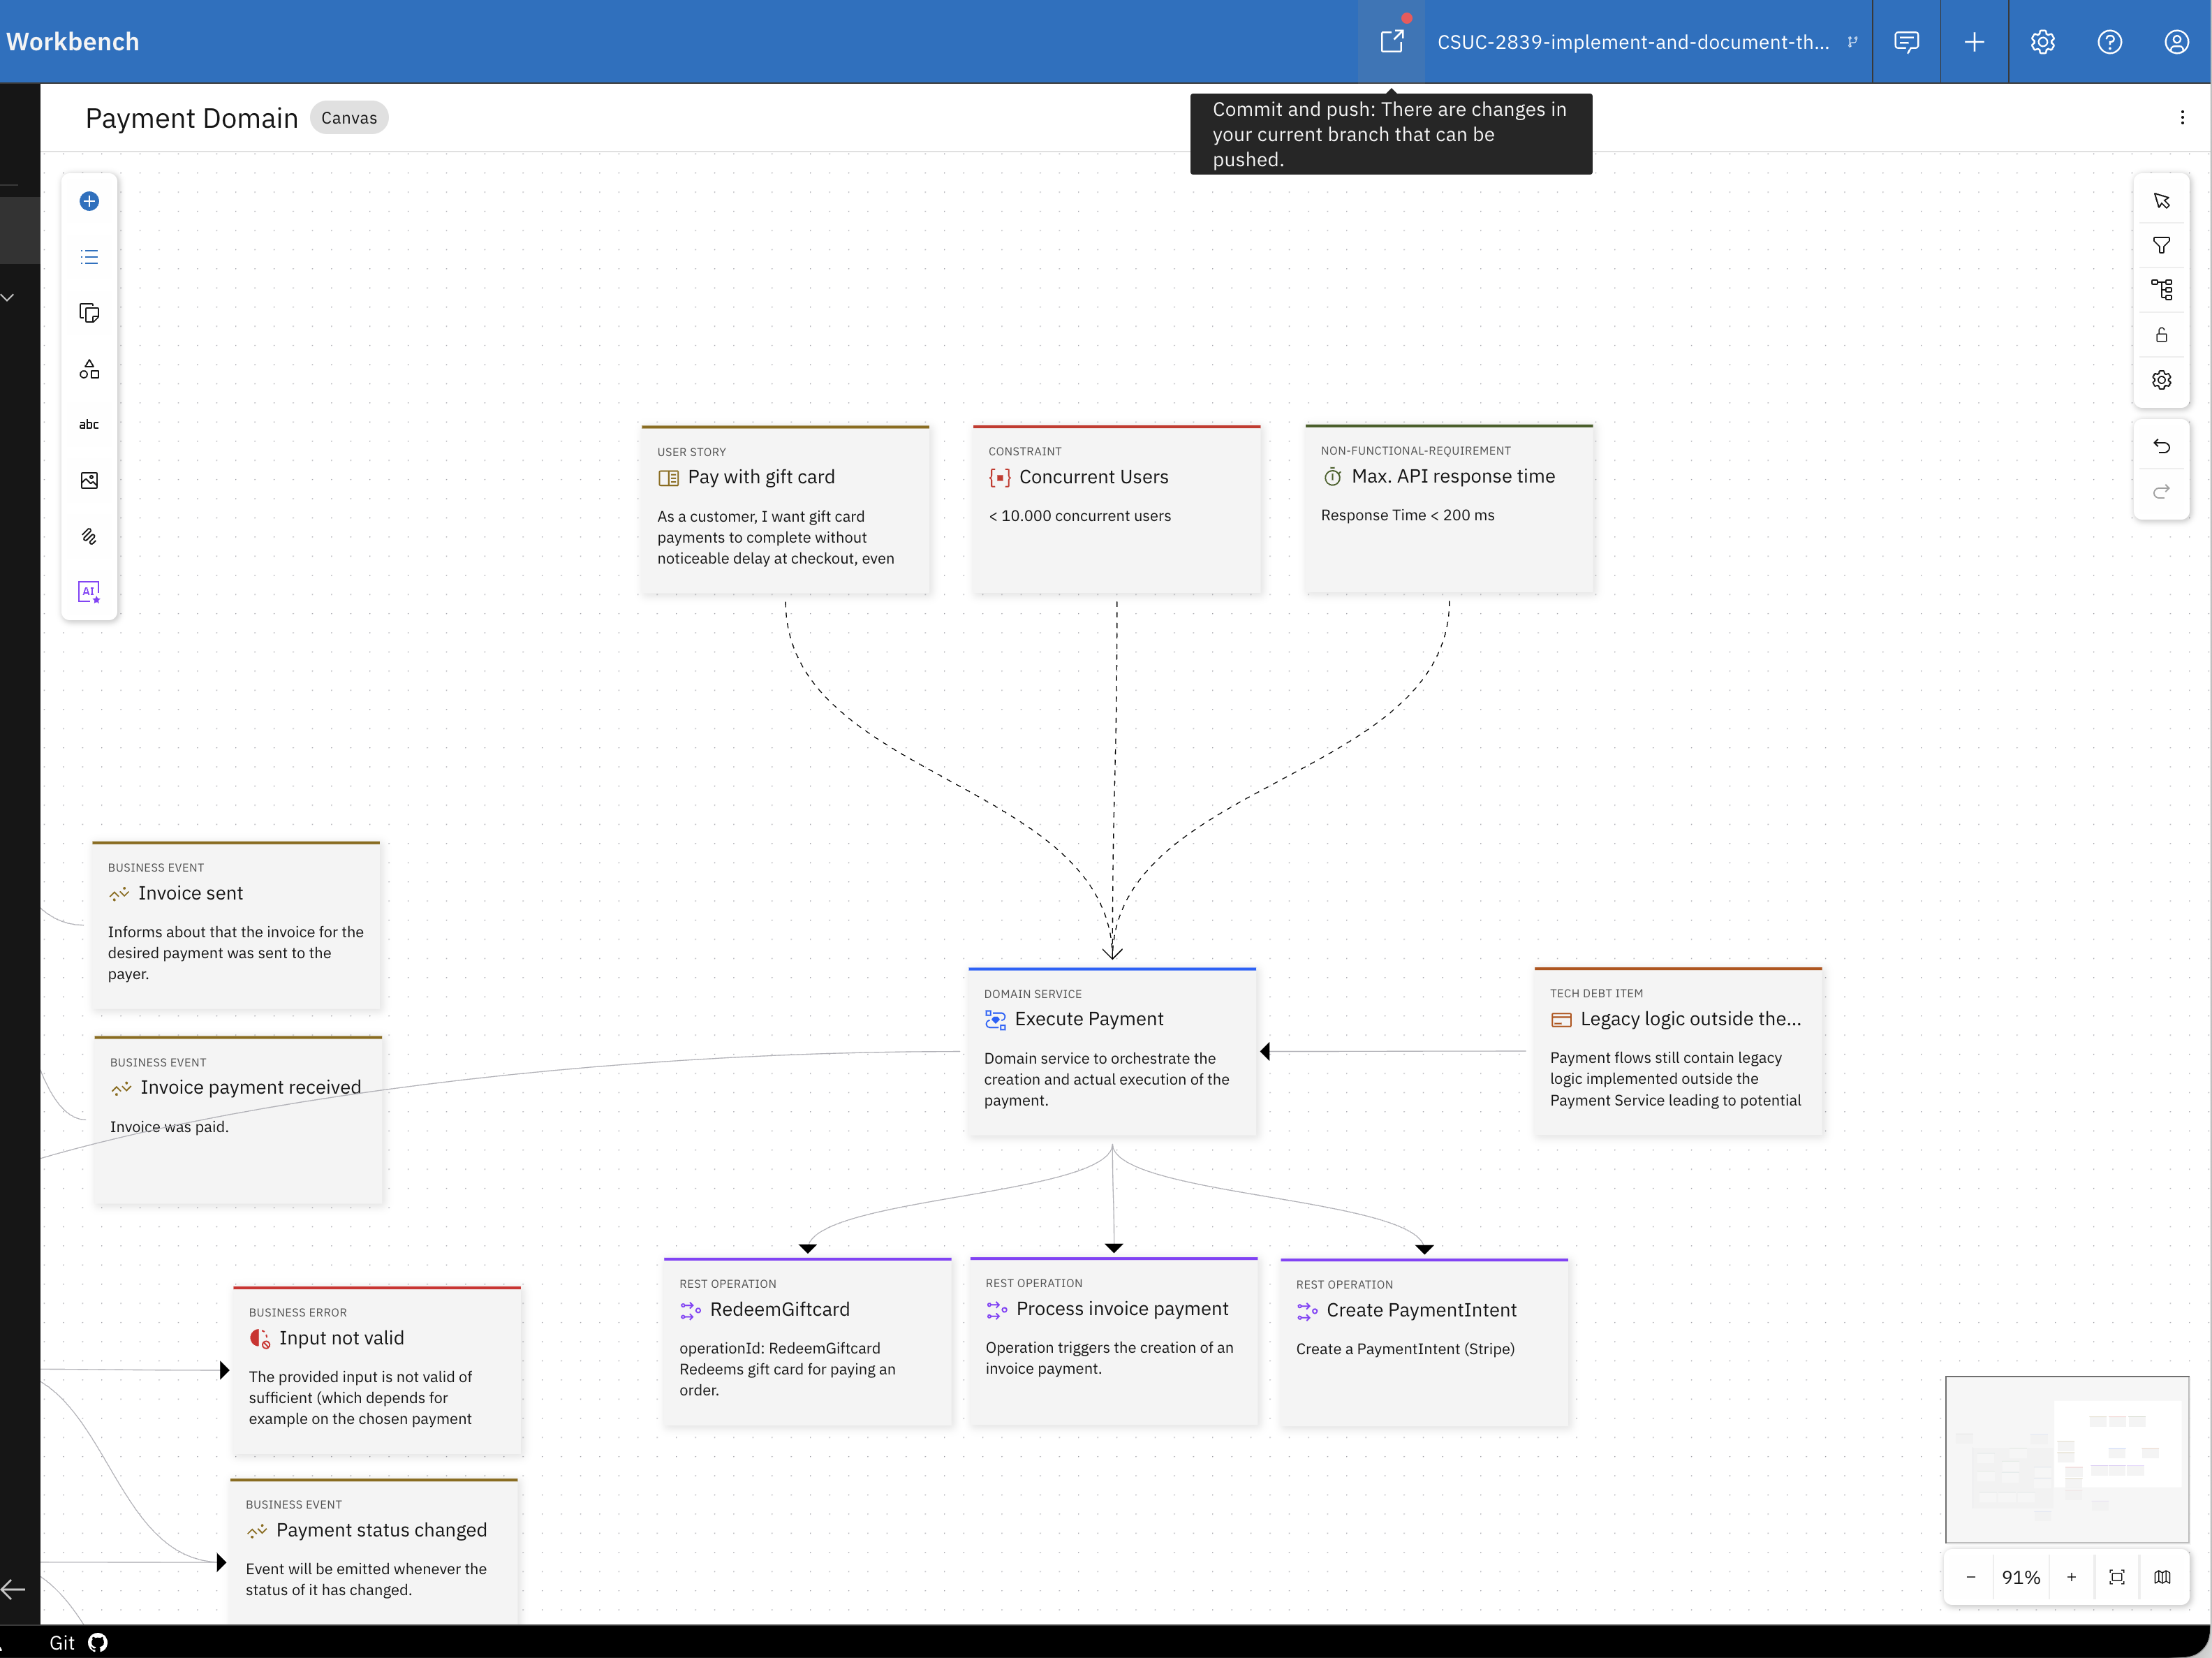
The icon in the top bar shows there are unpushed changes. Click it to open the "Commit and push" dialog.
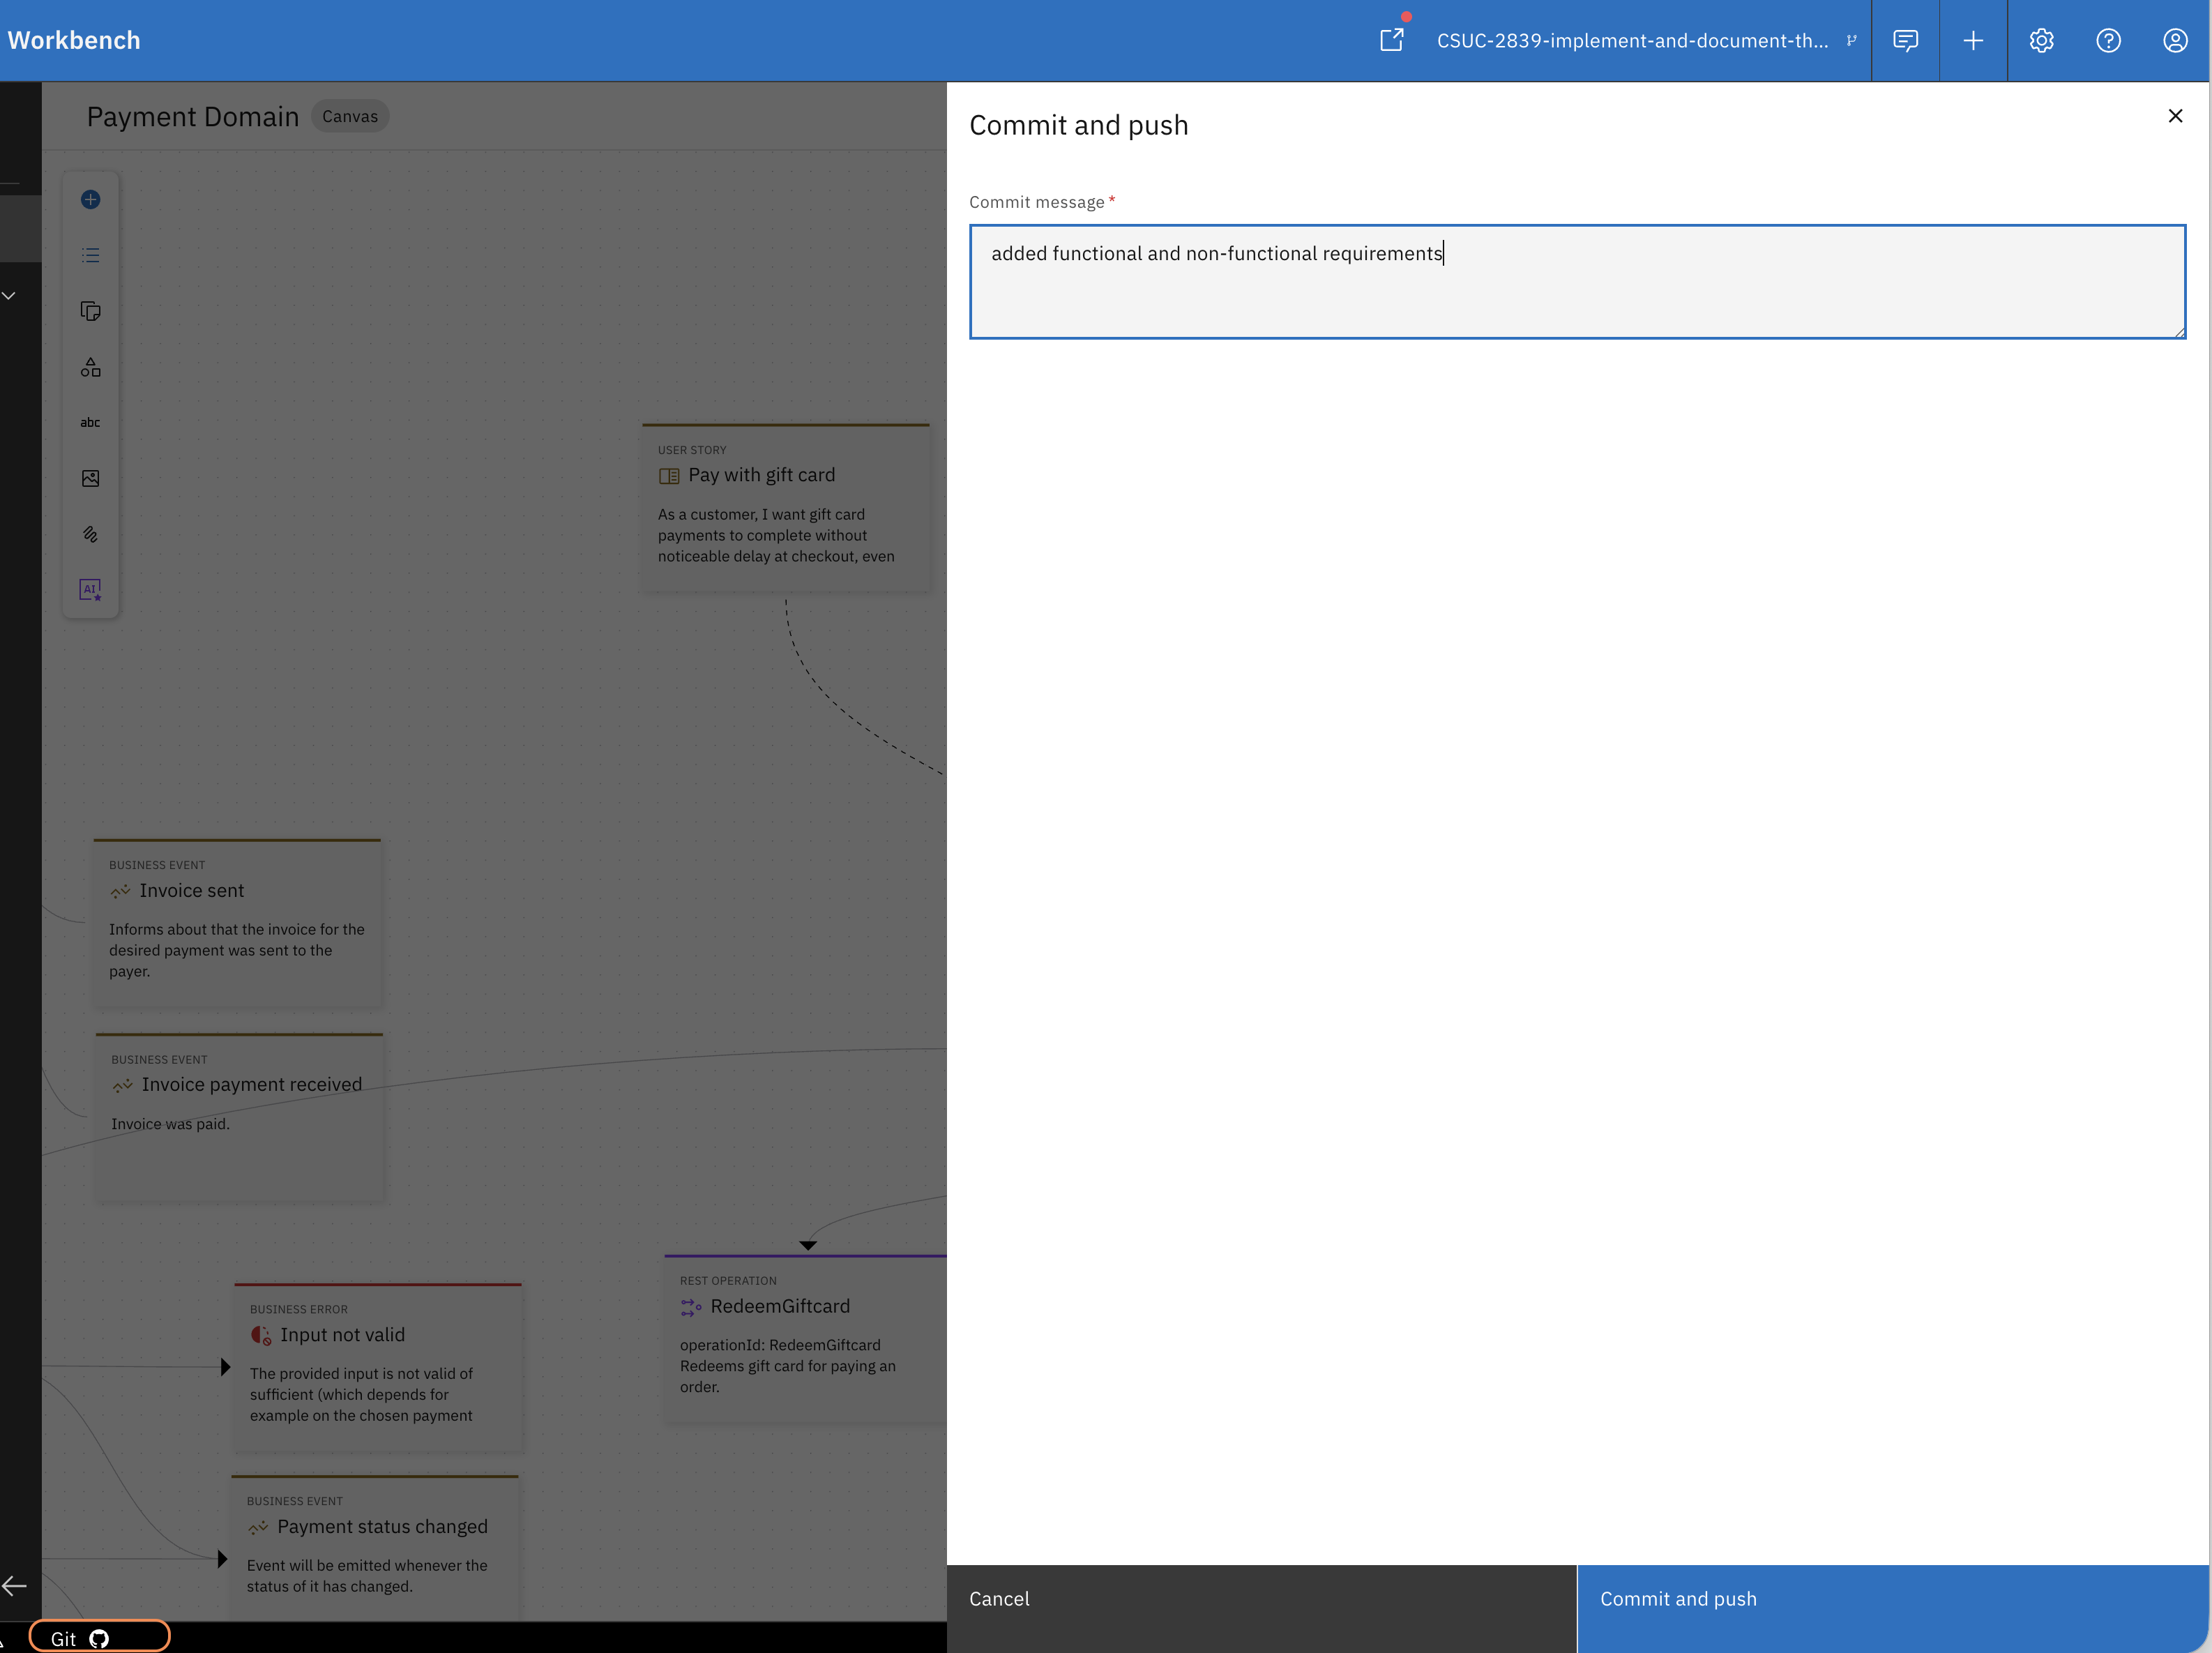
Enter a commit message and click "Commit and push". Your changes are now in the repository. Open the "Git" tab in the footer.
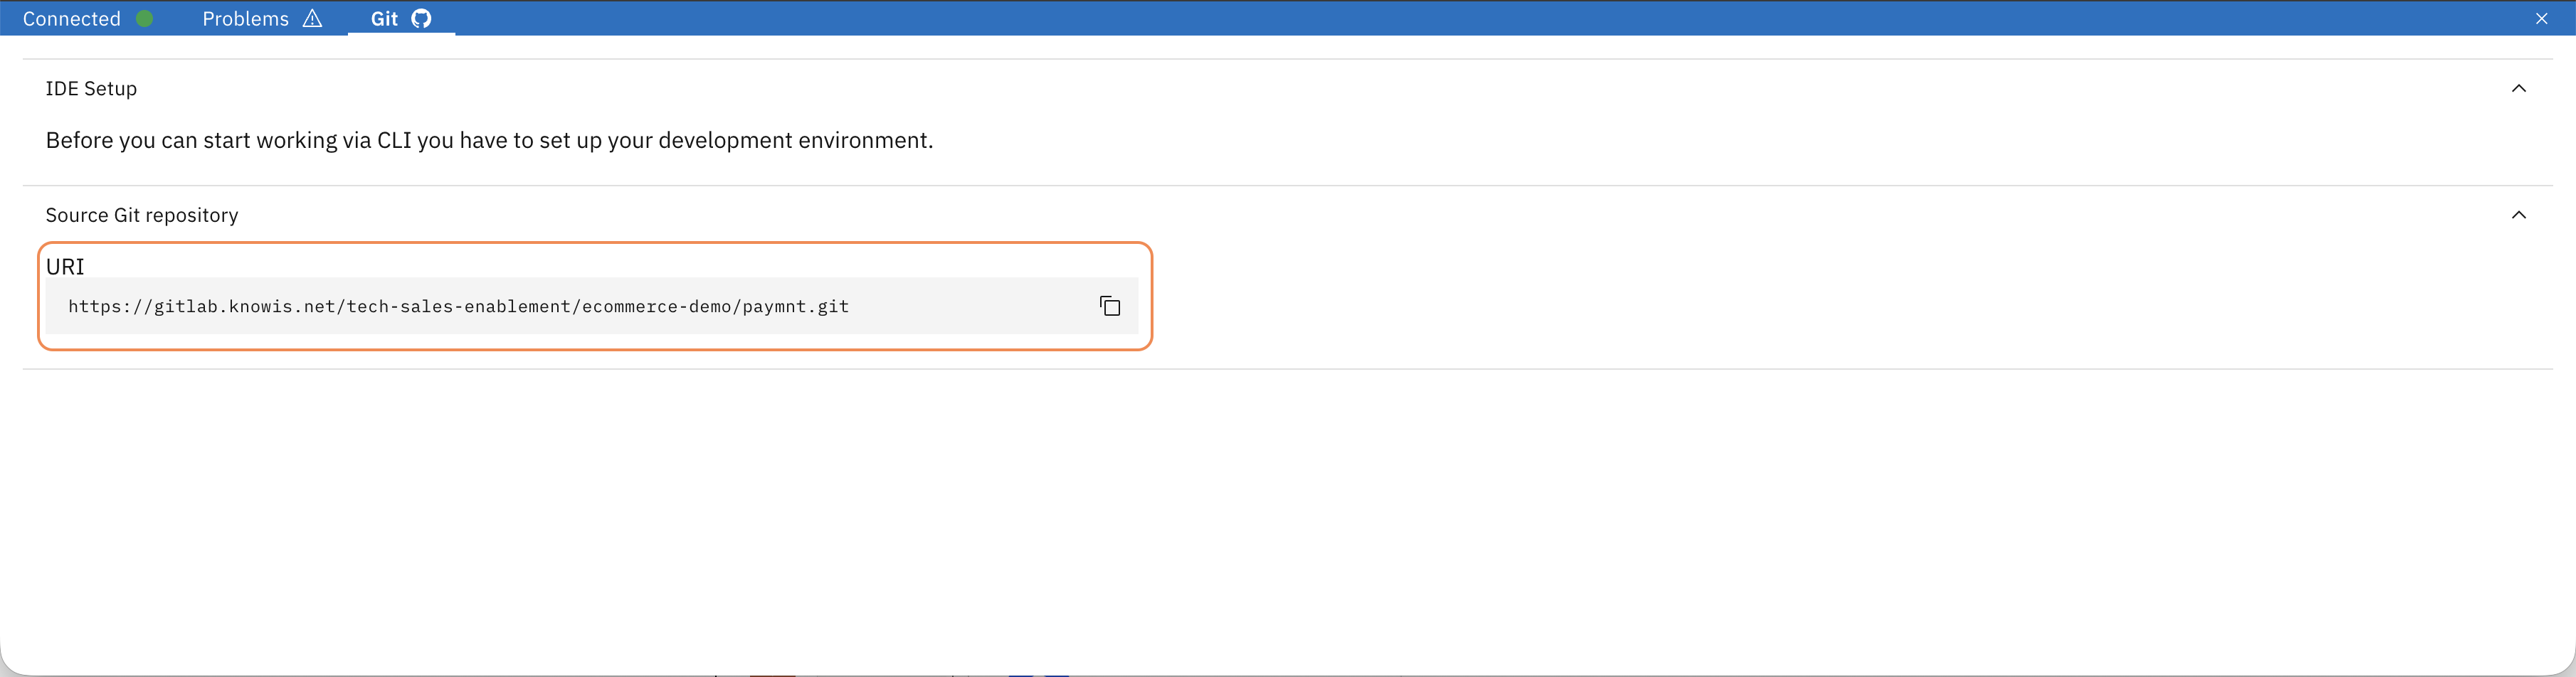
Here you can find the repository URL. Copy it — you will need it to clone the project.
To work with the Gitlab repositories provided with the trial environment on your machine, you need a Personal Access Token. If you haven't set that up, see the About your trial environment section above.
Clone the project and open it in your IDE: git clone <URL>
The design files from Workbench live in the repository alongside the code — so your coding assistant picks them up automatically, no extra setup needed.
Open ExecutePaymentService.java in your IDE and ask your coding assistant:
"Are there any non-functional requirements or constraints I should be aware of before adjusting the ExecutePaymentService?"
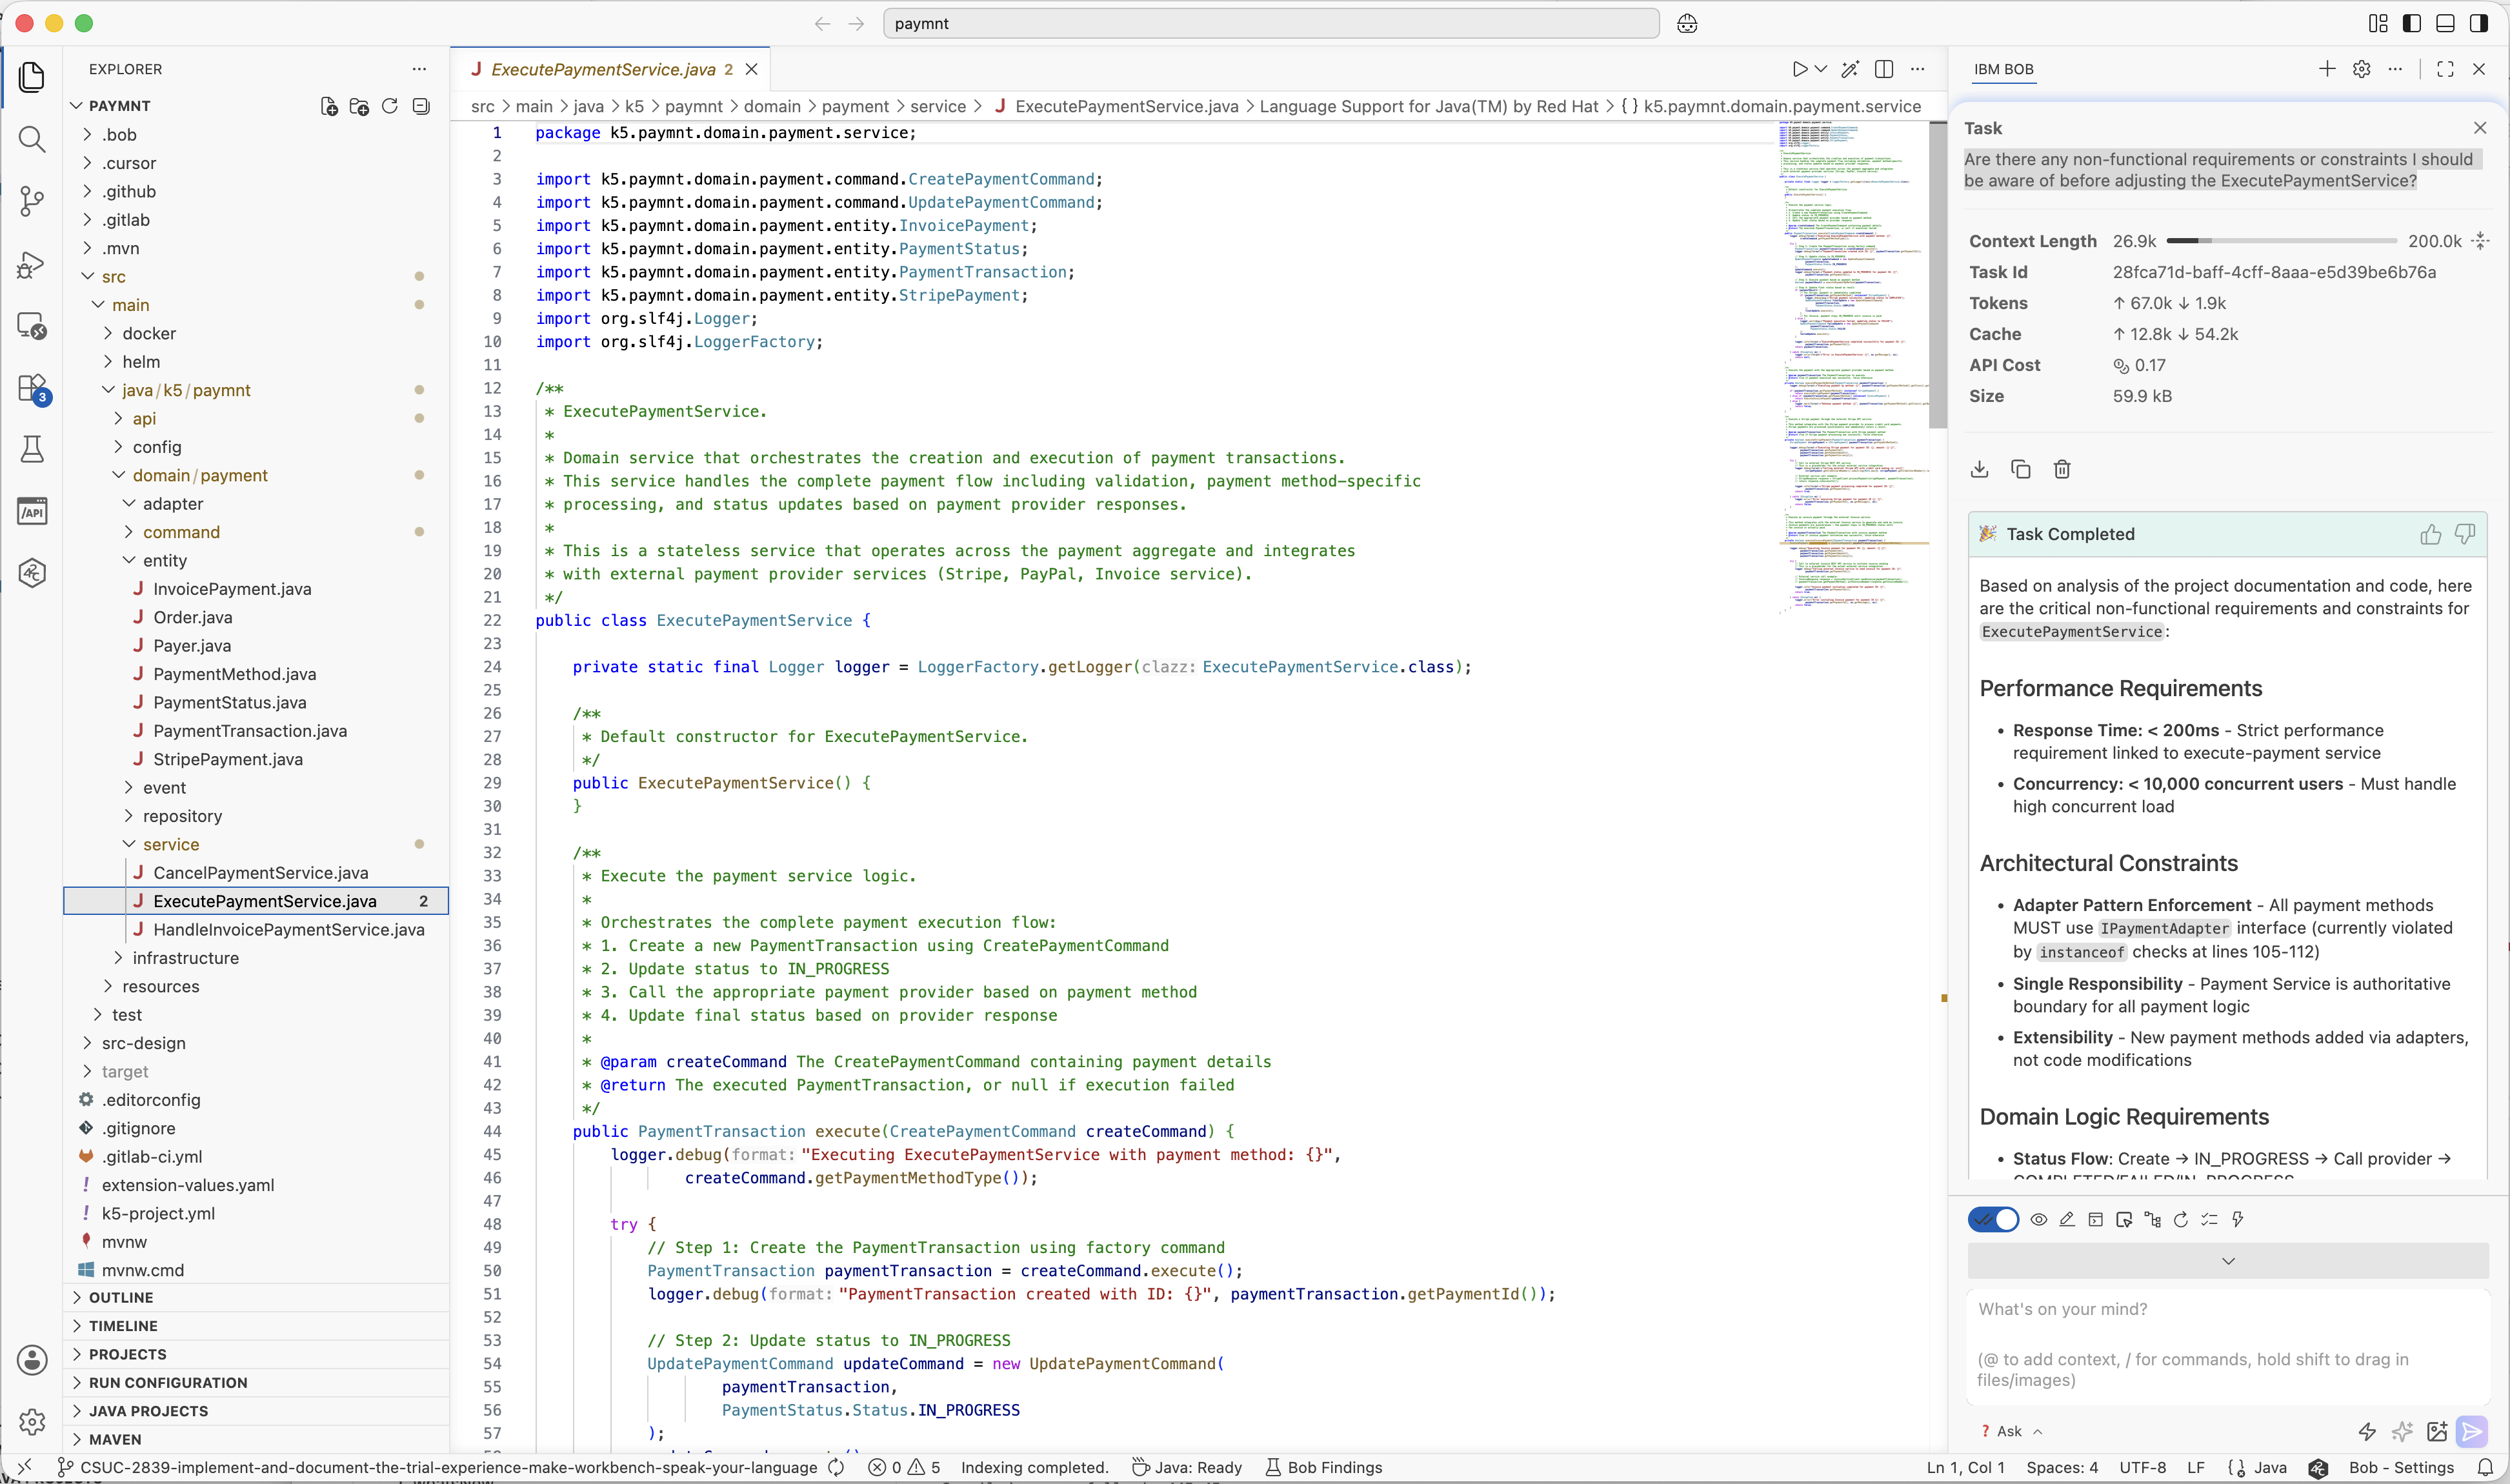
The coding assistant reads the design files and returns the requirements defined by the product owner and architect — performance constraints, concurrency limits, architectural decisions — without being told they exist.
The Product Owner's user story. The architect's NFRs and constraints. Both in the model, both visible to the coding assistant — without a single mention in the prompt. That's what it means to work from a shared design.
What just happened
You extended the modeling language of a service to include business requirements and non-functional constraints. Not as documentation — as structured, machine-readable model elements in the design, queryable by the Design Assistant and visible to your Coding Assistant.
This is what "make Workbench speak your language" means. Whatever your organisation needs to express — user stories, NFRs, constraints, domain concepts — can become part of the shared design model that everyone works from.
Imagine this with your organisation's vocabulary: Your architects have their notation and artefacts. Your product owners have others. Create the right OML profiles, add them to a baseline and every persona works in the same model — with their own artefacts, their own properties, contributing to the same context that developers and coding assistants work from.
Go deeper
Create custom OML Profiles
Step-by-step guide to defining your own element types, relationships, and properties from scratch.
Create custom Project Baselines
Step-by-step guide to packaging your OML profiles and coding recipes into a reusable baseline for your team.
Turn Existing Code into a Design Model
Already have services with no design attached? See how reverse engineering creates a structured starting point.